How To Install CakePHP On a Ubuntu 16.04 VPS
With this tutorial, you will be able to create a CakePHP environment from scratch, define a database, and automatically generate a working web app.
You will start with an empty black screen and within an hour have a small web site on a VPS.
![]()
What are we going to cover
- installation of LAMP stack (Linux, Apache, MySQL, PHP),
- creation of user which will have access to the app,
- installation of CakePHP itself,
- creation of the database for the app,
- creation of the app itself, through the process known as baking.
PRE-REQUISITES
We shall install and deploy CakePHP on Ubuntu 16.04:
- Starting with a clean VPS with
- At least 512Mb of RAM and
- 15Gb of free disk space.
- You will need root user access
Step 1: Creating a Non Root User
Once you are logged in as root, you can create a new user account that you’ll use from now on. Root is useful for performing system administration tasks, but using it for ordinary tasks is error prone and risky.
We’ll call the new user cakeuser. To create it, run:
adduser cakeuser
Then, add it to the sudo group, so that you can run commands as sudo:
usermod -aG sudo cakeuser
Step 2: Install Apache
First, update your package manager’s cache:
sudo apt update -y
Install the Apache web server:
sudo apt install apache2 -y
Next, enable its service to make it run on every system boot:
sudo systemctl enable apache2
Finally, start it:
sudo systemctl start apache2
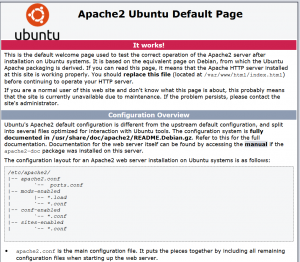
To verify that Apache was installed successfully, access it from your local browser by navigating to http://SERVER_IP/. If that does not work, try adding :80 in the end, like this:
http://SERVER_IP:80
You should see a welcome page for Apache, which means that you now have Apache running.
Step 3: Install MySQL Database
To install MySQL database, run the following command:
sudo apt install mysql-server -y
This will install the MariaDB database server (an enhanced fork of MySQL). You will be asked to enter a password for the MySQL root user. (Use Tab key from the keyboard to switch to the OK button and press Enter on the keyboard.)
Then secure MySQL installation by running:
sudo /usr/bin/mysql_secure_installation
Depending on the level of security you wish to achieve, you’ll have the option to adjust the minimum password complexity. Press 2 to select the highest level. Answer y to every prompt you get afterwards.
So you enter one password first, to enable access to MySQL, then ener another password to secure the installation. Store that second password as you will need it in Step 9 of this article.
To make it run on every system boot, enable it via systemctl:
sudo systemctl enable mysql
Step 4: Install PHP
Finally, install PHP by running:
sudo apt install php -y
This will install PHP 7.0, which will here serve just fine.
You’ll then need to install common PHP extensions that CakePHP requires:
sudo apt install php-{bcmath,bz2,intl,gd,mbstring,mcrypt,mysql,zip,intl,xml} libapache2-mod-php unzip -y
Linux uses tar to decompress files while some of the files for PHP come in zip format, so the above line will install zip and unzip programs as well.
Step 5: Install Composer
Composer is a flexible PHP package manager, which CakePHP uses to manage all of its dependencies.
Install curl to download the install script for Composer:
sudo apt install curl -y
Then, download the installer:
cd ~
sudo curl -s https://getcomposer.org/installer | php
To make it available globally, move it to /usr/bin:
sudo mv composer.phar /usr/local/bin/composer
You are installing Composer as root user and it will show a warning about it. Once we have the app installed, we shall give access to its folder to user cakeuser.
Step 6: Create an Example CakePHP App
Apache stores the data it serves under /var/www/html. To create a new app, run:
composer create-project --prefer-dist cakephp/app /var/www/html/cakeapp
Here “cakeapp” will be the name of the app. You may install several CakePHP apps in this way on the same server, just change “cakeapp” for the new name.
When Composer asks if you want it to set up folder permissions, answer with y.
If for some reason you later get a warning that these folders are not accessible, you may run these two commands:
sudo chmod -R a+rw /var/www/html/cakeapp/logs
sudo chmod -R a+rw /var/www/html/cakeapp/tmp
In Step 11 of this tutorial we shall use bake command in CakePHP to create a ready made app. For now, let us create a permission to access it:
cd /var/www/html/cakeapp
chmod +x bin/cake
We can now give user cakeuser access to the app folder:
sudo chown -R cakeuser /var/www/html/cakeapp
Have your passwords always easily accessible as Ubuntu will ask you for them whenever you change or access something in the system.
Step 8: Configuring Apache
Edit Apache configuration file so that it will serve CakePHP app by default. It is called 000-default.conf and is stored in directory /etc/apache/sites-enabled. Open it for editing:
sudo nano /etc/apache2/sites-enabled/000-default.conf
Find line which starts with DocumentRoot and replace it with this:
DocumentRoot /var/www/html/cakeapp/webroot
Save and close the file.
CakePHP requires Apache module_rewrite to also be enabled; do so by running:
sudo a2enmod rewrite
Finally, instruct Apache to use .htaccess files, with which CakePHP configures Apache on the fly. Open Apache global configuration file for editing:
sudo nano /etc/apache2/apache2.conf
Under the <Directory /var/www/> block, you’ll find the following line:
AllowOverride None
Change it to
AllowOverride All
When you are done, save the file.

Again restart Apache so that it takes new configuration into account:
sudo systemctl restart apache2
You can now navigate to your domain in your browser. You should see the following:
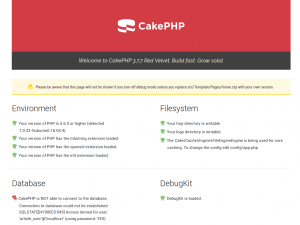
CakePHP is now installed properly, save for the fact that there is no database to connect to. We shall first create the database and then connect it to CakePHP in the next step.
Step 9 – Creating a Database
Launch MySQL shell:
sudo mysql -u root -p
When asked, enter the second password from Step 3 of this tutorial.
Once in MySQL prompt, copy and paste the following code as a whole, then press Enter on the keyboard:
CREATE DATABASE blogdb;
USE blogdb;
CREATE TABLE posts (
    id INT UNSIGNED AUTO_INCREMENT PRIMARY KEY,
    title VARCHAR(50),
    body TEXT,
    created DATETIME DEFAULT NULL,
    modified DATETIME DEFAULT NULL
);
    INSERT INTO posts (title, body, created)
    VALUES ('Sample title', 'This is the article body.', NOW());
    GRANT ALL PRIVILEGES ON blogdb.* TO 'post_user'@'localhost' IDENTIFIED BY 'password9I%';
    FLUSH PRIVILEGES;
    EXIT;
That will execute everything at once. Here is what it will look like in the terninal:
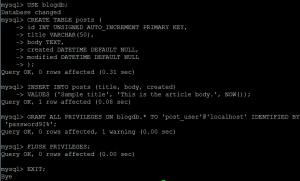
The first line will create a database blogdb and from the second line on, will start using it. Then we create table called posts with two visible fields, title and body. Columns id, created, and modified are necessary but will be used by CakePHP only internally.
Then we populate table posts by inserting one sample value.
The next line, starting with GRANT ALL PRIVILEGES is crucial. It creates a new user called _postuser and grants it all privileges on database blogdb. Currently there is only one table in this database, posts.
The third part, starting with IDENTIFIED BY, defines the password. It must contain lower and uppercase letters, as well as digits and special characters. Be sure to always change and invent new passwords for database users.
Command FLUSH PRIVILEGES; reloads the database with the changes made. The last command is EXIT, to leave the MySQL prompt and go back to the command line in Ubuntu itself.
Step 10: Connecting App to the Database
Navigate to the app folder:
cd /var/www/html/cakeapp/
CakePHP stores database credentials in a file named app.php, stored under the config folder. Open it for editing:
sudo nano /var/www/html/cakeapp/config/app.php
Find the Datasources block:
    'Datasources' => [
        'default' => [
            'className' => 'Cake\Database\Connection',
            'driver' => 'Cake\Database\Driver\Mysql',
            'persistent' => false,
            'host' => 'localhost',
            ...
            //'port' => 'non_standard_port_number',
            'username' => 'post_user',
            'password' => 'password9I%',
            'database' => 'blogdb',
In your terminal it may look like this:
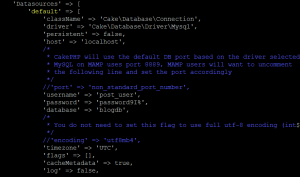
For ‘username’ put your database user’s user name (post_user), for ‘password’ put your database user’s password (password9I%), and for database name it is obvious what to put (blogdb).
Save and close the file.
Refresh app in your browser and observe the success message under the Database section.
Step 11: Creating Your First CakePHP App
Under normal circumstances, you would have to now learn programming in PHP, then learn CakePHP, and within a couple of days, weeks or months, you would have your first “Hello World” app on the server.
There is a much faster way – using the bake command. Execute this:
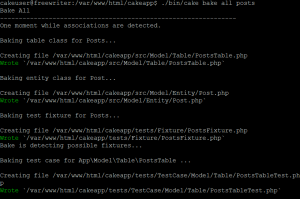
./bin/cake bake all posts
It will create CakePHP code in various folders and produce an app that can read, save, update and delete entries in table posts of database blogdb.
Part of the bake output is shown here:
Visit the address in the browser:
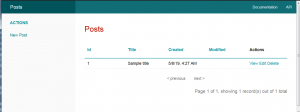
That’s it, we now have a CakePHP app installed, connected to the database and running for real.
What To Do Next
Now you have a rudimentary CakePHP app on your server. The rest depends on your original intentions. For example, if you are a developer selling sites to the clients, at this point you can upload your CakePHP app and be sure that it will run properly.
Once you finish your app, see article “How To Set Up CakePHP For Production: Ubuntu 16.04” how to improve your site before going to production phase.
Dusko Savic is a technical writer and Flutter programmer.
duskosavic.com
Related Posts:

- Looking for a VPN?We’ve Got a Thread for You - December 7, 2021
- Are you ready to win some prizes? Sign up today - September 15, 2021
- How To Set Up Apache Virtual Hosts on Debian 8, 9, and 10 - April 13, 2020


Leave a Reply