SeaFile is an open source file sharing platform like Dropbox. Unlike Dropbox, SeaFile can be hosted on a client machine which gives the user full control of the cloud. It also provides better security as it omits the presence of a third party cloud hosting platform.
SeaFile includes a number of features such as client-side encryption, public uploading, downloading, link sharing, antivirus integrations etc. You can read more about SeaFile here.
In this tutorial, we will be covering how to install SeaFile on Ubuntu 16.04. Just follow these steps and you’ll be good to go.
Prerequisite
- Putty with sudo user privileges
- Ubuntu 16.04 installed machine
- LAMP stack installed – Refer the tutorial How to install LAMP stack on Ubuntu to install LAMP stack on the server.
Please note that this tutorial will be demonstrating through a dummy domain name or IP address. I have decided to keep the SeaFile files on the directory www.example1.com/seafile and the seahub to run on my demo server IP address.
Before you start with installation, please make sure that the system repositories are up to date by releasing the following command.
sudo apt-get update
Installing Dependencies
The sea file installation requires the following packages to be installed on the server. If you don’t install these packages, the seafile installation will be failed
- python 2.7
- python-setuptools
- python-imaging
- python-ldap
- python-mysqldb
- python-urllib3
- python-memcache (or python-memcached)
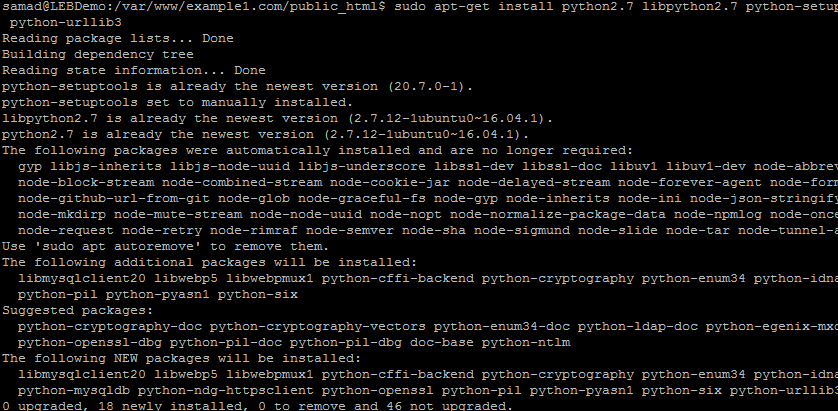
Please use the following commands to install the dependency package on Ubuntu 16.04
sudo apt-get install python
sudo apt-get install python2.7 libpython2.7 python-setuptools python-imaging python-ldap python-mysqldb python-memcache python-urllib3
Download Latest SeaFile Package
In this step, we will download the latest SeaFile package into our server. You can find the latest version on the official website download page. The latest version of the SeaFile is 6.0.9 by the time of writing this article and I have used it throughout this article.
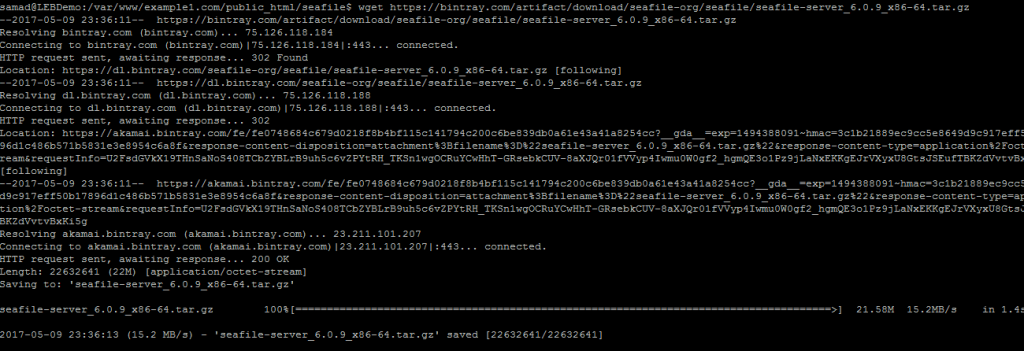
Before downloading the SeaFile package, please make sure that you are in the correct directory where you want to keep the SeaFile files. Then use the following command to download the SeaFile file
wget https://bintray.com/artifact/download/seafile-org/seafile/seafile-server_6.0.9_x86-64.tar.gz
After the download complete, just use the following command to extract the SeaFile tar package on the current directory.
tar -xzf seafile-server_6.0.9_x86-64.tar.gz
Now a folder named seafile-server-6.0.9 will be created on the server with all the seafile files
Navigate to the seafile-server directory by using the following command
cd seafile-server-6.0.9
Installing Seafile on Server
There is an automatic installation script available with the SeaFile package that will simplify the SeaFile installation on the server.
The installation script can even setup databases and database users on the go if you are able to provide the MySQL root password. Else, you can create the databases and users manually and can provide the details to the installation script while it asking for the details.
I will be using the automatic creation of the databases during the installation by choosing the option 1 while the installation starts. If you have already created the databases and user for the databases, just choose the option 2 while the installation script asks for the option
Just run the setup-seafile-mysql.sh script from the seafile-server directory to begin the seafile setup
sudo ./setup-seafile-mysql.sh
Running this script will initialize the SeaFile installation on the server. Read the instructions carefully and fill the details. You can see the data used for my installation in the below script
This script will guide you to setup your SeaFile server using MySQL.
Make sure you have read SeaFile server manual athttps://github.com/haiwen/seafile/wiki
Press ENTER to continue
—————————————————————–
What is the name of the server? It will be displayed on the client.
3 – 15 letters or digits
[ server name ] LEBDemo // Type a name for Seafile ServerWhat is the ip or domain of the server?
For example: www.mycompany.com, 192.168.1.101
[ This server’s ip or domain ] 104.168.101.139 // I have used IP address. You can use even your domain name insteadWhere do you want to put your seafile data?
Please use a volume with enough free space
[ default “/var/www/example1.com/public_html/seafile/seafile-data” ] // I have left it as default. Better to choose a directory that is different from the public directory for better securityWhich port do you want to use for the seafile fileserver?
[ default “8082” ] // I have used the default port. Better to use different port——————————————————-
Please choose a way to initialize seafile databases:
——————————————————-[1] Create new ccnet/seafile/seahub databases
[2] Use existing ccnet/seafile/seahub databases[ 1 or 2 ] 1 // I have choose the option to create new databases. This script will automatically create the databases for seafile. If you have created the databases already, just choose the option 2 and enter the databases details when it asks.
What is the host of mysql server?
[ default “localhost” ] // By default it is localhostWhat is the port of mysql server?
[ default “3306” ] // By default it is 3306. Just press enter if you don’t have a different port numberWhat is the password of the mysql root user?
[ root password ] // You must provide MySQL root password for the script to create databases.verifying password of user root … done
Enter the name for mysql user of seafile. It would be created if not exists.
[ default “seafile” ] seafileuser // Create a database user for seafile.Enter the password for mysql user “seafileuser”:
[ password for seafileuser ] // type a password for the user created aboveverifying password of user seafileuser … done
Enter the database name for ccnet-server:
[ default “ccnet-db” ] sfccnet // type a database name for ccnet-serverEnter the database name for seafile-server:
[ default “seafile-db” ] sfserver//type a database name for seafile serverEnter the database name for seahub:
[ default “seahub-db” ] sfhub //type a database name for seafhub———————————
This is your configuration
———————————server name: LEBDemo
server ip/domain: 104.168.101.139seafile data dir: /var/www/example1.com/public_html/seafile/seafile-data
fileserver port: 8082database: create new
ccnet database: sfccnet
seafile database: sfserver
seahub database: sfhub
database user: seafileuser
Please hit enter when it asks to press Enter to continue. Upon hitting enter, the script will start configuring the seafile on the server.

After the installation complete, navigate to seafile-server* directory using the following command
cd seafile-server-6.0.9
Starting the Server
Once you are on the seafile-server directory, we will run a script to initialize the server. Use the following command to initialize the seafile service
sudo ./seafile.sh start

Now, start seahub website using the following command
sudo ./seahub.sh start 8001
Please note that I have used the port 8001. If you leave it empty the script will take the default port as 8000.
As it is the first time run of the server, it will ask you to configure the admin account for seahub. Just fill out the details to continue
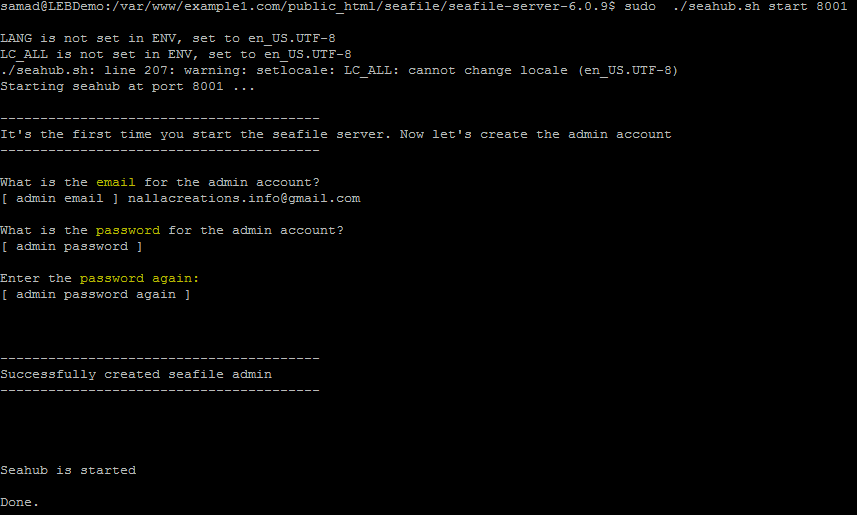
Congratulations! You have successfully installed seafile on the server.
Now you can access the seahub over the URL domain.com:port or ipaddress:port
ie, I can access the seahub server on http://104.168.101.139:8001 as I have used the IP 104.168.101.139 and port 8001.
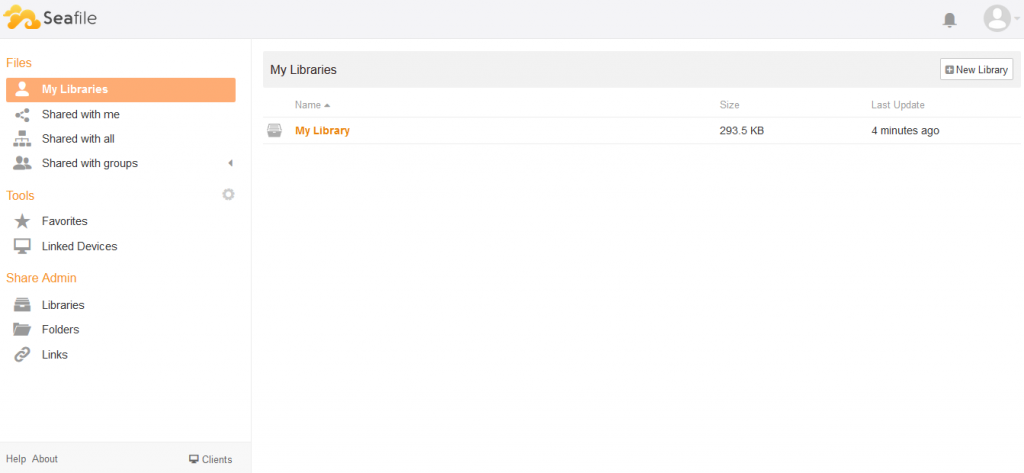
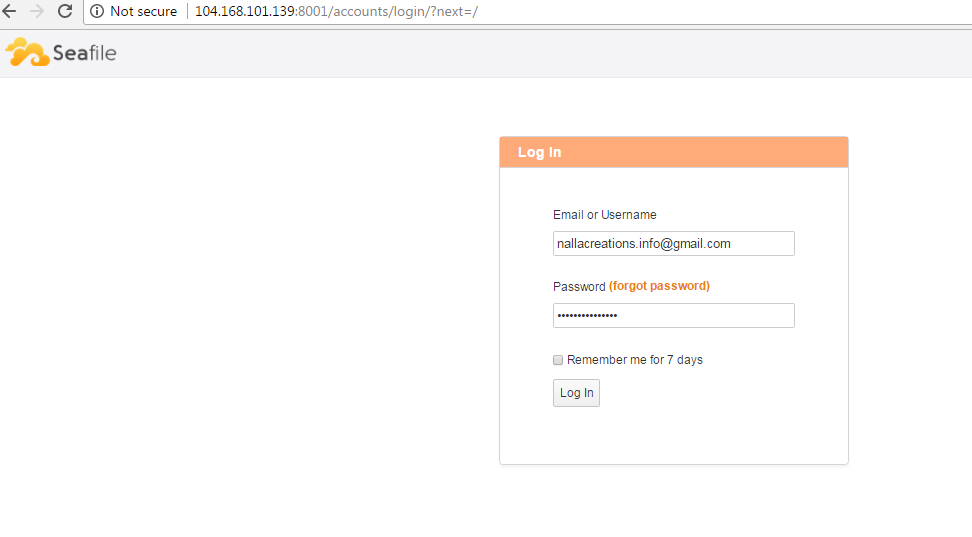 The SeaFile SeaHub dashboard will look like below
You can configure the desktop client by downloading from the official website download page and can manage the files and libraries from your local machine. Hope you have enjoyed the seafile installation tutorial!
At LowEndBox, our News and Editorial Team is dedicated to delivering timely, accurate, and actionable content tailored to the needs of developers, hosting enthusiasts, and infrastructure professionals. We curate, report, and analyze the latest developments in the world of hosting, cloud infrastructure, data centers, open-source platforms, and internet services, always with a focus on value, performance, and accessibility.
Our team monitors the global hosting landscape to bring you breaking news, vendor updates, platform changes, market trends, and expert insights. Whether it’s a price hike from a major control panel, a breakthrough in virtualization technology, or a new indie provider shaking up the market, we strive to deliver content that empowers the LowEnd community to stay informed and ahead of the curve.
We also collaborate closely with the vibrant LowEndTalk community to surface meaningful discussions, highlight real-world deployments, and share voices from within the ecosystem.
Our mission is simple: to help you make smarter infrastructure decisions by delivering the stories that matter, clearly, consistently, and without hype.
Stay tuned for fresh editorial content, in-depth analyses, and community-powered features from the team that keeps LowEndBox running.


Can Seafile Sync only the file change, not entire file to not always re-uploads entire files?
I don’t know the answer to that, but I do think I prefer to omit that kind of functionality.
But that functionality would mean Seafile has to completely scan every single one of your files and keep track of the changes. Not sure if I want that kind of intrusive file sharing program :p
Could you please post a tutorial about “any connect server” (the VPN server solution of CISCO)? This kind of VPN server is the only solution that works fine in China to break the Great Fire Wall compared to PPTP or L2TP VPN. There has been some tutorial about this server but I failed each time due to the complexity. I have read a lot of your post here, and I think your different kinds of tutorial is rather clear than others’. So I really want to read your post about getting a safe and fast any connect server. Thank you!
I’ll see what we can do. Thanks for the feedback!
Can Seafile sync Dropbox files as well?