 Back before there was HTTP, much less HTTPS, there was an early menu-based protocol for sharing information called Gopher, which was described in RFC 1436. Developed at the University of Minnesota (whose mascot is the gopher), it was popular in the early 90s as a way of sharing information. There was a directory called Veronica, which was a sort of old school Google.
Unfortunately, in 1993 U-Minnesota made the catastrophic decision to announce that it would charge a licensing fee for its Gopher server. Use of the protocol precipitously cratered. The Web was coming on strong then, so mindshare moved to HTTP.
Fun fact: early web browsers like Mosaic supported the Gopher protocol using gopher:// URLs. Mozilla Firefox removed it in 2011, and Internet Explorer removed it after IE 6. Chrome and Safari never supported it.
The protocol still survives among hobbyists and retro-computing fans. Is there a need for it today? No. Anything you can do with Gopher you can do with HTTP. But people run FreeDOS, OpenBSD on SPARC, and FORTRAN-77 code, so why not spin up some Gopher for some retro computing fun?
Our Gopher Server
We’ll be using Debian 12 on a VM, and Gophernicus, which is a Gopher server in Debian’s apt repository. There’s also geomyidae but let’s be honest: Gophernicus is a lot cooler name. According to the project’s minimalist home page, Gophernicus is “a modern full-featured (and hopefully) secure gopher daemon”.
Installing Gophernicus
Couldn’t be easier:
apt update
apt install gophernicus
I’ll have a dedicated user own the content:
useradd -m gopher
Create Your Gopher Root
By default, Gophernicus serves content from /var/gopher. But Debian wants it to be in /srv/gopher. However, the apt package doesn’t actually create /srv/gopher.
You have two choices. If you want to use /srv, then:
# mkdir -p /srv/gopher
# chown -R gopher:gopher /srv/gopher
Or you can use the Gophernicus default:
# mkdir -p /var/gopher
# chown -R gopher:gopher /var/gopher
Now edit /etc/default gophernicus, as follows, adjusting your root if needed:
OPTIONS=-r /var/gopher -p 70 -h hostname.example.com
Those options are:
- -r: your gopher root where your gopher content will live, like a web root
- -p: port on which Gophernicus will run on. 70 is the default for the gopher protocol. (It was developed before HTTP, which is why the port is lower).
- -h: the hostname for your instance
-d (with no arguments) is another flag you could add if you want verbose debugging info in the logs.
I’ll be using /var/gopher so adjust below to /srv/gopher if you go that way.
Create Some Content
A gophermap is like an index page in a web directory.
Let’s put some starter content on our Gopher server:
cp /usr/share/doc/gophernicus/examples/gophermap.sample /var/gopher/gophermapFiring Up Gophernicus
You can use inetd, or you can use systemd. I’ll use the latter because it’s 2025.
Create
/etc/systemd/system/gophernicus.service
with this, changing the -r flag to your gopher root if you’re using something different:
[Unit]
Description=Gophernicus Gopher Server
After=network.target

[Service]
ExecStart=/usr/sbin/gophernicus -r /var/gopher
User=gopher
Group=gopher
Restart=on-failure

[Install]
WantedBy=multi-user.target
You can look at the gophernicus man page to see other options. In my tests, if I put the -r option in /etc/default/gophernicus and not in the systemd unit file, Gophernicus threw a lot of errors. If I put it in the systemd unit file and not /etc/default/gophernicus, or in both places, it was happy.
Then:
sudo systemctl daemon-reload
sudo systemctl enable gophernicus
sudo systemctl start gophernicus
Open Up Port 70
If you’re using the UFW firewall:
ufw allow 70/tcp
Test It!
I’m using Gophie, which is a Gopher client that is available for Windows, Mac, and Linux. Here’s what it shows after I browse to my VM:
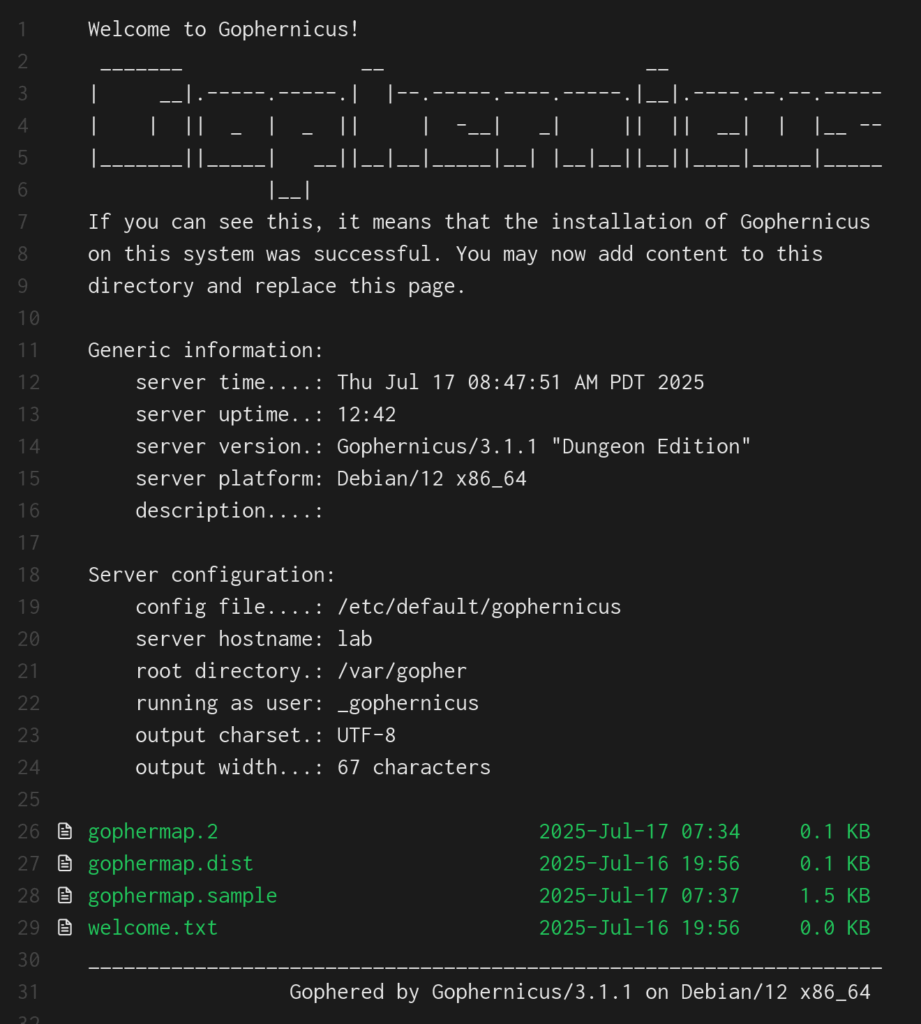
Sweet! Rockin’ like it’s 1991.
Making It Useful
If you open up that gophermap, you’ll see a lot of fancy tricks to display all kinds of info dynamically. But at its core, Gopher is sharing data in a hierarchical fashion. A lot of Gopher info is plain text.
A gophermap is like an index page in a web directory. Note that if you change your gophermap, you do not need to restart Gophernicus.
Let’s setup this structure:
f/var/gopher/
├── gophermap
├── about.txt
└── books/
    └── books.txt
└── guitar/
    └── tab1.txt
    └── tab2.txt
└── movies/
    └── across_the_pacific.txt
    └── destination_tokyo.txt
Edit this file:
/var/gopher/gophermap
and paste this:
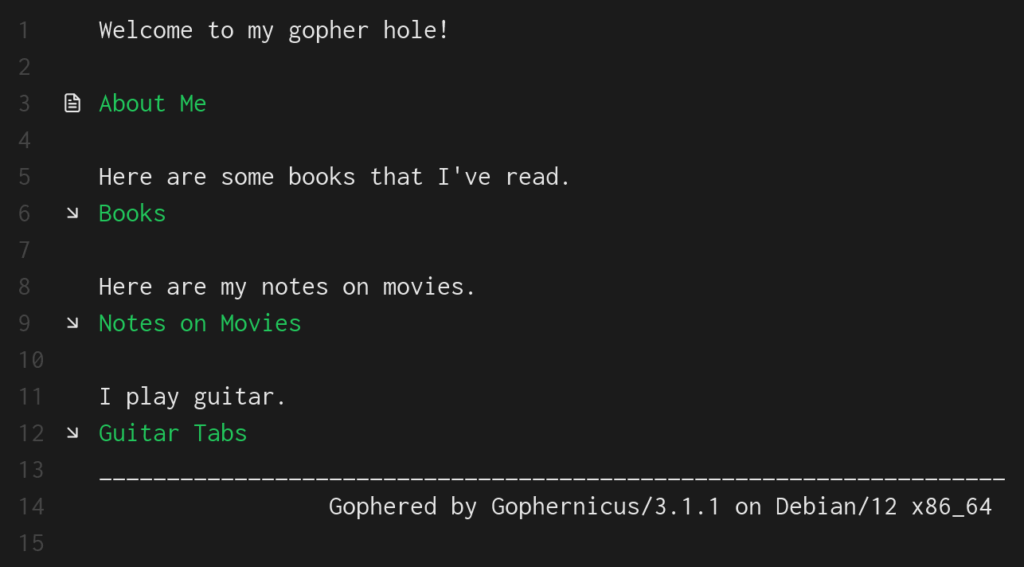
Welcome to my gopher hole!
i<SPACE>
0About Me<TAB>about.txt
i<SPACE>
Here are some books that I've read.
1Books<TAB>books
i<SPACE>
Here are my notes on movies.
1Notes on Movies<TAB>movies
i<SPACE>
I play guitar.
1Guitar Tabs<TAB>guitar
Let’s break that down.
The format is:
[type_char][display_text]<TAB>[selector]<TAB>[host]<TAB>[port]
Not all fields are needed. Usually you can leave host and port off.
“i” as a type character means “informational message”. “1” is a directory.
So a line like this:
1Notes on Movies<TAB>moviesMeans “create a display label saying ‘Notes on Movies'” and if the user clicks on it, go to the “movies” directory.
Let’s see it in action:
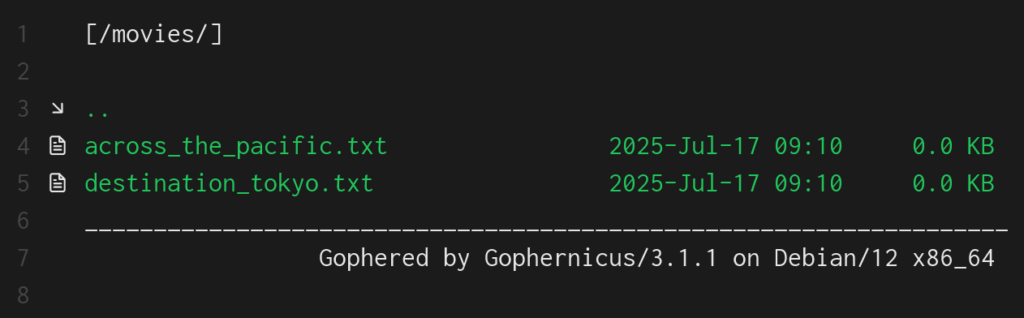
And if we click on “Notes on Movies”:
One interesting idea is to have scripts or jobs that drop files into your directories, providing daily reports or other information for you to browse to.
Where to Go From Here
We’ve only scratched the surface of what Gopher is capable of. To learn more:
- The README.gophermap in the Gophernicus Github has a lot of detailed info on what you can do with a Gopher server. You can offer archive files, images, binary files, dynamically produced content, and more.
- The sample gophermap also shows some neat ideas.
- RFC 1436 defines the Gopher protocol.
Raindog308 is a longtime LowEndTalk community administrator, technical writer, and self-described techno polymath. With deep roots in the *nix world, he has a passion for systems both modern and vintage, ranging from Unix, Perl, Python, and Golang to shell scripting and mainframe-era operating systems like MVS. He’s equally comfortable with relational database systems, having spent years working with Oracle, PostgreSQL, and MySQL.
As an avid user of LowEndBox providers, Raindog runs an empire of LEBs, from tiny boxes for VPNs, to mid-sized instances for application hosting, and heavyweight servers for data storage and complex databases. He brings both technical rigor and real-world experience to every piece he writes.
Beyond the command line, Raindog is a lover of German Shepherds, high-quality knives, target shooting, theology, tabletop RPGs, and hiking in deep, quiet forests.
His goal with every article is to help users, from beginners to seasoned sysadmins, get more value, performance, and enjoyment out of their infrastructure.
You can find him daily in the forums at LowEndTalk under the handle @raindog308.


That is some serious nerdy old man stuff! It brings me back to the days when I was convinced HTML was going nowhere. I changed my opinion with my first HoTMaiL account. 😄