In Part 1 of this Tutorial, we discussed why we decided to build a LAMP server instead of getting one pre-configured via a control panel such as cPanel or Virtualmin. We configured Remi’s repository for PHP and installed PHP 7.3 and PHP-FPM. We also got the latest version of MariaDB installed and filled in some prerequisites.
In this installment of the CentOS 7 LAMP Server Tutorial, we’re going to fully configure Apache and PHP-FPM for our first virtually hosted website, and then test everything to make sure that it works. Let’s get to it!
Adding a Virtual User
First, let’s add the user to our server and create the directories for hosting the website and the log files that Apache will generate.
useradd lowend
passwd lowend
The website will live in /home/lowend/public_html and the logs will be in /home/lowend/logs. Paste in the following to create the directories and set their ownership (CHange OWNership) and permissions (CHange MODe):
mkdir /home/lowend/public_html
mkdir /home/lowend/logs
chown lowend.lowend /home/lowend/public_html
chmod 755 -R /home/lowend
Readying Apache
We need to create a directory for our website configuration files and tell Apache where to look for them. We can name it anything we want, but the standard is “sites-enabled”. It lives in the same directory as the rest of Apache’s configuration files, /etc/httpd.
mkdir /etc/httpd/sites-enabled
echo "Include sites-enabled/*.conf" >> /etc/httpd/conf/httpd.conf
By default, Apache only looks for index.html files to serve as an index page. We will be hosting a dynamic PHP site, so we need to tell Apache to look for index.php pages, too. Apache uses the “DirectoryIndex” directive to decide which filenames to look for, and in what order. We’re going to add “index.php” to it by replacing “DirectoryIndex index.html” with “DirectoryIndex index.html index.php” in the main Apache configuration file, httpd.conf. For that we’ll use the Stream EDitor (sed):
sed -i 's/DirectoryIndex index.html/DirectoryIndex index.html index.php/' /etc/httpd/conf/httpd.conf Setting up a Virtual Host
Now we need to tell Apache about our website, lowend-tutorial.tld. We told Apache to look for .conf files in /etc/httpd/sites-enabled/ and include them in its configuration. So that’s where we’ll put our configuration file. Use the nano editor to open a new file, named after the domain name.
nano /etc/httpd/sites-enabled/lowend-tutorial.tld.confPaste in the following configuration text. We’ve added a lot of comments to indicate what each section does. Be sure to read the comments, as they are very much part of this tutorial.
#define our VirtualHost. It's IP independent (hence the asterisk) and serves pages on port 80
<VirtualHost *:80>

#Set the ServerName- the name of the VirtualHost, not of your entire server.
#Since no IP is used, the ServerName defines the domain name of the Virtual Host
   ServerName lowend-tutorial.tld

# Allow the use of the "www" prefix
ServerAlias www.lowend-tutorial.tld

#DocumentRoot sets the location of the website files
    DocumentRoot /home/lowend/public_html

#Sett options for our public_html directory
    <Directory /home/lowend/public_html>
       Options -Indexes +FollowSymLinks +MultiViews
        AllowOverride All
        Require all granted
   </Directory>

 #Set the location and name of the error
   ErrorLog /home/lowend/logs/lowend-tutorial.tld-error.log

    # Possible values include: debug, info, notice, warn, error, crit,
   # alert, emerg.
    # Defines how much information goes into our log files
    LogLevel warn

#Set the location and name of the access log
    CustomLog /home/lowend/logs/lowend-tutorial.tld-access.log combined


# Configure a way for Apache to talk to PHP-FPM through
# a unique Unix Socket that contains the username
# We'll explain what a socket is in the next section

<Proxy "unix:/var/run/php73-fpm/php73-fpm.lowend.sock|fcgi://php-fpm">
       # PHP-FPM requires at least one parameter to kick things off, so we'll use this one
ProxySet disablereuse=off
</Proxy>

# Tell Apache to direct all PHP file requests to our proxy, which in turn passes the request to PHP-FPM, which runs the PHP program and returns the results for Apache to serve.
<FilesMatch \.php$>
       SetHandler proxy:fcgi://php-fpm
</FilesMatch>
</VirtualHost>
Save the file with CTRL+O, and exit with CTRL+X. We’ve now told Apache about our website, but we haven’t told PHP-FPM. Next, we’ll finish configuring PHP-FPM and create its configuration file for our website.
Now we’re going to edit Apache’s Multi-Processing Module (MPM) configuration file. There are different MPM’s available to suit different use cases. Because we’re going to be using PHP-FPM, we need to use the MPM-worker module and disable the MPM-prefork module. Apache has a directory where it loads extra configuration files for its modules as if they were part of httpd.conf, it’s main configuration file. That directory is /etc/httpd/conf.modules.d/. The file we’re editing is 00-mpm.conf. The “00” prefix assures that it will get loaded before other configuration files with a numerically higher prefix.
nano /etc/httpd/conf.modules.d/00-mpm.confComment out the mod_mpm_prefork.so line, and uncomment the mod_mpm_worker.so line. this is how ours looks:
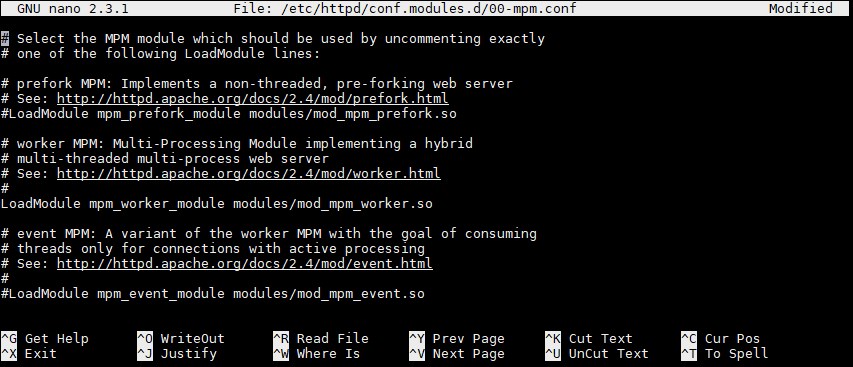
Save the changes (CTRL+O) and exit nano (CTRL+X). If you’re interested in learning more about the MPM worker modules and their differences, there’s an excellent explanation over on ServerFault: https://serverfault.com/questions/383526/how-do-i-select-which-apache-mpm-to-use
Configuring PHP-FPM for the Virtual Host
We’ve told Apache about our Virtual Host, and we’ve even told it where to expect a Unix socket to communicate with. A Unix socket is a way for processes to communicate with each other, and it lives in the file system. Any process with access to the file has access to the socket, and can communicate with the program that created the socket. Pretty neat, right?
We’re going to create a PHP-FPM pool for our “lowend-tutorial.tld” account. Each account will get its own pool that runs as that user. That way each PHP-FPM has access to both reading and writing to the account. PHP-FPM creates a socket for each PHP-FPM pool, and we’ve already configured Apache where to look for that socket.
Since we’re running Remi’s PHP 7.3, this configuration file needs to live in Remi’s PHP 7.3 configuration directory. That directory is at
/etc/opt/remi/php73/php-fpm.d/That directory already contains “www.conf” which is a default configuration file. We’re going to use it as a basis for creating our own configuration file, lowend.conf. Then we’re going to disable www.conf by renaming it to www.conf.disabled. Here are the commands to run:
cp /etc/opt/remi/php73/php-fpm.d/www.conf /etc/opt/remi/php73/php-fpm.d/lowend.conf
mv /etc/opt/remi/php73/php-fpm.d/www.conf /etc/opt/remi/php73/php-fpm.d/www.conf.disabled
We need to edit lowend.conf a bit. Open it with nano:
nano /etc/opt/remi/php73/php-fpm.d/lowend.conf
This configuration file is commented with a semicolon, so everything with a ; in front of it is just a comment. The first uncommented line you’ll see is [www]. This gives the PHP-FPM pool a name, and it should be unique to this pool of processes. Change [www] to [lowend].
[lowend]The next uncommented lines you will see are “user” and “group”. These are configured to run the PHP-FPM pool as the “apache” user. We need to change them to run as the “lowend” user.
; RPM: apache user chosen to provide access to the same directories as httpd
user = lowend
; RPM: Keep a group allowed to write in log dir.
group = lowend
Just a bit further down is a line that defines where PHP-FPM listens for communication. It’s not correct for our use. Comment out the “listen” line:
;listen = 127.0.0.1:9000and add this line below it:
listen = /var/run/php73-fpm/php73-fpm.lowend.sockThe last addition we’ll make is right below the “;listen.mode” line a few lines down. We need to tell PHP-FPM to listen for connections from Apache’s user (apache) user and give apache read/write access to the socket. Paste in the following:
listen.owner = apache
listen.group = apache
listen.mode = 0666
Save the changes (CTRL+O) and exit nano (CTRL+X). We’re almost there!
We told Apache to look in /var/run/php73-fpm, and we told PHP-FPM to put the socket in that directory, but that directory doesn’t yet exist. That’s easy enough to fix- just create it with the following command:
mkdir /var/run/php73-fpmIt’s time to enable PHP-FPM so that it starts up every time the server boots, and we need to start it now.
systemctl enable php73-php-fpm
systemctl start php73-php-fpm
Lastly, we need to restart Apache to enact all of the changes made to its configuration:
systemctl restart httpdSo there it is- Apache and PHP-FPM are configured, enabled, and have been manually started. MariaDB is ready to take care of database duties, and FirewallD has been configured to allow traffic on port 80. Before we call it “done” we need to test that it works.
Making Sure it Works
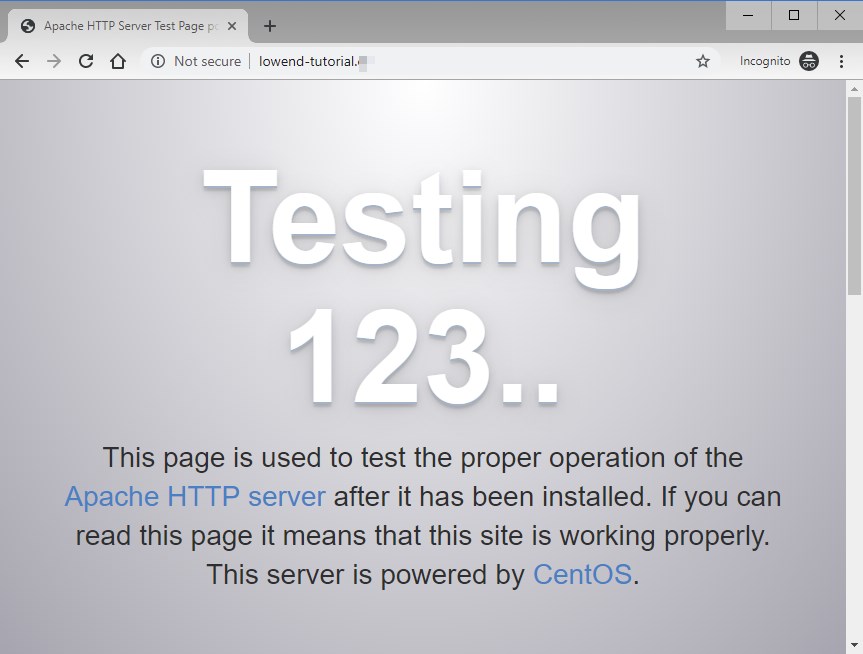
If this were non-virtual hosting, we’d just go to the server’s IP address in a browser and see that it loads a page. But this is virtual hosting, and just visiting the IP doesn’t tell us anything. We need to visit the domain name associated with the virtual host. In our case that’s “lowend-tutorial.tld”. To do this, we need to actually point the domain name at the server’s primary IP address. Your domain registrar should offer you this option. If they don’t, then you can use CloudFlare’s DNS or any other free DNS provider to point yourdomain.com and www.yourdomain.com to your server’s main IP with A records.
Once the DNS is configured, try visiting the website. For us that’s “lowend-tutorial.tld”. You should see the plain Apache test page, since there is no index.html or index.php in /home/lowend/public_html. Here’s how it looks:
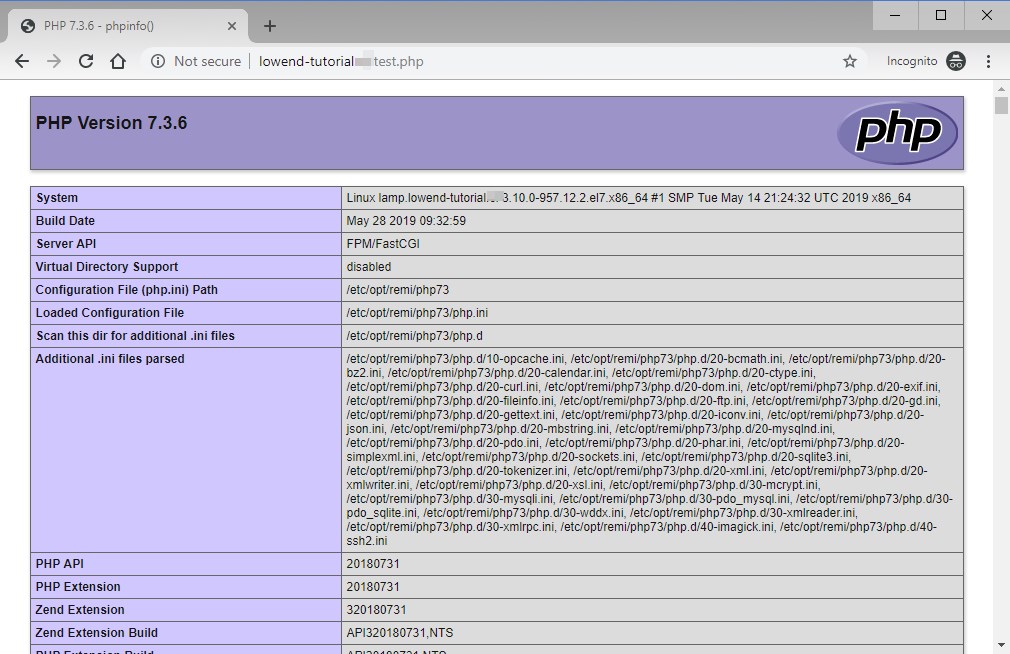
This tells us that Apache is working, but says nothing of PHP. To test that, we’re going to use phpinfo() to provide us with a test page for PHP. The test page needs to go in /home/lowend/public_html because that’s the DocumentRoot we gave Apache. Be sure to substitute “lowend” in the following command to create a file called “test.php”
sudo -u lowend echo "<?php phpinfo() ?>" > /home/lowend/public_html/test.phpNow visit the page in a browser by going to yourdomain.com/test.php. It should look like this:
Wrapping it up
If your PHP test page worked, congratulations! If it didn’t work, don’t despair. Go back through this tutorial and make sure that each step is just right. It’s easy to miss a minor detail, and all it takes is one small thing to be incorrect.
We hope you found this tutorial both informative and helpful. The next article in this series will have us installing WordPress, the Internet’s most common (and most loved!) CMS. Click Here to got o Part 3.


Hi
I have tried this solution and worked great. But when I followed the same procedure for second domain, I got stuck.
I have searched for the similar codes and could not found any help.
Please advise.
Thanks
Thanks for your instruction. I have already read part one and waiting for this part. Now I can understand how to modernize the centos 7 lamp server.
In my opinion, this is a piece full of useful information that demonstrates a high level of knowledge.In my opinion, this is a piece full of useful information that demonstrates a high level of knowledge.
The tutorial you give are very detailed and easy to understand for beginners to get used to the CentOS 7 LAMP server.
I love the tutorial you provided.