CouchPotato an application server that will easily and automatically download movies and T.V. series. You can set the quality that you want to download e.g. 4K or 1080p, the movie you want and CouchPotato will continuously monitor BitTorrent and Usenet sites and download the version you want as soon as it becomes available.
In this guide, you will install CouchPotato on a Raspberry PI minicomputer. Raspberry PI’s make excellent CouchPotato servers because:
- They are low power and fan-less. You can leave them running 24/7 to download your moves without worrying about your energy bills.
- They are full computers with a desktop environment so you can log and use GUI tools to manage them.
- They are $35 USD!
These reasons make a Raspberry PI an ideal home download server and a great introduction to using Linux if you haven’t already taken the plunge.
Requirements
You will need a few things to get your CouchPotato server up and running. They are as follows:
- Raspberry PI 3 or 4 (any version).
- 16GB MicroSD card.
- Micro-USB Android phone charger (for the Raspberry PI).
- USB keyboard.
- HDMI monitor or TV to use a monitor.
- USB storage device which is large enough to hold your Movies and T.V. shows.
You will use the keyboard and mouse to access the Raspberry PI during the installation and configuration stages. You will not need them later during the normal use of CouchPotato as you will log into its web interface or log into the Raspberry PI’s desktop.
Installing The Operating System
Your first job is to get the operating installed onto the microSD card that will hold the OS of the Raspberry PI. The operating system that we will install is Raspbian. Raspbian is based on the Debian operating system and compiled for the ARM CPU that the Raspbian uses.
Browse to the download page here and download the Raspbian Buster with desktop image. This is a large, 1.1GB, file that you need to save to your computer. Do not unzip this file. The software we will use to flash it to the MicroSD card will do this for you.
If you are an experienced Linux user the command line instructions for flashing the Raspbian image are here
Everyone else should download and install the software that we will use to flash the microSD card – balenaEtcher. This software is a beautiful cross-platform (Windows, OSX, and Linux) application that flashes SD cards and USB thumb drives.
Note, you will erase any data on the MicroSD card in the next step so make sure you have a copy of any data on it before you proceed.
Insert your microSD card into your computer and start up balenaEtcher. The simple screen that you will see looks like this:
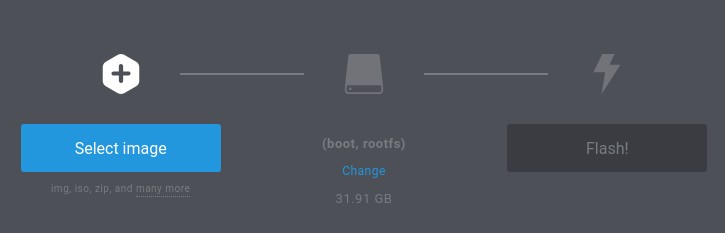
Click on the Select image button and browse to the Raspbian image you downloaded and select it. balenaEtcher will search for and automatically select the MicroSD card that plugged into your computer. Check that the size listed next to the device that balenaEtcher has selected is the same size as your MicroSD card just to be sure you are using the MicroSD card.
When you are ready hit Flash!. It will take several minutes to flash the microSD card. When balenEtcher has finished remove the microSD card and load it into your Raspberry PI.
Plug the screen and keyboard into your Raspberry PI and then plug in the phone charger. The Raspberry PI will now power on. Log in with the following details:
- Username –
pi - Password –
raspberry
Follow the first-boot, on-screen instructions until you get to the desktop.
You will need to open a terminal from the desktop to continue the guide.
Auto-Mounting The USB Device
In this section, you will configure the PI to automatically join or mount the USB memory stick so that your movies will be saved onto it.
Raspbian will always give the device name /dev/sda to the first USB device that you plug into the Raspberry PI. This allows us to create an entry in the file that configures device mounting, the /etc/fstab, so that the USB you have your media on will always get automatically mounted at the same location.
Before you edit /etc/fstab you need to get the UID (User ID) of pi and the GID (Group ID) of users. First, get the UID of pi by running this command:
sudo grep "pi" /etc/passwd
This will give output that looks like the following:
pi:x:1000:1000:,,,:/home/pi:/bin/bash
pi‘s UID is the first number i.e. 1000. The following command will get the UID of users:
sudo grep "users" /etc/group
This prints the output:
users:x:100:pi
The UID of users is 100. Using this information open /etc/fstab with a text editor. Here nano is used:
sudo nano /etc/fstab
Add a line that has the following format:
/dev/sda1 /home/pi/Downloads vfat umask=0002,gid=<GID>,uid=<UID> 0 0
Substituting the values we discovered earlier:
/dev/sda1 /home/pi/Downloads vfat umask=0002,gid=100,uid=1000 0 0
You must use the values from your Raspberry PI.
Finally, we need to change the user and group for `/home/pi/Downloads:
sudo chown -R pi:users /home/pi/Downloads
sudo chmod -R 775 /home/pi/Downloads
Plugin your USB device and confirm that it has been automatically mounted at /home/pi/Downloads. You will be prompted to open a file manager when you plug in the USB device that will open to its mount point i.e. /home/pi/Downloads.
Installing And Configuring CouchPotato
The recommended method to install CouchPotato on a Linux server is to clone the Git repository. Before you can do that you will need to install Git and some additional Python libraries with the following commands:
sudo apt update
sudo apt install git python-lxml python-pip
pip install --upgrade pyopenssl
Next, you need to clone the CouchPotato repository into the home directory of the pi user with the following commands:
cd ~/
git clone https://github.com/CouchPotato/CouchPotatoServer.git CouchPotato
You are now able to start the CouchPotato server by simply executing the Python script that was downloaded with the Git pull at /home/pi/CouchPotato/CouchPotato.py. This is not an ideal way to manage a service on Linux as it will not get started automatically on re-boot, you are not able to gracefully restart it. Instead, you will create a systemd service file with which you can manage CouchPotato as a first-class system service.
The CouchPotato repository contains a systemd service file that we can use with a little modification. You will need to edit the file so that the location of the CouchPotato.py is correctly specified and CouchPotato runs as the pi user. First, open the service file with a text editor, here nano is used:
nano /home/pi/CouchPotato/init/couchpotato.service
And edit the [Service] section to look like this:
[Service]
ExecStart=/home/pi/CouchPotato/CouchPotato.py
Type=simple
User=pi
Group=pi
Next, copy this file to /etc/systemd/system/:
sudo cp /home/pi/CouchPotato/init/couchpotato.service /etc/systemd/system/
Now, get systemd to start CouchPotato automatically on boot:
sudo systemctl enable couchpotato
You can now start CouchPotato using the following systemd command:
sudo systemctl start couchpotato
You can now log into CouchPotato as it is up and running. However, you will not be able to do anything because there are no “downloaders” installed and running. A downloader is an external tool that will download the movies. CouchPotato supports two protocols for downloading; Bittorrent for bittorrents and NZBs from Usenet sites.
You will install and configure these two downloaders before logging to CouchPotato so that you can start downloading as soon as you log in.
Installing And Configuring a Bittorrent Downloader: Transmission
CouchPotato supports several different Bittorrent servers for automatically downloading bittorrents. The BitTorrent server that you will install in this guide is Transmission because of its ease of installation and lightweight resource footprint.
Transmission is installed with a single apt command:
sudo apt install transmission-daemon
The transmission-daemon server will start automatically so shut this down before proceeding:
sudo systemctl stop transmission-daemon.service
Transmission will run as the user debian-transmission. This user will need to be added to the users group so that they have permission to write to the Downloads directory. Do this by executing the following command:
sudo usermod -a -G users debian-transmission
Finally, you need to change the password that CouchPotato will need to use to access the Transmission server. This is held in a configuration file at /etc/transmission-daemon/settings.json. Open this file with a text editor:
sudo nano /etc/transmission-daemon/settings.json
Then find the line that looks like this:
"rpc-password": "{2f889e06ebec2515e6db5a8c70cec6fe8d89a50dUVQqNg9z",
And change everything between the second set of speech marks to a new password. Make a note of the new password.
Finally, start the transmission server:
sudo systemctl start transmission-daemon.service
The BitTorrent downloader is now configured and running.
Installing And Configuring A Usenet Downloader: NZBGet
Install NZBGet with the following command:
sudo apt install nzbget
Next, you will need to set a unique password for NZBGet because unlike Transmission a unique password is not generated on installation. Open the NZBGet configuration file with a text editor:
sudo nano /etc/nzbget.conf
And scroll down until you find this line:
ControlPassword=tegbzn6789
Then change tegbzn6789 for a new password. Make a note of this password then save and exit the text editor.
Finally, you need to create a systemd unit file for NZBGet so that it can be managed by systemd. Open the service file with a text editor:
sudo nano /etc/systemd/system/nzbget.service
And paste in the following:
[Unit]
Description=NZBGet
After=network.target

[Service]
ExecStart=/usr/bin/nzbget -D
ExecStop=/usr/bin/nzbget -Q
ExecReload=/bin/kill -HUP $MAINPID
User=pi
KillMode=process
Type=forking

[Install]
WantedBy=multi-user.target
Then enable and start NZBGet:
sudo systemctl enable nzbget.service
sudo systemctl start nzbget.service
The Usenet downloader is now configured and running. You can log into CouchPotato, perform the initial configuration and begin using it.
Logging into CouchPotato
CouchPotato is now running and listening on the public IP address of the Raspberry PI. You will need to get the IP of the Raspberry PI so that you can log into CouchPotato. In the terminal you have open run this command:
hostname -I
The IPv4 IP address will be the first one listed. Take this IP address and create a URL that has the same format as the following one:
http://<IP>:5050
Substituting <IP> with an example private network IP gives us the example URL:
http://192.168.0.3:5050
Enter that into a browser on your computer on the same local network as your Raspberry PI.
The first time you log into CouchPotato you will be presented with the configuration wizard page. Here, we will work from top to bottom to configure CouchPotato.
Username and Password
The first section is where you can set a user name and password for CochPotato. This is not mandatory but it is recommended.
Configuring NZBGet
Scroll down a little further in the What download apps are you using? section until you see the line marked NZBGet. Toggle the switch on the right to enable this downloader. This will reveal three dialog boxes:
- Host – Leave this set to
localhost:6789 - Password – Edit this to the password you set in the Installing And Configuring A Usenet Downloader: NZBGet section.
- Category – Set to a category that you want CouchPotato so display these downloads.
Configuring Transmission
Transmission is the line below NZBGet. Toggle the switch on the right to enable Transmission.
When you toggle the switch a dialog box will be revealed with the following four boxed:
- Host – Leave this set to
http://localhost:9091 - Username – Leave this set to
transmission - Password – Copy and paste the password you noted in the Installing And Configuring a Bittorrent Downloader: Transmission section
- Directory – This selects the directory where your downloads will be saved. When you click on this field a new box will open showing all the directories under the user
pi‘s home directory. Select the Downloads directory.
When you have finished this the Transmission section should look like this:
![]()
Select Additional Torrent Providers
CouchPotato is pre-configured to access torrent sites to search for the movies that you want to download. The more that you enable the faster that CouchPotato will be able to find the movies you want. Most of the sites listed need a registered account that you will need to sign up for.
The following sites do not need a registered account so enable them immediately to speed up your searches:
- KickAssTorrents
- YTS
- ThePirateBay
- MagnetDL
- NZBClub (Free NZB Site)
- Binsearch (Free NZB Site)
You’re now ready to start using CouchPotato. Just hit:

Enabling The VNC Remote Desktop
VNC is an open-source version of the Windows Remote Desktop Protocol. It enables a person to log into the desktop environment of a remote computer such as your Raspberry Pi. When you have enabled VNC you will not have to use a keyboard and mouse to access your Raspberry PI’s desktop.
The default Raspbian image contains all the VNC components so you don’t need to install anything but you do need to enable it.
Open a terminal on the Raspbian desktop and enter the following command:
sudo raspi-config
This will open a command-line menu. Use the up and down arrows and enter to navigate the menus. Proceed as follows:
- Highlight
Interfacing Optionsand hit enter. - Highlight
P3 VNCand hit enter. - Hit enter for
<Yes>. - Confirm
<OK>. - Use the
TABkey to highlight<Finish>and hit enter to exit the program.
You can now log into your Raspberry PI desktop using the VNC Viewer. Downland and install this application on your local computer and use the IP address of your Raspberry PI to log in as the pi user.
Moving Your Movies To Your Computer
After your downloads have completed you will need to move the movies and T.V. shows to your main computer so you can watch them. Here we will look at two easy ways of doing this.
Moving The USB Device
The first method is to unplug the USB device from your Raspberry PI, plug it into your local computer, copy off the data and then plug it back into the Raspberry PI.
The following procedure will ensure that you do not corrupt the data on the USB device.
- Log into your Raspberry PI’s desktop via the VNC Viewer application linked to in the Enabling The VNC Remote Desktop section.
- Shutdown the Raspberry PI.
- Unplug the USB.
- Plug the USB device into your local computer.
- Copy your off on the device and onto your computer.
- Eject or unmount the USB device.
- Unplug the USB device.
- Plug the USB device into the Raspberry PI.
- Unplug and plug back in the power cable to the Raspberry PI.
Copying Files Over The Network
Your Raspberry PI is connected to the local network so you can transfer your media to it over the network instead of manually moving the USB to your computer to copy the files.
The best program to get files securely from your Windows computer to the Raspberry PI is called WinSCP. Follow that link to download, install and open WinSCP.
WinSCP will open the following dialog box:
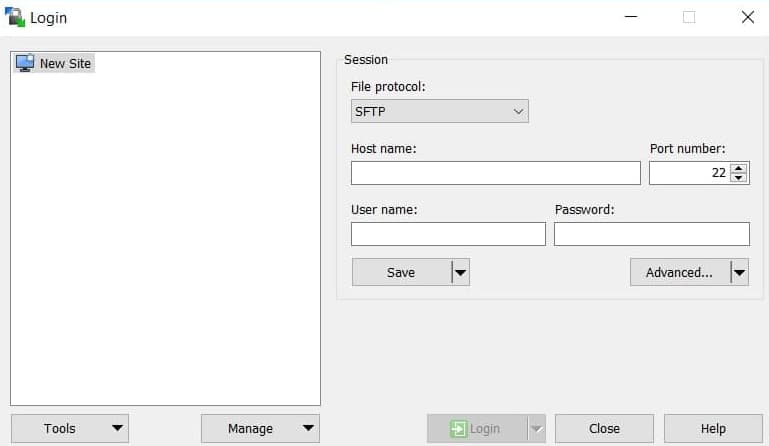
Fill in the boxes as follows:
- Host – Enter the IP of your Raspberry PI.
- Username – Enter
pi. - Password – Enter the password for user
pi.
Click Save and create a bookmark for the Raspberry PI. Finally, hit Login to log into your Raspberry PI.
Use the address bar in the right-hand panel to navigate to /home/pi/Downloads. You can download your movies and T.V. shows from this directory and then delete after you have them on your computer.
Related Posts:
Should You Run FreeBSD in 2026? Maybe, Maybe Not
Revisiting One of the Greatest Posts in LowEndBox History
So How Exactly Do You Learn About Security Issues on Your VPS?
Before You Format: ext4, XFS, and btrfs Differences Explained (And Which One You Should Pick)
A Deep Dive Into Debian 13's /tmp: What's New, And What To Do If You Don't Like It
Tighten Up Your VPS With an SSH Audit! Let's Look at the ssh-audit Package...Does OpenBSD Score Hig...
Jon Biloh is the owner and operator of LowEndBox and LowEndTalk, two of the most recognized platforms in the global web hosting and infrastructure community. With nearly two decades of experience in the IT industry, Jon has spent his career building, growing, and acquiring internet infrastructure companies, with a focus on affordability, transparency, and performance.
Before acquiring LowEndBox and LowEndTalk, Jon was involved in founding and scaling several hosting-related ventures, from bare-metal data center operations to high-volume cloud platforms. His hands-on understanding of both the business and technical sides of infrastructure has shaped his approach to community building and editorial strategy.
Today, Jon’s mission is to modernize and expand the LowEnd ecosystem while staying true to its roots: serving developers, small businesses, and independent providers who value control, value, and community. Under his leadership, LowEndBox is evolving into more than just a deals site, it’s becoming a resource hub, media platform, and discovery engine for DIY hosting enthusiasts and indie cloud providers.
When he’s not working on platform improvements, Jon can be found engaging with users on LowEndTalk (@jbiloh), collaborating with providers, and exploring new ways to support the next generation of internet builders.


Couchpotato is still a thing? I thought everyone was using Radarr these days! Move to Radarr, thank me later. I’ve never looked back.