 Way back in 2020, I wrote a tutorial on how to use NSD (Name Server Daemon) to create an authoritative DNS server you can run on your VPSes. NSD doesn’t require much in the way of resources and is very lightweight compared to BIND, which makes it ideal for the hobbyists. I also did a video tutorial on LowEndBoxTV.
When I did the tutorial here on LEB, I set it up with rsync for the zone transfers because…I honestly don’t remember why I did that. The proper thing is to let NSD do zone transfers, which is a core part of DNS. I corrected that in the video tutorial.
Now we’re going to go over the tutorial again in text form, updated for 2024. This time we’ll configure a DNS zone with proper transfers. Let’s go!
The Domain and VPSes
I’m going to be setting up two nameservers. I spun up a couple VMs on Vultr. They’re both Debian 12. These will be for the lowend.vip domain.
ns1.lowend.vip 149.28.254.206
ns2.lowend.vip 144.202.76.207
Let’s start at Porkbun, actually, where is the registrar. We need to setup authoritative nameservers and glue records. The panel interface will be different if you’re using a different registrar, but every registrar will offer an interface to change these settings.
Authoritative nameservers answer the question “what are the legitimate nameservers (DNS servers) for this domain”. But how does someone querying the domain where they are? It’s a chicken-egg problem. How can someone look up a DNS entry when they need to know where DNS is? that’s the problem glue records solve. They are the initial bread crumb trail to the DNS servers themselves.
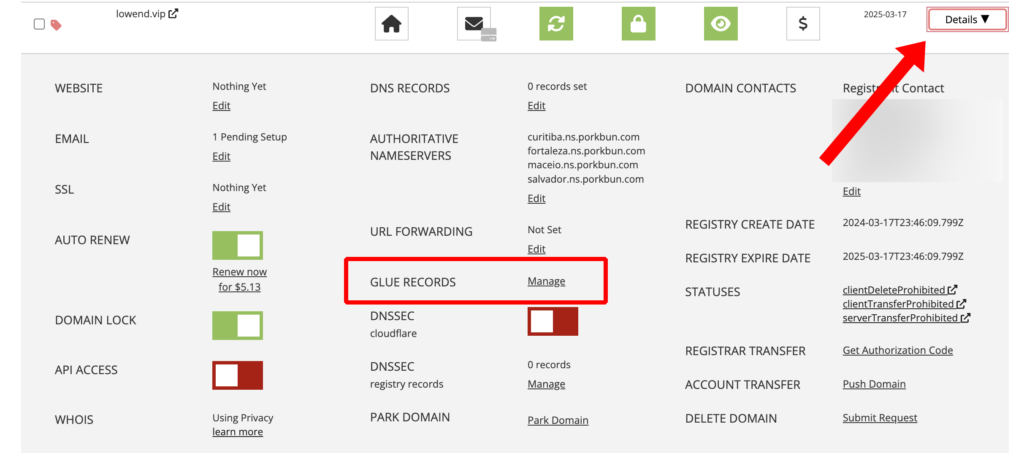
At Porkbun, I go to my list of domains, click Details, and then select Glue Records.

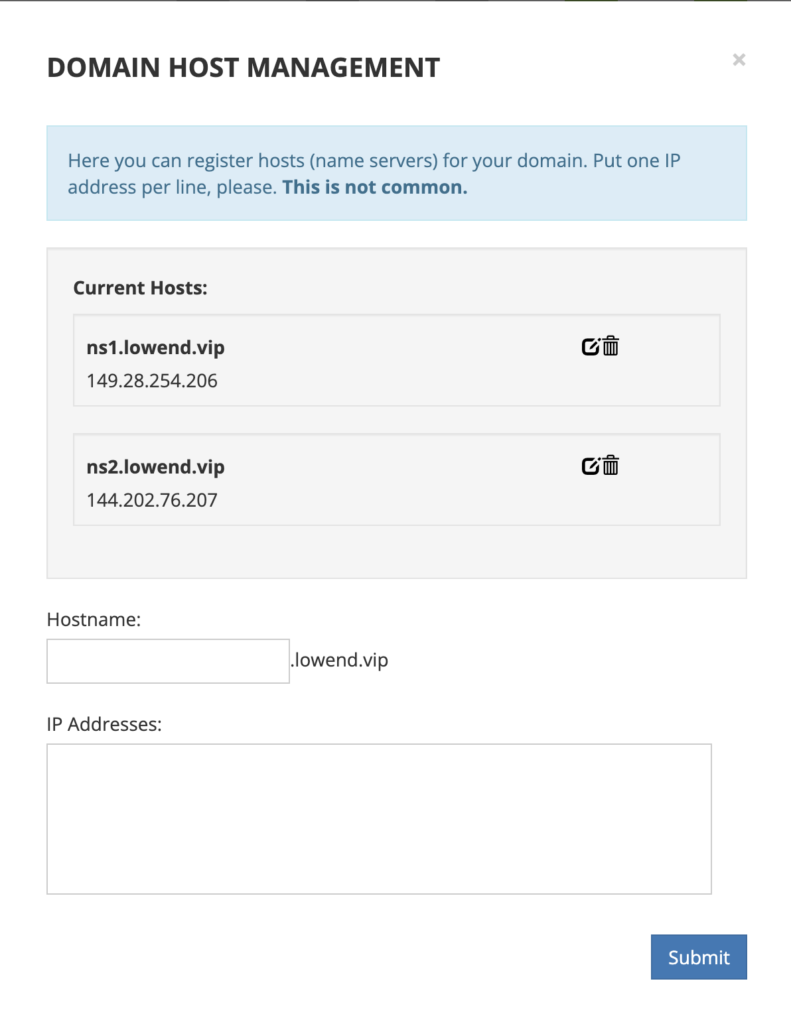
Then I clicked Manage, and entered the hostname and IPs for ns1 and ns2.

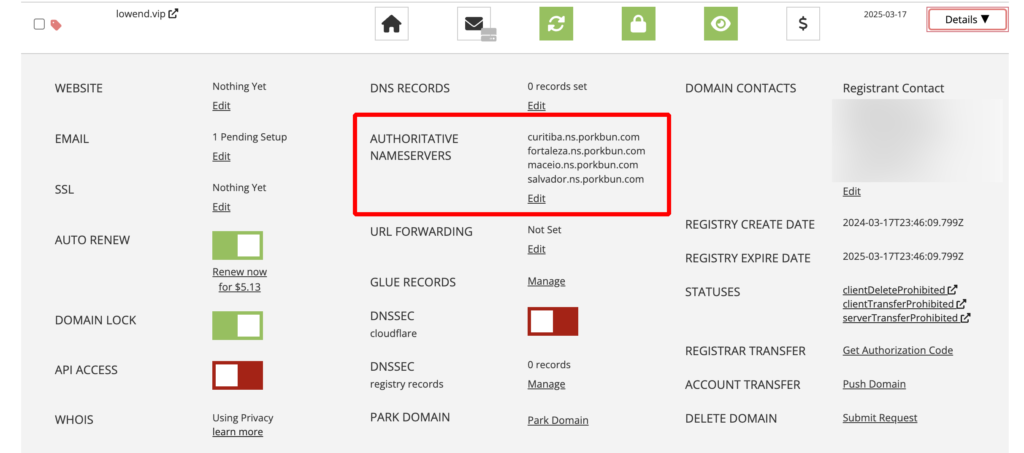
Next we’ll update the Authoritative Nameservers. Go back to Details and click Authoritative Nameservers:

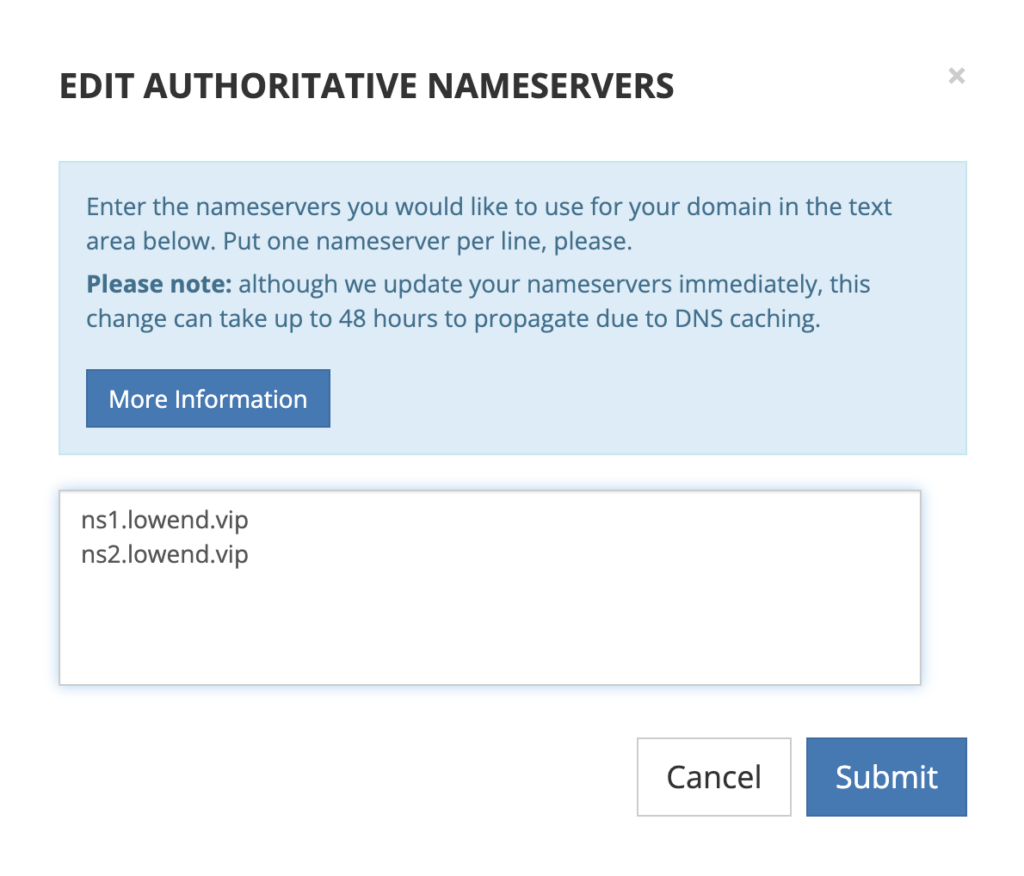
They’re set to the Porkbun DNS servers by default. I deleted that and added my DNS servers (defined in the glue records):

And we’re done at the registrar.
Setting Up NSD
Let’s get NSD up and running on our VPSes.
apt install nsd
cd /etc/nsd
mv nsd.conf nsd.conf.dist
Here is my nsd.conf on ns1:
server:
  ip-address: 149.28.254.206
  hide-version: yes
  database: "/var/lib/nsd/nsd.db"
  server-count: 1
  verbosity: 2

key:
  name: "my-secret"
  algorithm: hmac-sha512
  secret: abhnilvmqpVn9FODGFfCyj2gAhU21nQNLXWxLWOxVCw=

zone:
  name: lowend.vip
  zonefile: /etc/nsd/zones/lowend.vip
  notify: 144.202.76.207 my-secret
  provide-xfr: 144.202.76.207 my-secret
- ip-address: this is the IP address for ns1.lowend.vip
- hide-version: we won’t reveal the version of NSD in any of our greetings or protocol responses. If someday there is a NSD 0-day vulnerability, at least we won’t advertise we’re running an unpatched version.
- database: where the binary database is kept (not the human-editable zone files)
- server-count: how many NSD daemons to start at run-time. If you have busy zones, you may want to start more.
- verbosity: how verbose to be in the logs. I’ve cranked it up for tutorial purposes.
The “secret” stanza controls authentication for zone transfers. We define the shared secret we’re going to use. The secret is named “my-secret”. I generated the secret key via this command:
openssl rand -base64 32
but of course you can use whatever method you prefer.
Finally, we define zones. If you have a lot, consider putting each zone in a file and leveraging the include: directive. Because we are only using one for this tutorial, I’m just putting it in the base nsd.conf.
- name: the domain
- zonefile: where we save the human-editable text. In this case, I’m putting my zones in /etc/nsd/zones
- notify: which DNS slaves to notify when there is a change, and what secret we use
- provide-xfr: which servers are allowed to get zone transfers, and what secret to use
- Port 53 udp: this should be opened to the world, because that’s how DNS records are served.
- Port 53 tcp: this needs to be opened only to your other DNS servers. DNS zone transfers (which are only done by authorized name servers – in this case, ns2) are done over port 53 tcp.
On server 2, the setup is very similar, with a couple key changes (in red):
server:
  ip-address: 144.202.76.207
  hide-version: yes
  database: "/var/lib/nsd/nsd.db"
  server-count: 1
  verbosity: 2

key:
  name: "my-secret"
  algorithm: hmac-sha512
  secret: abhnilvmqpVn9FODGFfCyj2gAhU21nQNLXWxLWOxVCw=

zone:
  name: lowend.vip
  zonefile: /etc/nsd/zones/lowend.vip
  allow-notify: 149.28.254.206 my-secret
  request-xfr: AXFR 149.28.254.206@53 my-secret
The change of “ip-address” in the server stanza is just a change from ns1’s IP to ns2’s IP.
In the zone stanza, we change the last two lines:
- allow-notify: This is an access control list of servers that are allowed to notify us there are changes (here, ns1)
- request-xfr: This is also an access control list of servers (here, again ns1) we are going to contact to get zone transfers, and we’ll use port 53.
Now let’s create a zone file for lowend.vip on ns1:
mkdir /etc/nsd/zones
And here is what I put in /etc/nsd./zones/lowend.vip:
$ORIGIN lowend.vip.
$TTL 3600

@ IN SOA ns1.lowend.vip admin.lowend.vip (
  202404011 ; serial number
  28800 ; Refresh
  7200 ; Retry
  864000 ; Expire
  86400 ; Min TTL
)

IN NS ns1.lowend.vip.
IN NS ns2.lowend.vip.

ns1 IN A 149.28.254.206
ns2 IN A 144.202.76.207
bigvps IN A 1.23.45.100
www IN CNAME bigvps
I don’t go into every single DNS record entry, but here are some key points:
- We’ve got DNS records for both nameservers
- We’ve got a made-up IP for “bigvps”
- We’ve created a CNAME for “bigvps” for “www.lowend.vip”
- Our serial number format is YYYYMMDD#
Let’s fire nsd up:
systemctl enable nsd
systemctl restart nsd
And here’s what we see in /var/log/syslog:
2024-03-18T13:34:13.735090-07:00 ns1 systemd[1]: Stopped nsd.service - Name Server Daemon.
2024-03-18T13:34:13.741588-07:00 ns1 systemd[1]: Starting nsd.service - Name Server Daemon...
2024-03-18T13:34:13.767625-07:00 ns1 nsd[16395]: nsd starting (NSD 4.6.1)
2024-03-18T13:34:13.767898-07:00 ns1 nsd[16395]: [2024-03-18 13:34:13.767] nsd[16395]: notice: nsd starting (NSD 4.6.1)
2024-03-18T13:34:13.804355-07:00 ns1 nsd[16398]: zone lowend.vip read with success
2024-03-18T13:34:13.808870-07:00 ns1 nsd[16398]: [2024-03-18 13:34:13.808] nsd[16398]: info: zone lowend.vip read with success
2024-03-18T13:34:13.809132-07:00 ns1 nsd[16398]: zone lowend.vip written to db
2024-03-18T13:34:13.809291-07:00 ns1 nsd[16398]: [2024-03-18 13:34:13.809] nsd[16398]: info: zone lowend.vip written to db
2024-03-18T13:34:13.815895-07:00 ns1 nsd[16398]: nsd started (NSD 4.6.1), pid 16395
2024-03-18T13:34:13.815934-07:00 ns1 nsd[16398]: [2024-03-18 13:34:13.815] nsd[16398]: notice: nsd started (NSD 4.6.1), pid 16395
2024-03-18T13:34:13.817896-07:00 ns1 systemd[1]: Started nsd.service - Name Server Daemon.
Let’s go start on ns2:
mkdir /etc/nsd/zones
systemctl enable nsd
systemctl restart nsd
In /var/log/syslog, we see:
2024-03-18T13:47:47.869109-07:00 ns2 systemd[1]: Started nsd.service - Name Server Daemon.
2024-03-18T13:47:47.870845-07:00 ns2 nsd[15824]: xfrd: zone lowend.vip committed "received update to serial 2024104011 at 2024-03-18T13:47:47 from 149.28.254.206@53 TSIG verified with key my-secret"
2024-03-18T13:47:47.871385-07:00 ns2 nsd[15824]: [2024-03-18 13:47:47.870] nsd[15824]: info: xfrd: zone lowend.vip committed "received update to serial 2024104011 at 2024-03-18T13:47:47 from 149.28.254.206@53 TSIG verified with key my-secret"
2024-03-18T13:47:47.872244-07:00 ns2 nsd[15825]: zone lowend.vip. received update to serial 2024104011 at 2024-03-18T13:47:47 from 149.28.254.206@53 TSIG verified with key my-secret of 233 bytes in 3.2e-05 seconds
2024-03-18T13:47:47.872287-07:00 ns2 nsd[15825]: [2024-03-18 13:47:47.872] nsd[15825]: info: zone lowend.vip. received update to serial 2024104011 at 2024-03-18T13:47:47 from 149.28.254.206@53 TSIG verified with key my-secret of 233 bytes in 3.2e-05 seconds
2024-03-18T13:47:47.876295-07:00 ns2 nsd[15824]: zone lowend.vip serial 0 is updated to 2024104011
2024-03-18T13:47:47.876349-07:00 ns2 nsd[15824]: [2024-03-18 13:47:47.876] nsd[15824]: info: zone lowend.vip serial 0 is updated to 2024104011
On ns1, the log has:
2024-03-18T13:47:47.871552-07:00 ns1 nsd[16399]: axfr for lowend.vip. from 144.202.76.207
2024-03-18T13:47:47.872312-07:00 ns1 nsd[16399]: [2024-03-18 13:47:47.871] nsd[16399]: info: axfr for lowend.vip. from 144.202.76.207
Sweet!
On my home PC:
$ nslookup www.lowend.vip
Server: 8.8.8.8
Address: 8.8.8.8#53

Non-authoritative answer:
www.lowend.vip canonical name = bigvps.lowend.vip.
Name: bigvps.lowend.vip
Address: 1.23.45.100
So we’re up and running.
Now let’s add a record. We’ll modify /etc/nsd/zones/lowend.vip as follows:
$ORIGIN lowend.vip.
$TTL 3600

@ IN SOA ns1.lowend.vip admin.lowend.vip (
  202404012 ; serial number
  28800 ; Refresh
  7200 ; Retry
  864000 ; Expire
  86400 ; Min TTL
)

IN NS ns1.lowend.vip.
IN NS ns2.lowend.vip.

ns1 IN A 149.28.254.206
ns2 IN A 144.202.76.207
bigvps IN A 1.23.45.100
www IN CNAME bigvps
server1 IN A 4.5.6.7
I added a record for server1.lowend.vip, and then updated the serial number. Then reload nsd. This doesn’t stop/start, but rather tells nsd to keep serving records while reloading configs:
nsd-control reload
This will also push the change to ns2. In the ns2 logs we see:
2024-03-18T13:53:48.758673-07:00 ns2 nsd[15824]: [2024-03-18 13:53:48.758] nsd[15824]: info: zone lowend.vip serial 2024104011 is updated to 2024104012And at home: $ nslookup server1.lowend.vip Server: 8.8.8.8 Address: 8.8.8.8#53 Non-authoritative answer: Name: server1.lowend.vip Address: 4.5.6.7
NSD is how up and working on both nodes and both nodes are in sync.


Is there a way to avoid DDoS attacks after having installed the DNS Servers? like restricting the requests per minute/second from the same IP? Can it be made? Thank you
You should be able to use
setting in your nsd configuration. And otherwise place the NSD server in front of a reverse proxy, firewall or anything like that to have better rate limiting features or DDos protection.