
In light of recent events, there’s been a lot of chatter about leaving free e-mail services in favor of self-hosted e-mail. With self-hosted e-mail you have the option to host your e-mail wherever you want it, either on a server at home or on a VPS.
There’s plenty of affordable options around to run your own mail server. I would personally recommend a Xen or KVM VPS for this, as with OpenVZ it is really easy for your provider to “snoop” on your e-mail. This is also possible with Xen or KVM, but it usually requires a reboot (which you will probably notice).
I’ve used a 512MB Xen VPS for this tutorial. I’ve used “this much” memory because I want to run clamd and SpamAssassin in RAM. The server also has 45GB of disk space, which is more than enough to run a couple of big mailboxes on. You could do with less RAM (though that would increase the CPU load and slow down mail processing) and far less disk space (depending on your needs), but with “my” specs, you’re on the safe side.
Installing Virtualmin
I’m using Virtualmin in this tutorial. The choice for Virtualmin is quite easy: it’s free, fast, stable and doesn’t invade your system (like, for example, cPanel does). Virtualmin may not have the prettiest UI out there, but it’s clean and it’s effective. You’ll only be using Virtualmin to create and administrate mailboxes. Other than that, you won’t need it.
Virtualmin has an open source (GPL) version and a commercial version. The commercial version has some “advanced” features not in the GPL version. I’ll be using the GPL version. This should run on most Linux distributions and FreeBSD.
So let’s install Virtualmin. I recommend a clean server for this, to avoid any conflicts. On the server, run:
wget http://software.virtualmin.com/gpl/scripts/install.sh
Which will get the installer script. Next, make it executable:
chmod +x install.sh
And finally, run the installer:
sudo ./install.sh
Which should ask you for your sudo password and if you’re sure you’re running the installer on a suitable system:

Next, it’s going to install a bunch of packages. Just sit back and relax. Get a cup of coffee or a beer. It could take anywhere from 5 tot 15 minutes (on average).
Once that is done, open a web browser and go to either your IP address or domain name on port 10000 with ‘https’ prepended:
https://192.0.2.1:10000
https://leb001.example.net:10000/
This should ask you to log in:

Use the username and password of your sudo user to log in. Once logged in, the post-installation wizard should appear:

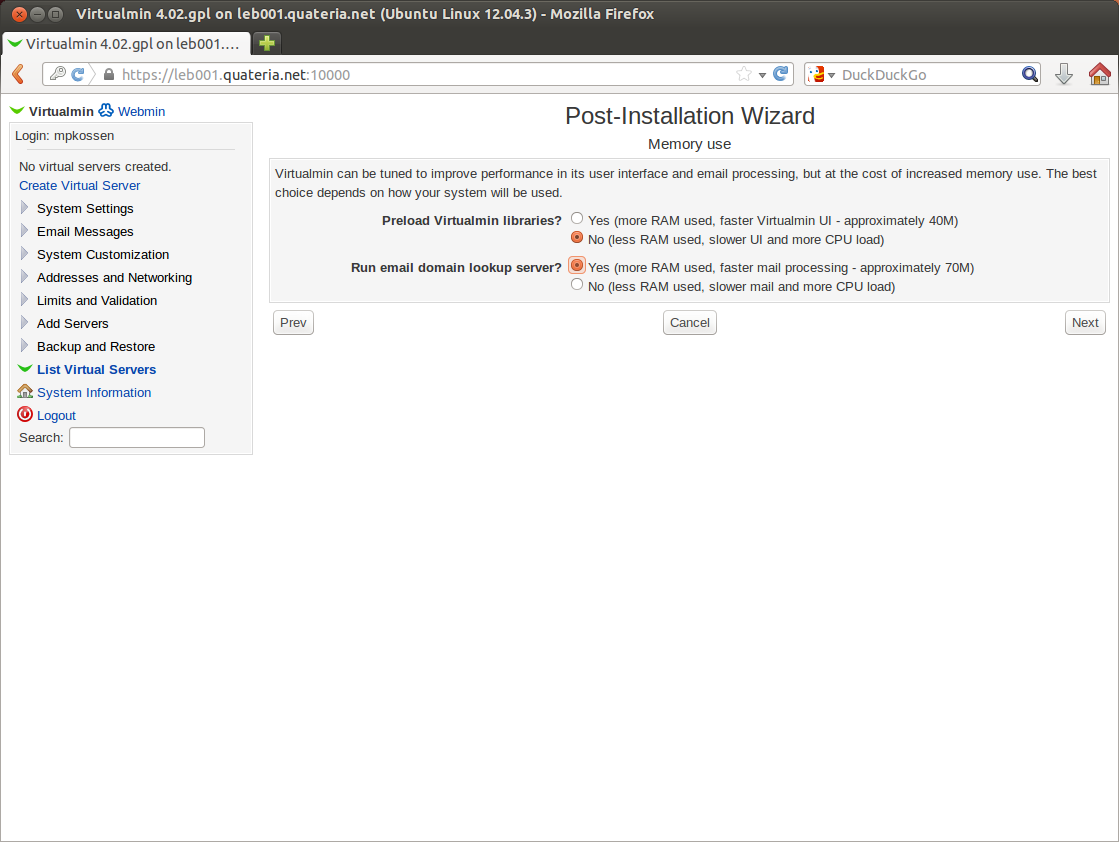
Click ‘Next’. You will be asked whether to preload the virtualmin libraries or not and whether you want to run the email domain lookup server. I would recommend against the former, except if you have plenty of RAM. I would recommend turning on the domain lookup server for faster mail processing.
In the next step you can enable the ClamAV mail scanner server. I would really recommend enabling this.

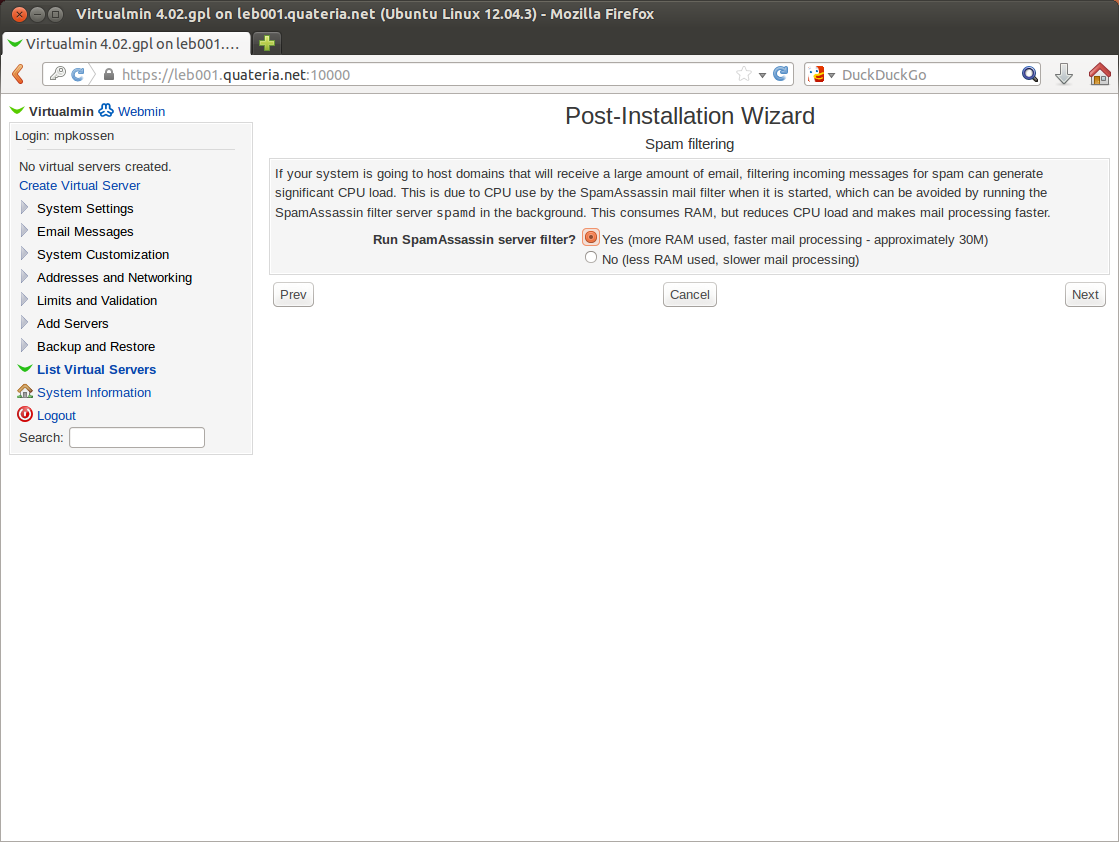
The same applies to the SpamAssassin server filter in the next step. This one is easier on the memory than the ClamAV server or domain lookup server, so even in you choose not to enable those two, you should enable this one.
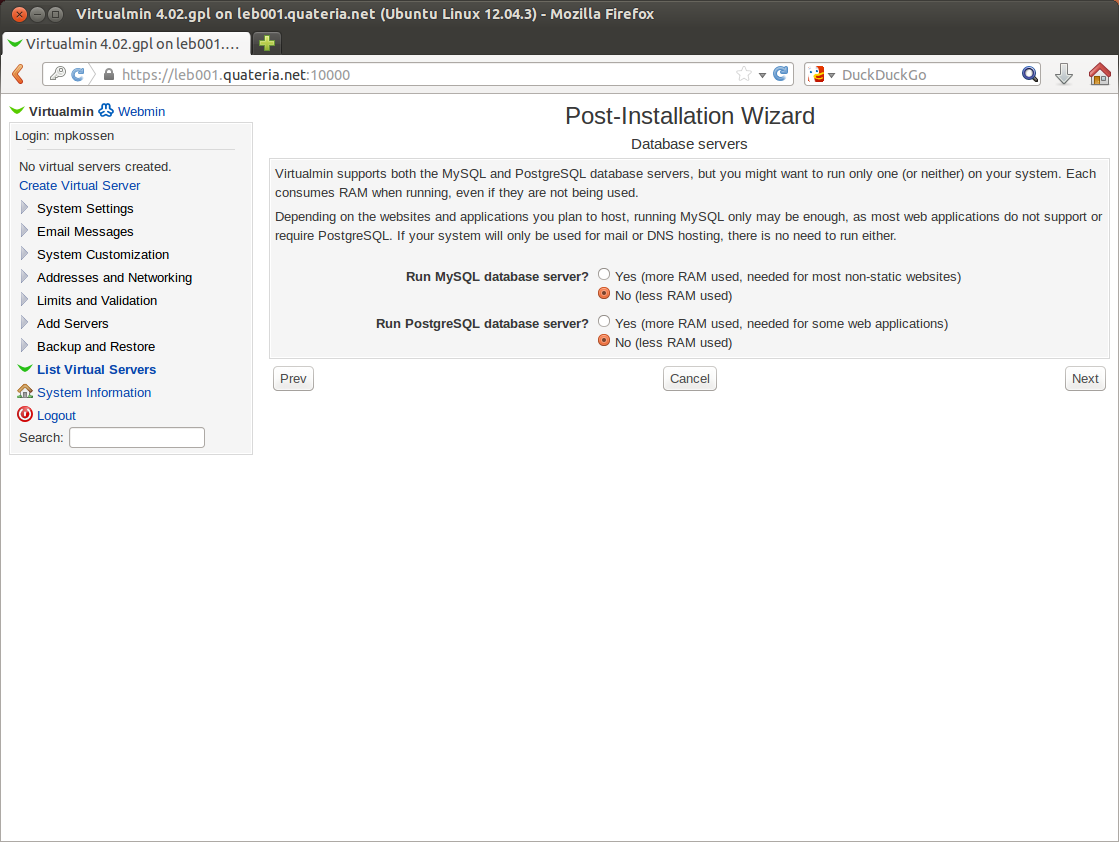
We don’t need MySQL or PostgreSQL running and sucking up memory. So disable both.
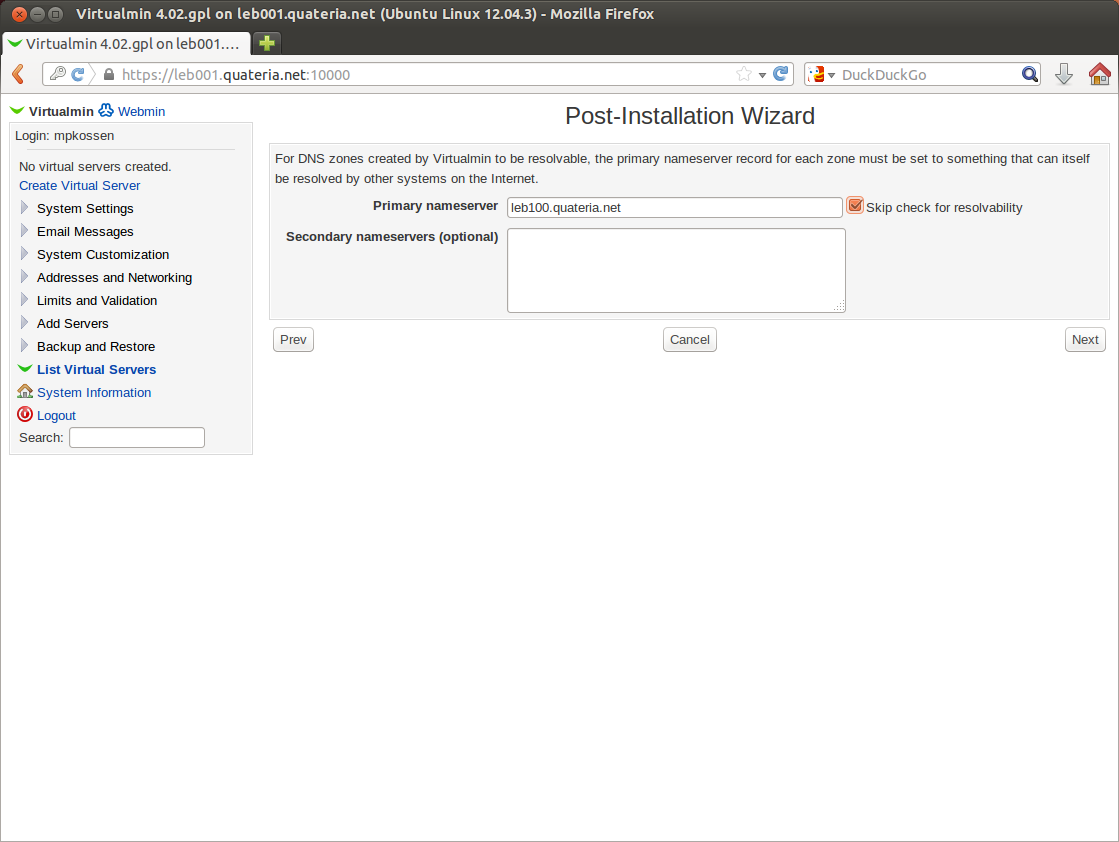
We don’t need bind, so tick the box to skip the resolvability check and leave the other fields the way they are.
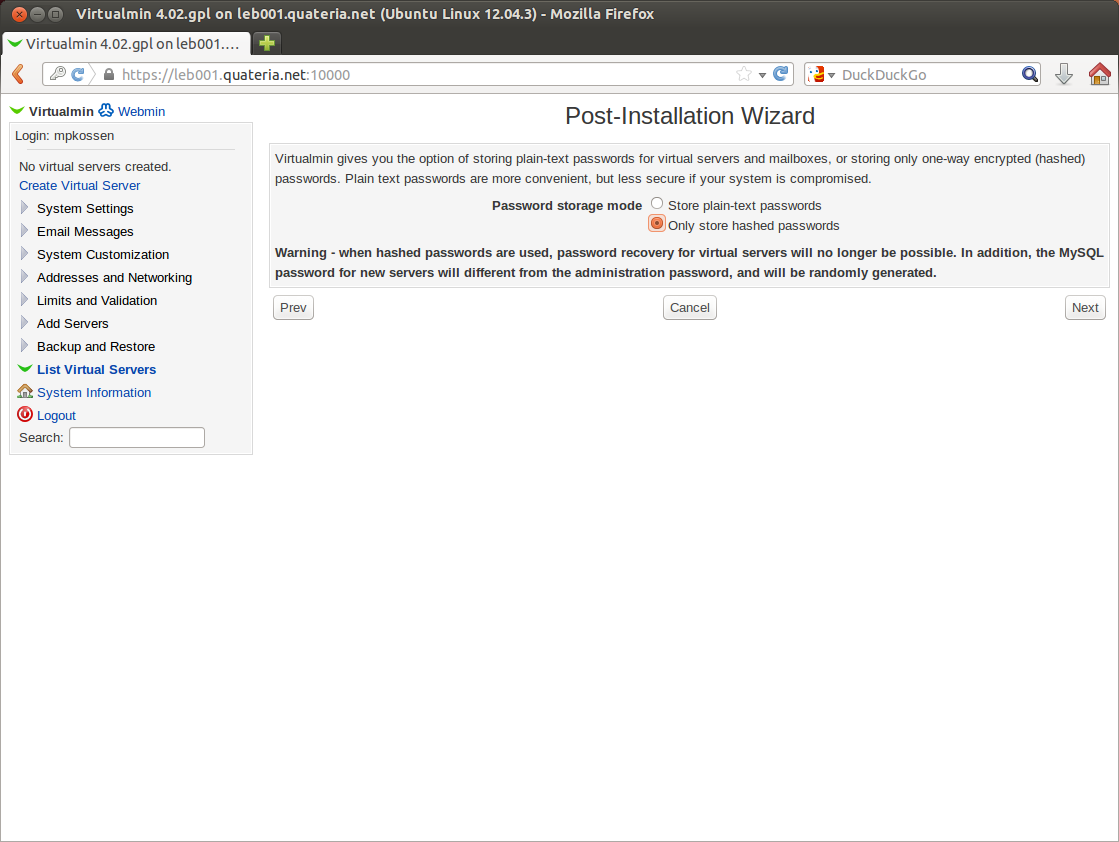
Passwords should never, ever be stored in plain text, so only store hashed passwords.
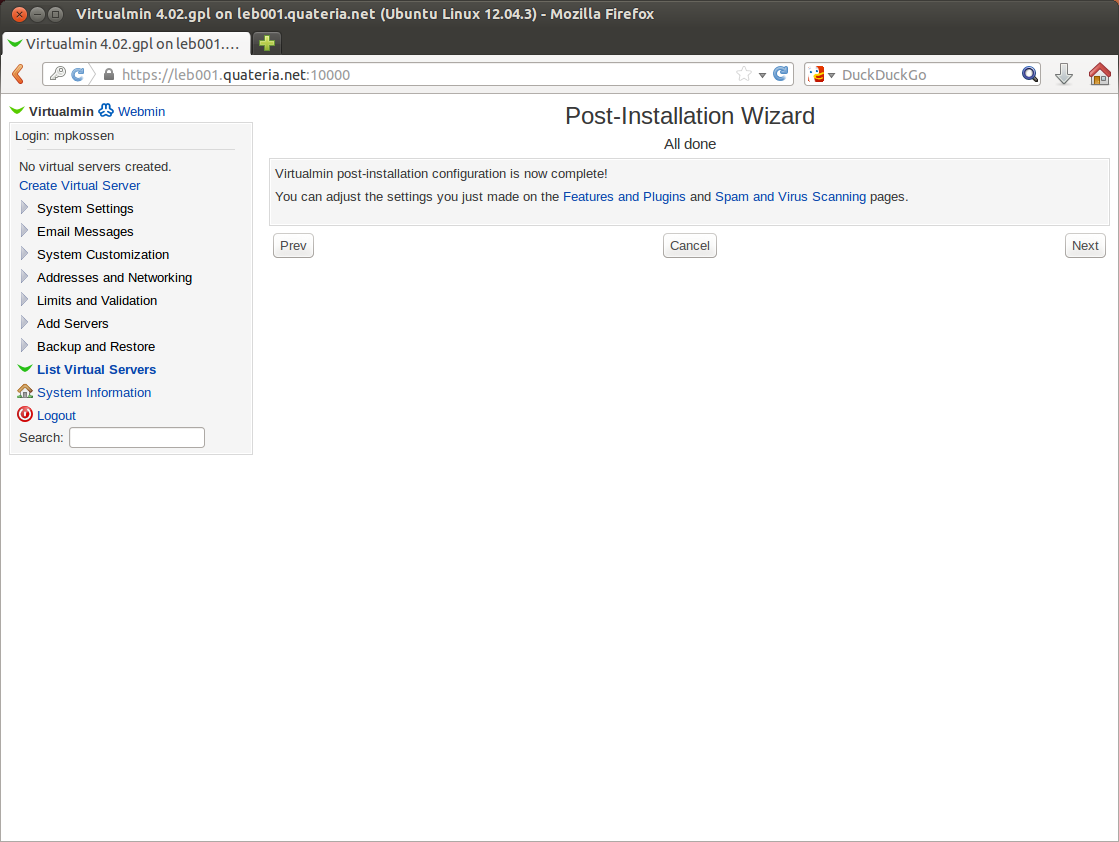
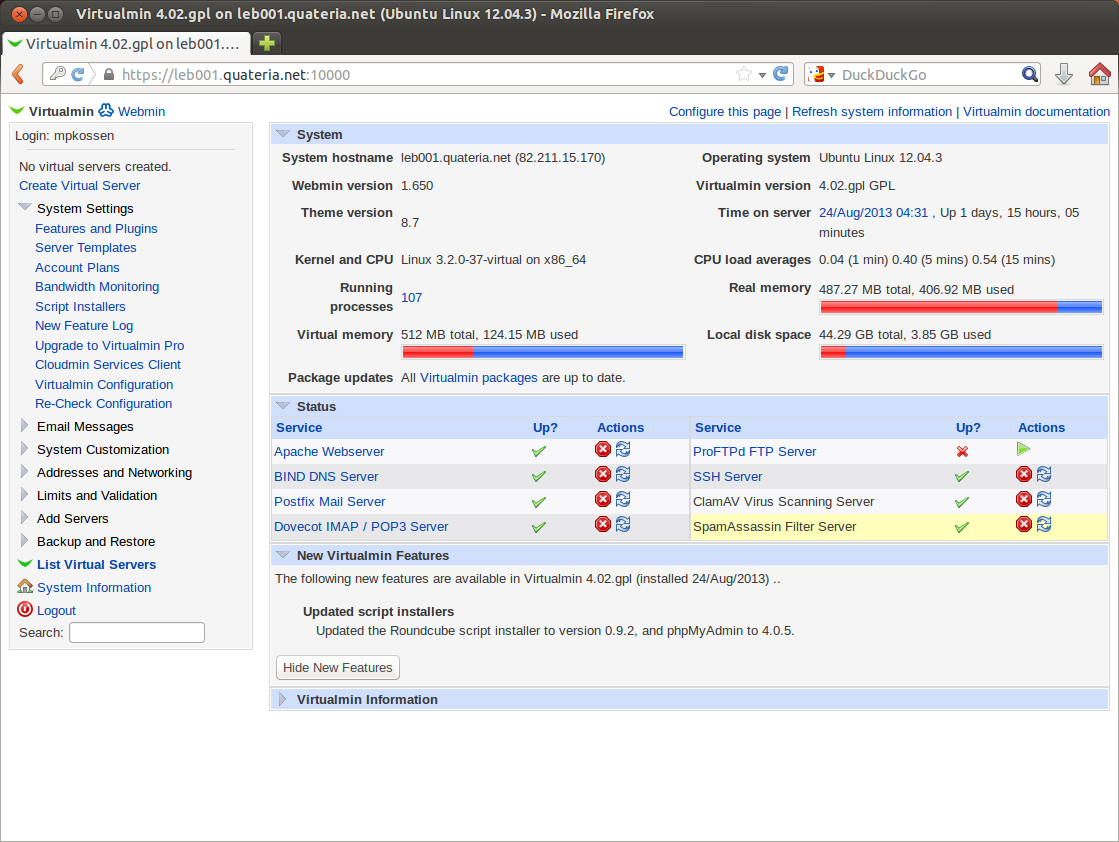
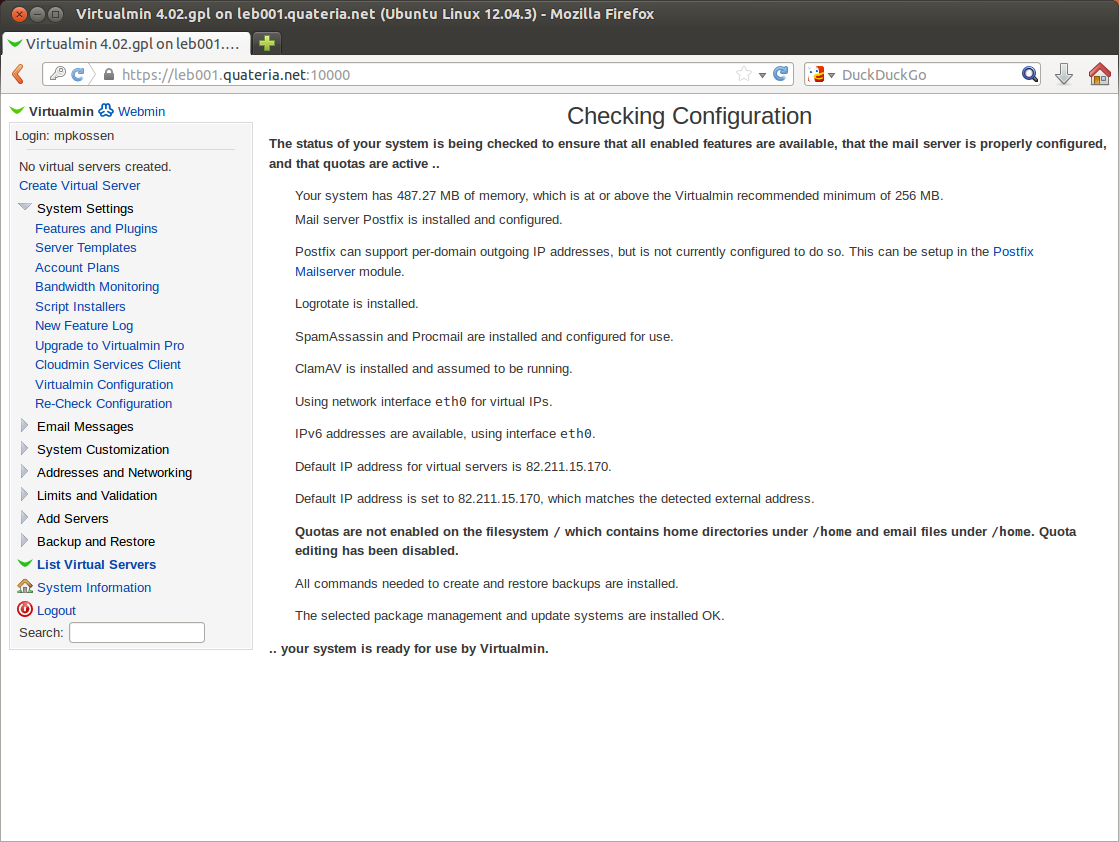
Click ‘Next’ to go to the ‘System Information’ screen.
Which should look like this (don’t mind the yellow warning, we’ll get to that):

You’ve now successfully installed Virtualmin! Let’s configure it and create a mailbox.
Configuring services and adding your first mailbox
First, we need to configure some services. Go to ‘System Settings’ in the left menu and then to ‘Features and Plugins’. This is where we disable all services that are not related to serving e-mail. Untick all the boxes I have unticked in this screenshot:
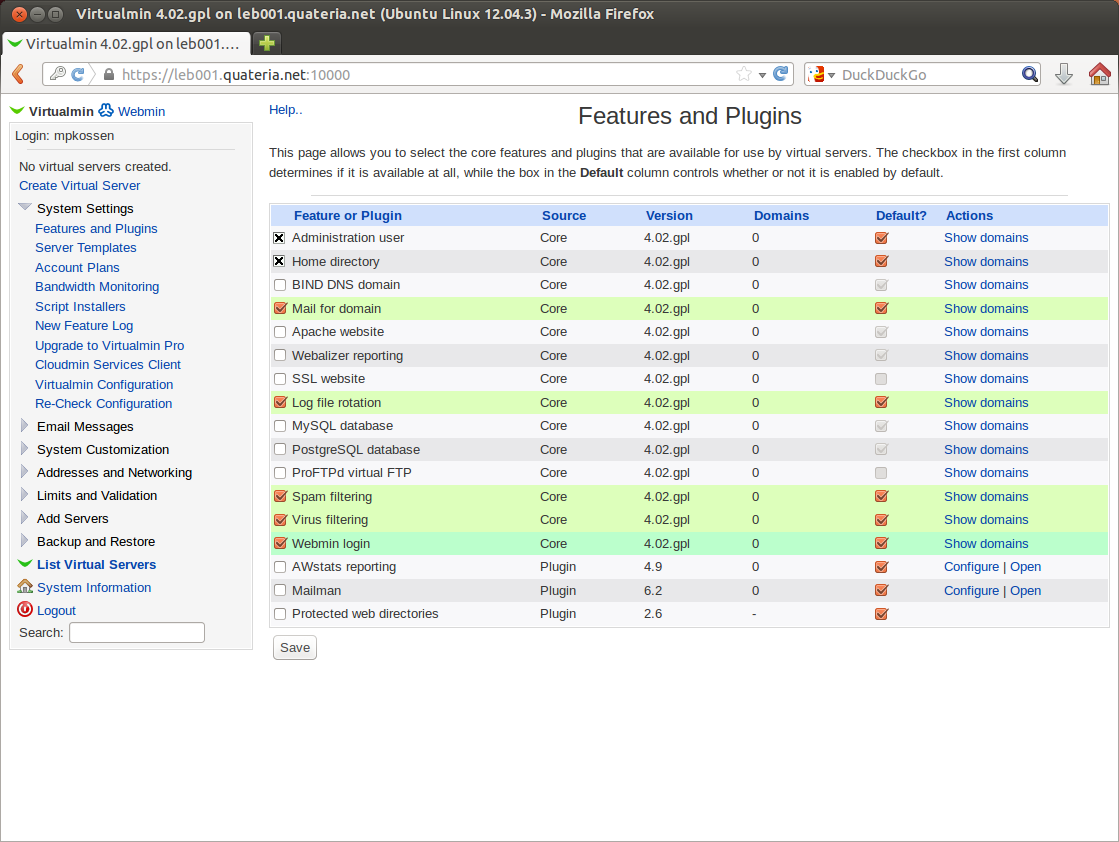
When you click ‘Save’ you should return to the ‘System Information’ screen.
In the left menu, under ‘System Settings’, click ‘Re-Check Configuration’. This should check several things of your installation and display an error is something is wrong.
Let’s create a Virtual Server, so we can add a mailbox. Click ‘Create Virtual Server’ in the left menu:
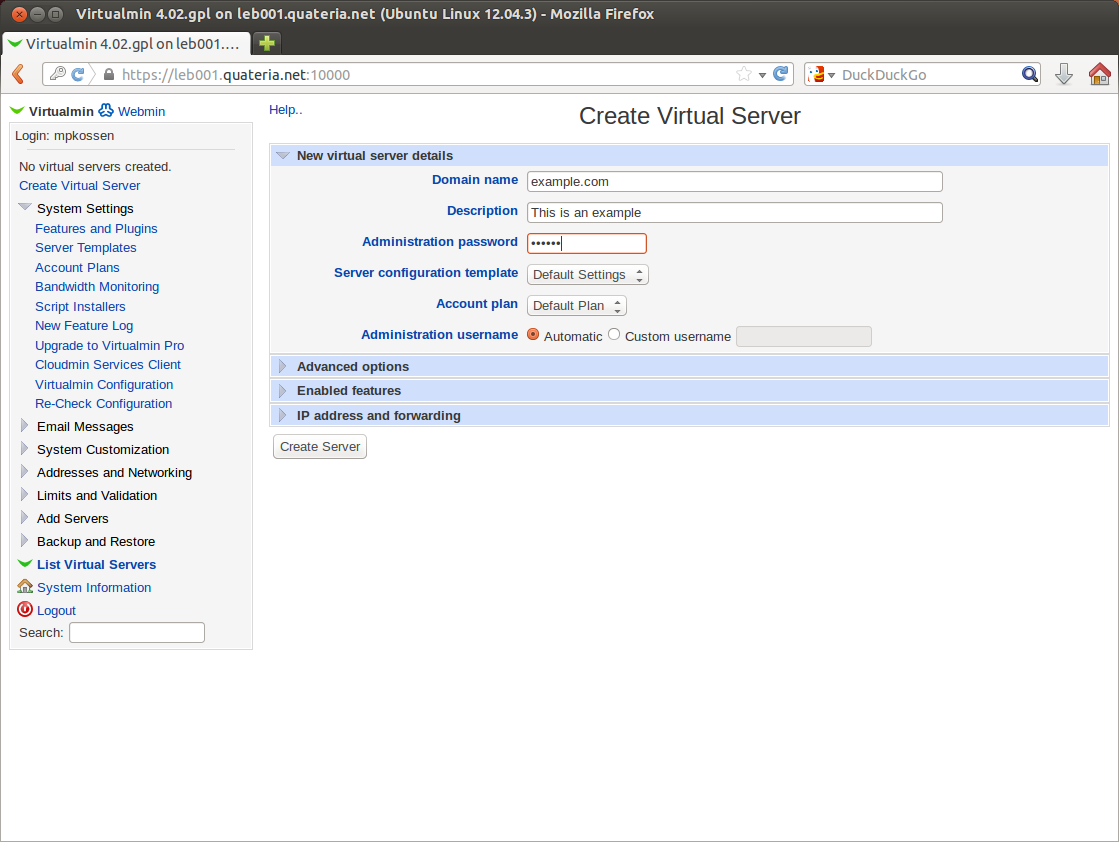
Fill out the domain name for the server, which is the domain name you wish to receive e-mail for. Also pick a strong password. Click ‘Create Server’ to actually create the server:
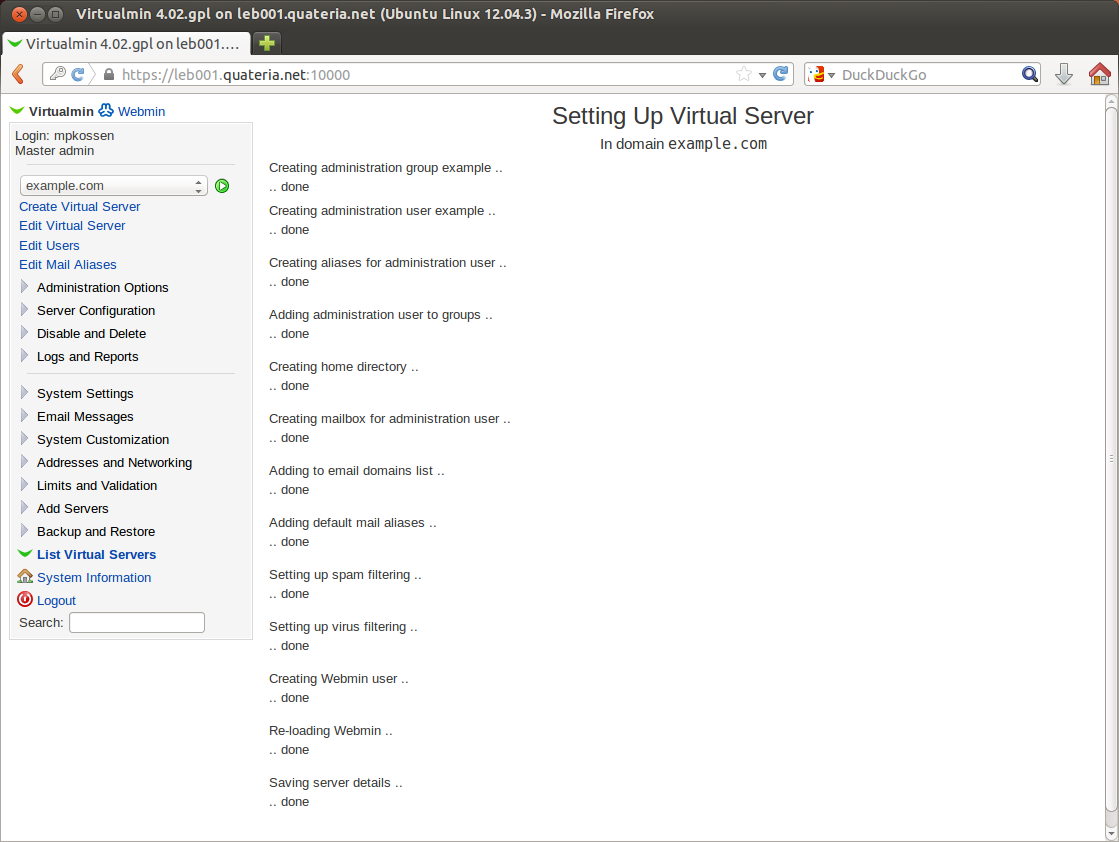
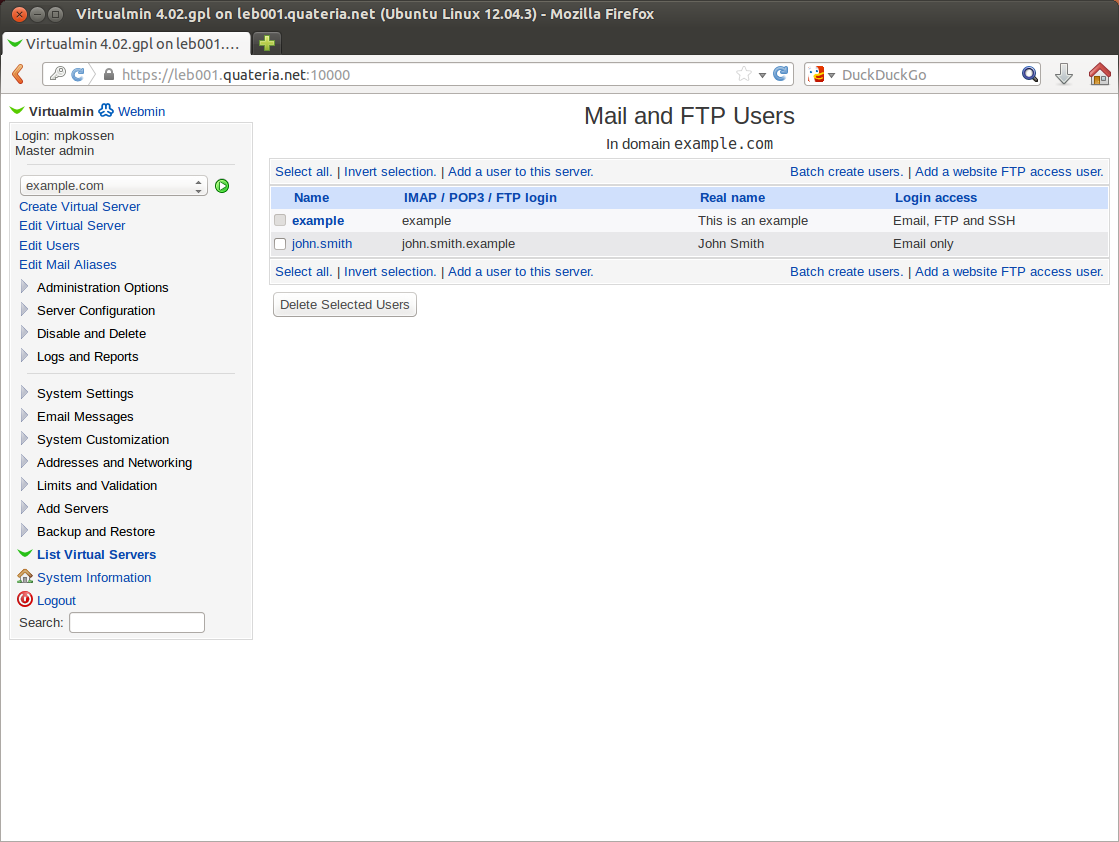
Once your virtual server is up, let’s create a mailbox. Click ‘Edit Users’ in the left menu, which should open the user list:
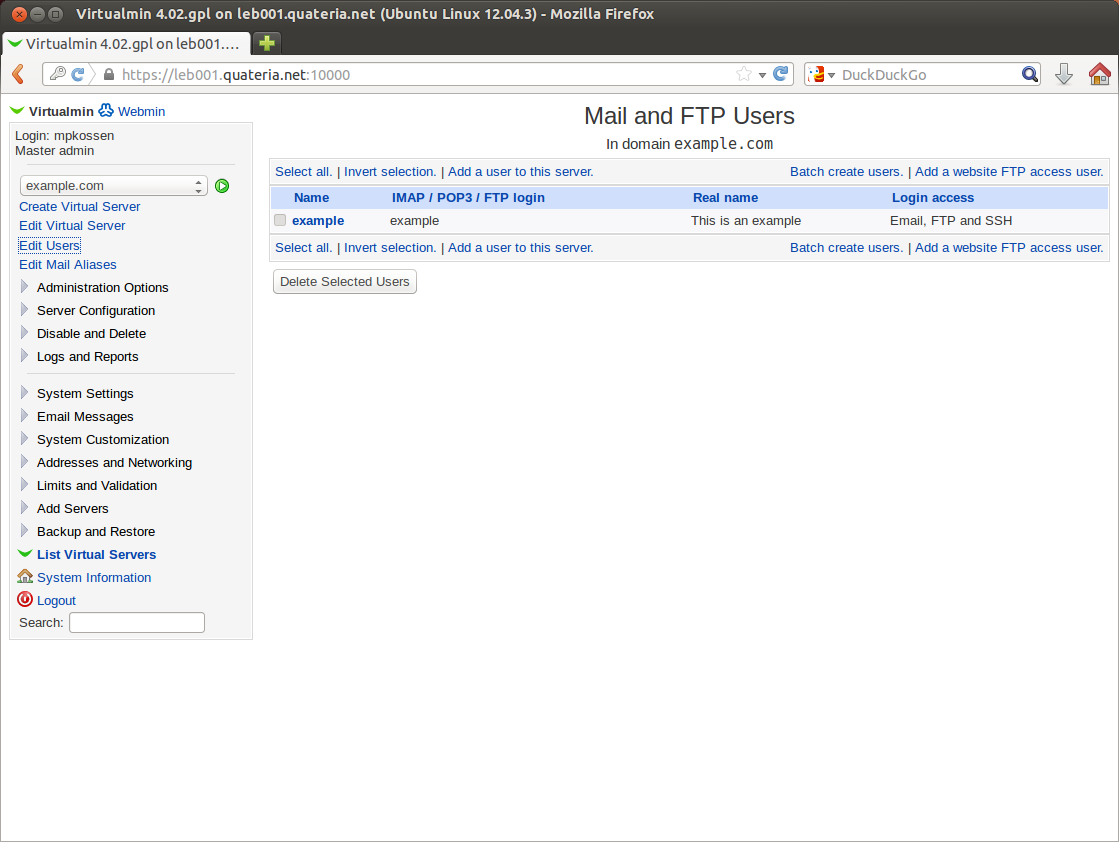
Clicking ‘Add a user to this server’ opens the screen to create a new user. Because we disabled several features before, the user you’re going to create will only have an e-mail account. So, basically, you’re creating an e-mail account.

Fill out the e-mail address field, a real name and a strong password. Click ‘Create’ to finish this. You should be returned to the user overview, where you see your newly-created user including the IMAP/POP3 login.
And that’s it! You’ve just created your own e-mail server and your first mailbox!
To add your mailbox to an e-mail client, like Mozilla Thunderbird, your details will be (from the example above):
- Username: john.smith.example
- Password: the one you picked
- Mail server (IMAP/POP3/SMTP): the domain name/IP of the mail server
TLS is available but the certificate is self-signed, so you should accept the certificate to enable secure communication with the mail server.
The final step is to point you domain name’s DNS records to your newly created server, if you didn’t already. If your domain points to the server, point the MX record to your domain. If you’ve used a different domain for your server, point the MX record to that or the server IP. Once the DNS records have propagated, you should be receiving e-mail!
Final notes
This is one of the easiest ways to get a mail server running. You can improve your server by using a commercial SSL certificate (although, there is word those are not save from government eyes either) and install webmail software. Those are things for a future tutorial, however!
Your mail server also supports IMAP IDLE, which boils down to push for IMAP. This works especially well with K-9 Mail on an Android device or Mozilla Thunderbird (which both support IMAP IDLE). So, no loss leaving your free e-mail service here!
Up next week: Getting started with OpenVPN (tap)!
Related Posts:
Are Tutorials Dead?
Have You Checked Out RackNerd's TikTok Channel? Video Content That Brings Web Hosting Mainstream!
From Oracle Cloud to TOR to Telegram: Check Out LowEndTalk Tutorials!
LowEndBox BUSTED for Dealing in Mind Expanding Substances
Guest Post: Top Five Reasons Why Most Businesses Either Fail or Stay Stagnant by Dustin B. Cisneros,...
How To Compile The 3 Items Needed To Begin MIT’s Free Xv6 Online Operating System Course!
Maarten Kossen served as the administrator of LowEndBox from 2013 to 2015, playing a key role in guiding the platform during a critical phase of its growth. During his tenure, Maarten introduced numerous improvements, helped shape editorial direction, and contributed to the evolution of LowEndBox as both a resource and a community hub for budget-conscious hosting users.
With a deep understanding of web hosting, server management, and open-source infrastructure, Maarten brought fresh ideas and steady leadership to the site, bridging the gap between the original vision of LowEndAdmin and the future of the platform.
Today, Maarten remains an active and valued member of the LowEndTalk community (@mpkossen), continuing to share his experience, engage in discussions, and support the broader LowEnd ecosystem.


Good tutorial Maarten
Thanks!
How it safe from ddos and hackers?
It’s as safe from hackers as most mail servers as long as you keep the software up to date. Using IPtables to secure your server will definitely help.
To protect the server from a DDOS, I suggest getting a DDOS-protected IP address if your provider offers those.
CSF along with lfd or lxguard is even better xD
CSF etc is only a software solution and will only protect you so far. A proper DDoS protected service will do a lot better if required.
lxguard is great security. I use kloxo mr, and this panel installed lxguard automatically
Two security suggestions I would make if you’re using webmin/virtualmin is to change the port from the default 10000 and install fail2ban because webmin on port 10000 is a favorite target of brute force attackers.
Even better: install and configure OpenVPN on the server, then add firewall rules so that only OpenVPN and mail-related connections are available from the outside world but everything else (including Virtualmin) is blocked. If you enable the “tls-auth” option in OpenVPN, it will only respond to digitally-signed packets from authorized users so it won’t show up in a port scan or anything.
You can then connect to your server using OpenVPN and administer things as expected without leaving important management interfaces open to the public internet.
Do you have any instruction or reference for this – i remember someone also spoke of this on LEB but never pointed us in the right direction.
Fantastic tutorial, was looking at how to set up a mail server but looked really difficult! Thanks!
You’re welcome! Enjoy!
newbie question, how about inbox rate?
I’d recommend Kloxo mr if you want to host your own email. I’ve been hosting my own for over a year now and have just recently moved it to a kimsufi £2.49 server to ensure my data is safe from snoopers. It’s really easy to setup though in either virtualmin or kloxo. Much easier than setting up the mail servers yourself.
I have nothing to prove this, but I just think Virtualmin is more secure than Kloxo. Kloxo MR is a “patched” version of Kloxo and I don’t feel it’s a stable base for a secure product.
But then again, Kloxo would be fine as well. It would just recommend Virtualmin.
dear mr kossen
kloxo is much easier to install and maintain as compared to webmin/virtualmin(pro)/usermin
even a 8 year old kid can manage kloxo.
as per security is concerned, shall i give you my installation link and if you would give the security holes………..
and yes klloxo-mr is not a patched version, even if it is, its better than the complex ones.
and yes can any one do i writeup to change password for the mail user from the webmail panel…
I use directadmin
Very nice tutorial 🙂
indeed a nice tutorial
Nice tutorial! I too thought setting up a mail server was difficult. Once it is setup, how do you register the VPS with the domain name provider? I currently use an mx address which points to Outlook.com. What would I use for the case of the new server on the VPS?
You could use the IP address of the server or the hostname of the server.
I just followed your tutorial on setting up virtualmin. Very nice. However, I’m new at all this and am not sure what to put for in my MX record. Do I just put the IP addy for my domain? Is that all?
Qmail-toaster, much better yum yum
Disable the web interface, lock down SSH, there you go, cracking!
Mind you it takes a little work to install but it is good.
Always hosted our own mail for years
Are we able to cluster this to an existing virtualmin server?
I’m not sure what you mean with “cluster” but you should be able to link this to existing Virtualmin/Webmin infrastructure.
I really enjoyed this tutorial.
Could create a tutorial on how to point a domain to a VPS?
ex.:
site1.com > VPS = OK
site2.com > VPS = FAIL
Hey can you post a tutorial on how to view my vps desktop via lxde. I have 256MB ram. Thanks
can’t think of any tut’s now but you can do this
sudo apt-get install lxde firefox synaptic uget vnc4server xrdp
after all install run – vnc4server
then add a new user and reboot server
if you on windows run mstsc.exe and enter the IP // make user 3389(RDP) is open on your box
then enter your username and password…
finito
Great tutorial. I’m curious how you were able to get this running on a 512 MB VM? I tried iRedMail and I had to disable ClamAV as it pushed the system over 512 MB.
I don’t know what iRedMail installs on a server?
I just disabled the databases and other unnecessary services that eat up RAM.
@Anuraag,
Sounds like you want to host multiple sites on one server. What you’re looking for is settign up “virtual hosts”. Do a search for that and you should find what you need.
Sorry, that last comment was meant for Leonir.
Bookmarked this, thanks for your good tutorial!
I don’t understand why the author recommends using a VPS when setting up a private email server for privacy reasons.
With a VPS, it is trivial for the ISP or a hacker/agency who infiltrated/subpoenaed the ISP to look into all your files without any chance for you to notice or stop them.
A dedicated server offers much better privacy.
Isn’t it the same with a dedi? If the colo provider gets a court order (in the US, they sometimes aren’t event allowed to tell you) they can start snooping as well or yank you server.
Sure, you’ve cut the ISP layer out. But somehow I don’t think most providers here are big enough (with all due respect, of course) to be infiltrated.
A server at home would probably still be the best solution.
A VPS hosting provider has full access to your storage and the memory of your running system. Even adding new processes or kernel code into your system is easy. And since most mail servers don’t use SSL/TLS, e-mail is transferred in plain-text anyway and hence trivial to sniff. Even when you use SSL/TLS, the provider – who has access to the network – could change your mail server’s signature “en route” to indicate SSL/TLS is not supported, or get the SSL session information right from your system.
Secure e-mail is an illusion. Even when PGP encryption is used, getting hold of either the sender’s or receiver’s computer is usually enough to get hold of the plain-text messages; not to mention that according to the law, most countries can lock you away for a long time if you don’t want to reveal either the encryption password or the message content itself.
Security against spammers is important; just don’t make any silly assumptions about security against providers or governments.
True. If they want to get to your e-mail, they can. If Google, Microsoft, Apple and others are infiltrated, it’s very likely that Verisign is as well and that they do have access to root keys.
SSL should make it harder for people to snoop on your WiFi, for example. And combined with PGP, the chances of getting your e-mail snooped are even smaller.
Well its really a very nice tutorial but I am directly using Admin support for this which is really very help full for me. does it any other way to get the vps support.
yes the same i want to know 🙁 is there any searches ?
I attempted to do something similar a few months back and didn’t fully understand the implications with setting up your own SMTP server. Receiving mail is one thing, SMTP is a completely different story. Don’t just select any VPS provider for this. It’s possible that you’re IP shows as not being on a blacklist while your provider very well could be. It is impossible to remove yourself from a blacklist such as UCEPROTECT L3 without paying the organization to remove you. The obvious issue here is with cheap VPS spammers take advantage of these systems and get the whole block blacklisted.
I eventually gave up, it just wasn’t worth my time. Now I have an extra VPS just sitting there waiting for me to think up a new project. If you do the research you can probably get your own mail server fully functional. But if you aren’t careful everything you send will go directly into peoples spam folders. I’m not saying don’t do this, just know what you’re getting into before you dive head first.
well one small thing missing though, the hostname and domain (email) has to different, Otherwise it tend to cause little trouble. Atleast in my experience it does cause some minor issues at times
Does a username have to include the virtual server domain in it? Im having an issue where my email address is user.mydns@mydns.ddns.net I want it to just be user@mydns.ddns.net
Oh sir … I haven’t even read it yet and my mind goes “yeyyy at last!”
How would someone properly point the mx records to the server if dns was being hosted on another server, and you only wanted the e-mail to go to this server?
the domain or ip address of the server that is hosting your
DNS zone records has not a thing to do with how you setup your
email dns record or and other dns record for your domail,
one zone file for one domain name, you point where the names go.
if email is not in this domain, you don’t list IP (A record)
if DNS if is not in this domain, you don’t list IP (A record)
domain.com. NS ns1.domain.com. ~

domain.com. NS ns2.domain.com. ~

ns1.domain.com. A ip of ns1 ~ (if DNS is another domail you don’t add this)

ns2.domain.com. A ip of ns2 ~ (if DNS is another domail you don’t add this)

domain.com. TXT ‘v=spf1 +all’ ~

domain.com. SPF ‘v=spf1 +all’ ~

domain.com. A ip of web server ~

http://www.domain.com. A ip of web server ~

http://ftp.domain.com. A ip of ftp server ~

(A records for Email – no one will have problem reaching your email server)

imap.domain.com A ip of email server ~ (if email is another domail you don’t add this)

smtp.domain.com. A ip of email server ~ (if email is another domail you don’t add this)

pop.domain.com. A ip of email server ~ (if email is another domail you don’t add this)

mail.domain.com. A ip of email server ~ (if email is another domail you don’t add this)

domain.com MX 10 mail.domain.com. ~
“v=spf1 +all”
= The domain owner thinks that SPF is useless and/or doesn’t care.
the domain or ip address of the server that is hosting your
DNS zone records has not a thing to do with how you setup your
email dns record or and other dns record for your domail,
one zone file for one domain name, you point where the names go.
if email is not in this domain, you don’t list IP (A record)
if DNS if is not in this domain, you don’t list IP (A record)
If web/email/dns is same is same domain name:
domain.com. NS ns1.domain.com. ~
domain.com. NS ns2.domain.com. ~
ns1.domain.com. A ip of ns1 ~ (if DNS is another domail you don’t add this)
ns2.domain.com. A ip of ns2 ~ (if DNS is another domail you don’t add this)
domain.com. TXT ‘v=spf1 +all’ ~
domain.com. SPF ‘v=spf1 +all’ ~
domain.com. A ip of web server ~
http://www.domain.com. A ip of web server ~
http://ftp.domain.com. A ip of ftp server ~
(A records for Email – no one will have problem reaching your email server)
imap.domain.com A ip of email server ~ (if email is another domail you don’t add this)
smtp.domain.com. A ip of email server ~ (if email is another domail you don’t add this)
pop.domain.com. A ip of email server ~ (if email is another domail you don’t add this)
mail.domain.com. A ip of email server ~ (if email is another domail you don’t add this)
domain.com MX 10 mail.domain.com. ~
“v=spf1 +all”
= The domain owner thinks that SPF is useless and/or doesn’t care.
Sorry about the way the format looks above –
Don’t know why http:// is added,
just remove the “http://”
Does this work on Mac or should I install Ubuntu? Either way is good.
after creating mail user by following above steps, on gmail/ymail my emails are landing into spam box.
pls help me out
thanks for sharing
I must say that its really amazing process and the things which are shared here are really nice.
I am really thankful to the holder of this web site who has shared this great piece of writing at
at this place.
Thanks for the tut Maarten… However I am not able to get thunderbird to authenticate out of the box. I am able to send and receive email via virtualmin but can’t seem to use a client. Is anyone else having this issue? Can anyone help me with this? I’m using the thunderbird defaults ie starttls and normal password for the security settings. I’m not asking for a 2gb VPS for $10 per year so don’t flame me to hard 🙂
Thanks in advance,
this was awesome blog
Nice Tutorial for beginners as well as Preffesionals
Nice tutorial. Thanks for sharing
thanks
Nice Tutorials.
great tutorial, get to learn few new things.
thanks for sharing a useful information.
good tutorials, thanks for sharing man.
This is really amazing and very informative tutorial thanks for sharing this one.
Is this good for mac.I have mac and want to install this. This is good way.
Good post again and thanks.
Hi there, I use a small usb modem for my internet access and using a usb wifi adaptor and a virtual wifi router I was able to share my internet …
nice post, thanks for reference. I will try it.
thanks for nice post
nice post, could you explain the records with an exemple please? MX, A and AAAA. i’ve got trouble in my installation
Big thank you
Tubemate is a software to watch and download videos online on Youtube very quickly and conveniently. This application is provided completely free
Hi bro, I used a small usb modem for my internet access and using a usb wifi adaptor and a virtual wifi router.I was able to share my internet …
I cannot install. As you said it only takes about 5 mins or 15 mins but I even waited for 1 hour but it did not done.
Thanks for your sharing. It has useful information which benefits me a lot.
Nice. I also have intention of installing Virtualmin. Your post hekp me a lot. Thanks for your sharing.
Nice, it is really informative, thanks a lot
ice. I also have intention of installing Virtualmin. Your post hekp m. this post is really amazing thing you can get this more at showbox apk here.
popcorn apk is also a best know app for streaming movie app get this here for free.
chekc this out latets showbox alternatives that might helpful for you
this is very nice post and i have enjoyed a lot.
great post. and i have the post bookmarked for the future reading.
I usually use a small USB modem for my internet access and using a USB wifi adapter and a virtual wifi router I was able to share my internet …This is a nice post, it is really informative, thanks for your sharing very much.
On our varlet, you will obtain a detailed pathfinder to download ShowBox Apk for Android and former platforms and use it to maximise your day-by-day acid of amusement. At the closing of the day, you will deliver often more than what you bargained for with this app. Before we advance to our scout, withal, we want to payoff a look at the features that survive a standout servicing.
Thank you for sharing. I was looking for the info and finally found it here.
Thank you so much for sharing…
Always wanted to do this, thanks for such valuable information.
thanks for sharing the knowledge with us.
Thanks for sharing wonderful information with us. We glad we found article to gain the knowledge 🙂
Great infor. Thanks for sharing that.
Fantastic tutorial.Thanks for sharing that.
Good Post.
Hello your post is amazing and I like it so much it helps me to understand a lot of things which cover my curiosity.
Thanks for the post.
good tutorial thank you.
Thanks for sharing that. This is something totally new to me.
Glad so many people have found this tutorial helpful.
Thanks for your post