In Part 1 of our tutorial, we installed Virtualmin on CentOS 7 and did some basic configuration. In this second half, we’re going to dive deep into the Linux configuration files to optimize our new server for a low memory footprint. We’re also going to make sure we have a modern version of PHP installed and get all the interfaces secured with a Let’s Encrypt SSL certificate.
Post Installation Work Continues
If you look at your browser’s SSL icon, you’ll notice that there’s no SSL certificate for Virtualmin. We can fix that in just a few steps! Firstly we need to install a virtual host (website) for your server’s FQDN. In our case, that was server.virtualmin-tutorial.tld. We’re going to host virtualmin-tutorial.tld on this server, so we’ll go to the top left of Virtualmin and click “Create Virtual Server”.
Fill in the Domain name (without the “server.” prefix) and optionally the description field. Set the account password in the “Administration password” field and save it for later reference. You can leave the Administration username to be set Automatically, or you can manually type in your preferred username for this account. Click the arrow next to “Enabled features” to expand this section, and be sure to check the “Setup SSL website too?” box as shown below:
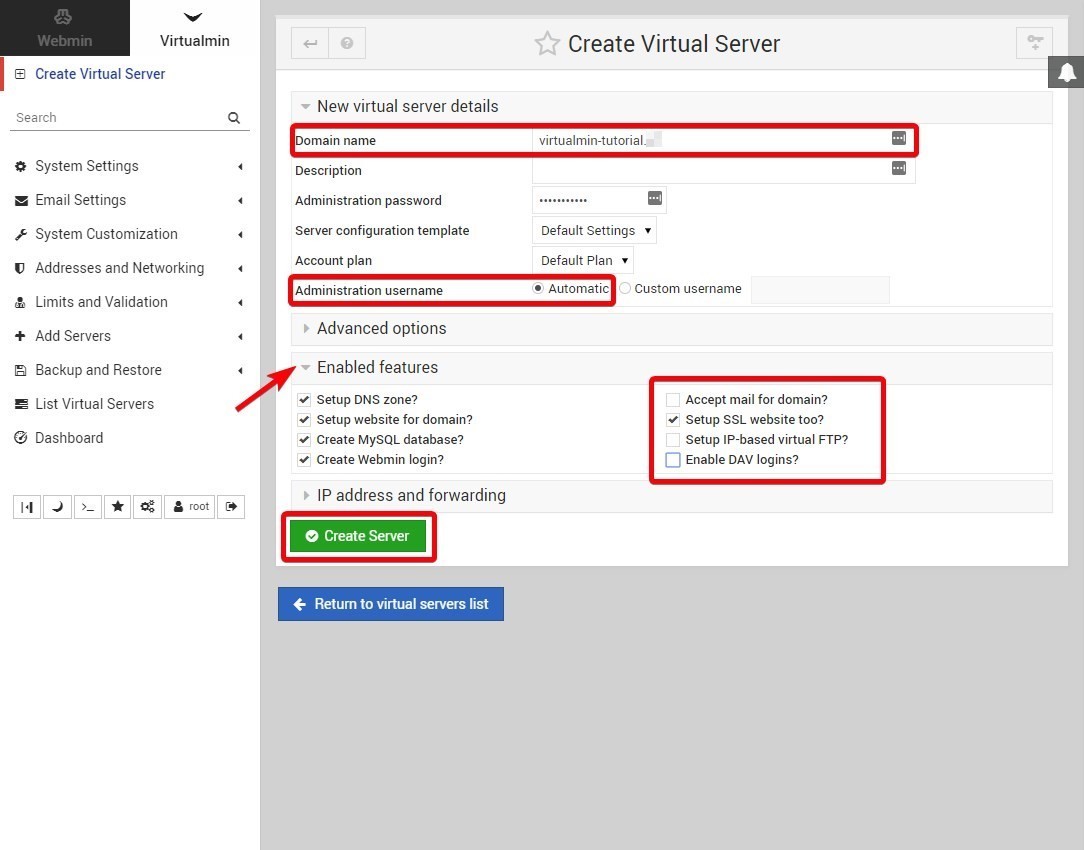
Uncheck the “DAV Login”. Since we’ve done a minimal install, also uncheck the “Accept mail for domain?” box. Now click the green “Create server” button.
When the new Virtual Server is created, you’ll see two options at the bottom of the page. Click on “Return to virtual server details” and then in the top left corner click on “Virtual Server Summary”.
To continue with configuring a Let’s Encrypt SSL certificate, we need to get the DNS pointed at the server. The IP address shown in the Virtual server details is what we need. Go to your DNS provider (CloudFlare for example) and add an A record for your domain that points the following names to your IP:
virtualmin-tutorial.tld
www.virtualmin-tutorial.tld
server.virtualmin-tutorial.tld
Of course, substitute virtualmin-tutorial.tld with your actual domain name, and server for your chosen server name. These hostnames will need to point at your servers primary IP address. Once that’s done, and the DNS propagation has occurred, you should be able to view the site in a web browser. If you haven’t added any content, then it’ll simply show a 403 Forbidden error. That’s fine, and we can move on.
As shown below, click the Server Configuration drop down (1) , then SSL Certificate (2), then Let’s Encrypt (3). Click the the “Domain names listed here” box radio button, and paste in the three domain names above into the box. You can omit mail.virtualmin-tutorial.tld (4). Check the screenshot below.

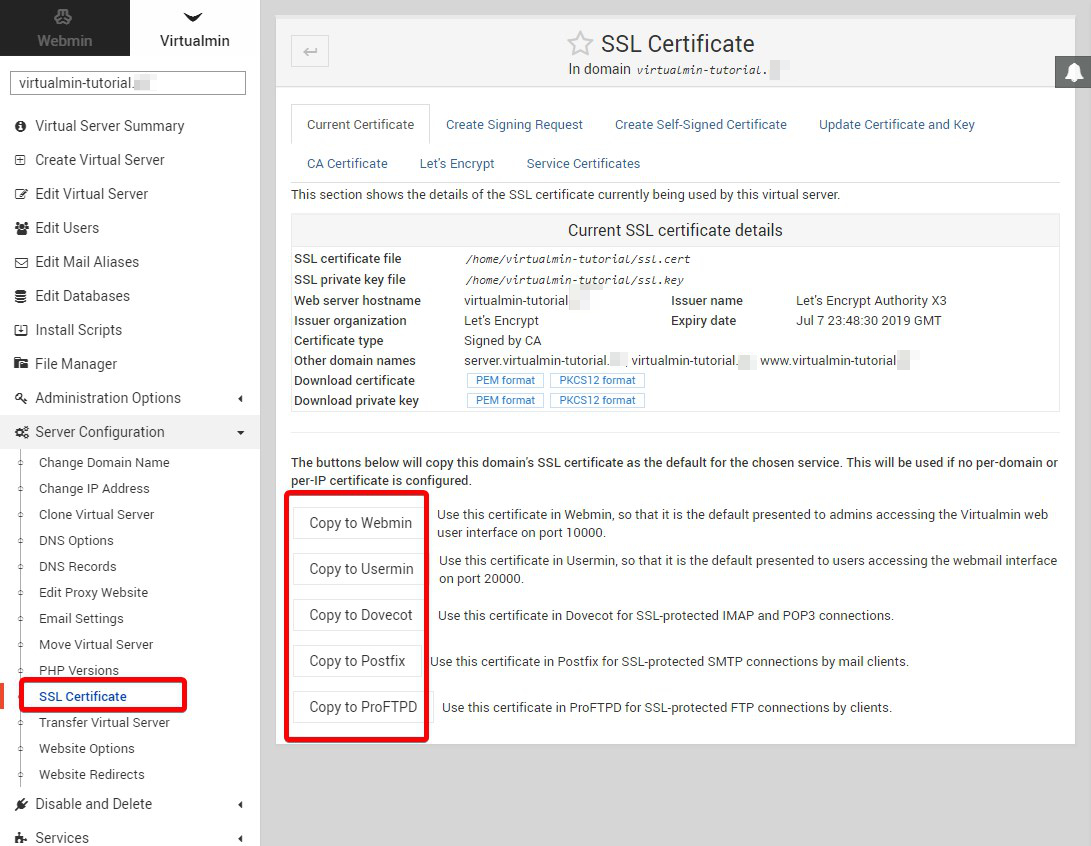
Click the Request Certificate button (5) at the bottom. If your DNS is set up correctly, then this will work with Let’s Encrypt, the free certificate signing authority, and your site and server will receive a Let’s Encrypt SSL certificate- free! It’s every bit as secure as a paid certificate. Since we added “server.virtualmin-tutorial.tld” to the list, now our Virtualmin installation itself will be covered by this certificate! All we have to do is go back to the SSL Certificate menu and click “Copy to Webmin”. While you’re at it, click on the rest of the “Copy to …” buttons as shown below, with the exception of Postfix and Dovecot, since we’re not using email on this server:
When done, close your browser tab and re-open Virtualmin in a new tab. You’ll see that the SSL lock in Chrome is now green. What’s more, when you go to the domain name that you just added the SSL certificate for, you can view it using https:// also.
Finally we want to test and make sure that the server is 100% ready to go. We’re going to use SSH to create an index.php page at our newly created Virtual Server. Our test domain was virtualmin-tutorial.tld, and the automatically assigned user was virtualmin-tutorial. You’ll want to substitute your username below. Notice how we use “su” to Switch User to the user we just created, and then type “exit” to become root again:
[root@server ~]# su virtualmin-tutorial
[virtualmin-tutorial@server root]$ cd ~/public_html
[virtualmin-tutorial@server public_html]$ echo "<?php phpinfo() ?>" > index.php
[virtualmin-tutorial@server public_html]$ exit
[root@server ~]#
Now visit your website in a browser and you’ll see a PHP test page:

Here we have PHP 7.0 installed. PHP 5.4 is also installed, although it is only there for legacy reasons- it should never be used. It is also desirable to use the newest version of PHP available to you, and the RedHat repository has up to PHP 7.2. We’ll install PHP 7.2 and make it the default PHP version for the command line, too. We’re going to install all available PHP modules as well to make sure we aren’t missing anything important.
Run the following command:
yum -y install rh-php72*Now we can change the PHP version in Virtualmin for the Virtual Server we created. This can be done via Virtualmin’s web interface, but it’s easily done from the command line as well. Be sure to substitute your domain name and username in the following command:
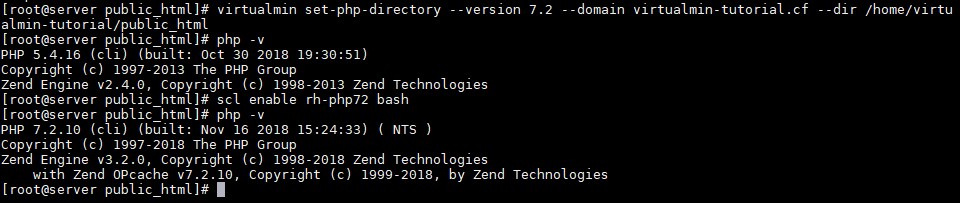
virtualmin set-php-directory --version 7.2 --domain virtualmin-tutorial.tld --dir /home/virtualmin-tutorial/public_htmlLet’s check our website. You may just need to refresh your browser page. You should see PHP 7.2 now being the active version:

The only problem now is that the command line still has PHP version 5.4:
[virtualmin-tutorial@server ~]$ php -v
PHP 5.4.16 (cli) (built: Oct 30 2018 19:30:51)
Copyright (c) 1997-2013 The PHP Group
Zend Engine v2.4.0, Copyright (c) 1998-2013 Zend Technologies
To resolve this, we’re going to run a simple command that tells bash (the command line) to use a different version of PHP from a Software Collection. The command is called “scl” and if we run “scl -l” we’ll get a list of available Software Collections:
[root@server ~]# scl -l
httpd24
rh-php70
rh-php72
The collection we want to use is rh-php72. Run the following command to use the rh-php72 in bash:
scl enable rh-php72 bash
Here’s how our output looked. Notice that the second time we ran “php -v” it shows PHP 7.2.0. Now, great utilities like wp-cli will work if you install them.
Adjusting Apache
Now we’ll adjust settings in Apache so that it doesn’t consume too much memory. If Apache runs out of memory, it can stop working, and all hosted websites will go down. We’ll also make some edits to the PHP configuration. We’re going to use the editor called Nano, which we installed at the beginning of the tutorial. If you’re not sure how to use Nano, don’t worry- we’ll show you the basics.
First we will edit the php.ini file so that it has some more sane limits in it. If you’re going to host a WordPress site for example, you will need more than an 8MB post_max_size and upload_max_filesize. We’re going to use sed again to edit the default values. Run the following command:
sed -i 's/^upload_max_filesize.*/upload_max_filesize = 256M/' /etc/php.ini
sed -i 's/^post_max_size.*/post_max_size = 256M/' /etc/php.ini
If you want to edit the test site we installed earlier, then run the same command on its php.ini by adjusting the paths to php.ini in the following commands:
sed -i 's/^upload_max_filesize.*/upload_max_filesize = 256M/'  /home/virtualmin-tutorial/etc/php7.2/php.ini
sed -i 's/^post_max_size.*/post_max_size = 256M/' /home/virtualmin-tutorial/etc/php7.2/php.ini
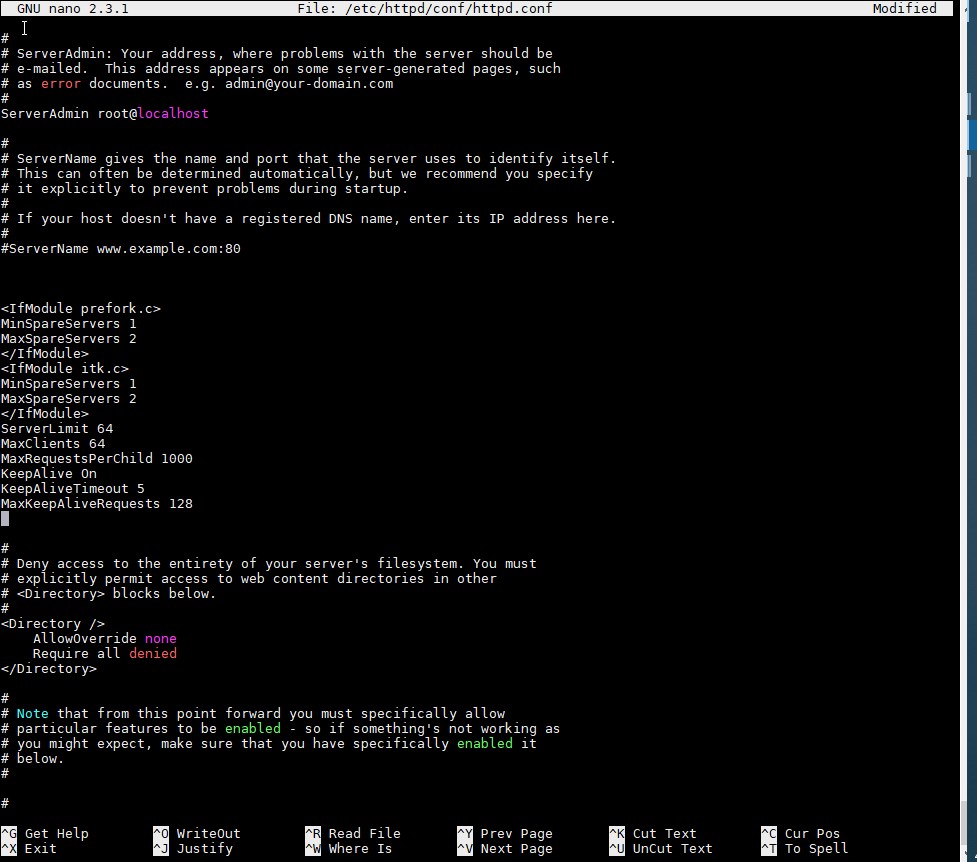
Now we’re going to edit our Apache configuration file using Nano. Nano works a lot like Notepad on the PC, and we’re going to utilize it to add some limits to Apache so that it cannot overload the server easily. Run the following command to edit Apache’s configuration file, httpd.conf:
nano /etc/httpd/conf/httpd.confUse the arrows to move the cursor down until you see the following line:
#ServerName www.example.com:80
Position the cursor at the end of the line and press Enter 2 or 3 times to create some extra space below it, and the copy/paste the following lines in:
<IfModule prefork.c>
MinSpareServers 1
MaxSpareServers 2
</IfModule>
<IfModule itk.c>
MinSpareServers 1
MaxSpareServers 2
</IfModule>
ServerLimit 64
MaxClients 64
MaxRequestsPerChild 1000
KeepAlive On
KeepAliveTimeout 5
MaxKeepAliveRequests 128
Note that these values are very conservative for a small VPS. If you have a larger server, you may increase the values for ServerLimit and MaxClients. If you run into problems and see the error
[error] server reached MaxClients setting, In a sites error_log file, then you will need to consider raising theMaxClients setting. These values will work in most cases, however. Here’s how that looked in our httpd.conf:
To exit and save, hold the Control key and press X. You’ll see the following confirmation at the bottom:
Save modified buffer (ANSWERING "No" WILL DESTROY CHANGES) ?Press Y and then press Enter to confirm that you want to save the file. To confirm that we didn’t make any mistakes, we’ll ask Apache to test the configuration:
[root@server ~]# httpd -t
Syntax OK
[root@server ~]#
Great! Now let’s restart Apache to get the new changes to take effect:
[root@server ~]# systemctl restart httpd [root@server ~]#
The Next Steps
From here, you can add several more Virtual Servers (Virtualmin’s name for a web hosting account) using the aforementioned steps, and each can have multiple MySQL databases. You can even install multiple sites per Virtual Server although for security reasons it’s safest to have just one each.
We hope that you’ll enjoy your new Virtualmin based web server and that you’ve found this tutorial informative. Be sure to check out the official Virtualmin documentation so that you can really unleash the potential of your new server!


Leave a Reply