 Does this sound familiar: you want to look at the content on some web site, but it requires you to sign up with your email address. You know that if you do, you’ll be spammed continuously until you go through the chore of unsubscribing. You’re tempted to make up a random email address, but you figure you’ll have to confirm the email by clicking on a link mailed to you.
Mailinator solves this problem by providing the Internet with unlimited disposable email addresses. If you go to mailinotor.com, you can make up any email address @mailintor.com you want – flaming.hotdog, burpingtoad, xyz123, etc. – and any email sent to that email address will show up on Mailinator. You don’t have to pre-register the email or sign up or anything – just make up any email address you want (@mailinator.com), give it out, and then return and read the email by going to that mailbox on mailinator.com. Sweet! But…
The Problems With Mailinator.com
Mailinator is cool but there are a couple issues:
- All inboxes are public. If you use tomatojuice@mailinator.com, anyone else can come along and read anything in the tomatojuice@mailinator.com inbox. Probably not a big deal if it’s just a one-time click-to-confirm throwaway, but sometimes email signups want personal info. You can ameliorate this somewhat by picking random-string inboxes or using UUID-style inboxes, but this is obviously suboptimal.
- Companies and marketers have gotten wise to Mailinator (and its legions of competitors) and some will not allow you to sign up with anything @mailinator.com.
Fortunately, you can easily self-host your own private Mailinator clone with a neat program called inbucket.
Setting Up inbucket
In this example, I’m going to be using a Debian 10 VPS.
First, make sure port 25 is not blocked by your VPS provider or your firewall. Second, adjust your MX records for your domain to point to your VPS. In this case, I’m using the domain lowend.party, the VPS is mail.lowend.party, and MX priority 10 (the only record) points to mail.lowend.party.
Let’s start by installing some pre-reqs:
apt-get update && apt-get upgrade
apt-get install git npm golang
Next, we’ll disable the exim4 mail system that comes with Debian:
systemctl stop exim4
systemctl disable exim4
For simplicity’s sake, I’m going to put everything in /inbucket, but you can put things wherever you want.
cd /
git clone https://github.com/inbucket/inbucket.git
cd inbucket/ui
npm i
npm run build
cd ..
go build ./cmd/inbucket
Configuring inbucket
inbucket is configured by environment variables. We’ll create a systemd unit to handle these, but to get a feeling for things you may want to change, you can either read the docs (at doc/config.md) or use the on-line configurator.
In this example, we’re using the following variables:
export INBUCKET_SMTP_DOMAIN="mail.lowend.party"
export INBUCKET_STORAGE_MAILBOXMSGCAP="0"
export INBUCKET_SMTP_ADDR="0.0.0.0:25"
export INBUCKET_WEB_ADDR="0.0.0.0:80"
These set the SMTP domain, say that every mailbox has unlimited storage, set inbucket’s SMTP server to run on port 25, and set the inbucket web interface to port 80. Since this is a tutorial, I’m not going to cover setting up https and an nginx proxy, so we’ll just expose inbucket’s web interface directly, which in effect makes it a public Mailinator clone. If you are using inbucket for serious use, you may wish to protect it behind https and perhaps basic web authorization.
Here is the systemd unit file we’ll use. In /etc/systemd/system/inbucket.service, I’ve placed the following:
[Unit]
Description=inbucket

[Service]
ExecStart=/inbucket/inbucket
Restart=always
StartIntervalLimit=5
TimeoutStartSec=30
Environment=INBUCKET_SMTP_DOMAIN="mail.lowend.party"
Environment=INBUCKET_STORAGE_MAILBOXMSGCAP="0"
Environment=INBUCKET_SMTP_ADDR="0.0.0.0:25"
Environment=INBUCKET_WEB_ADDR="0.0.0.0:80"

[Install]

WantedBy=multi-user.target
Then enable and start:
systemctl enable inbucket
systemctl start inbucket
And inbucket is now up and running
Testing inbucket
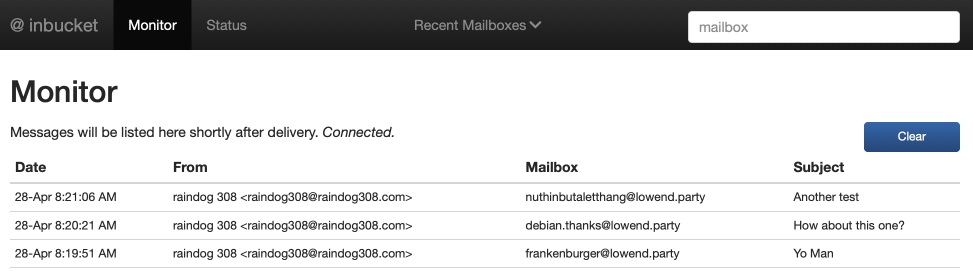
I mailed several emails to various random @lowend.party emails, then visited mail.lowend.party in my web browser. By clicking ‘Monitor’ at the top, I could see everything that’s arrived:
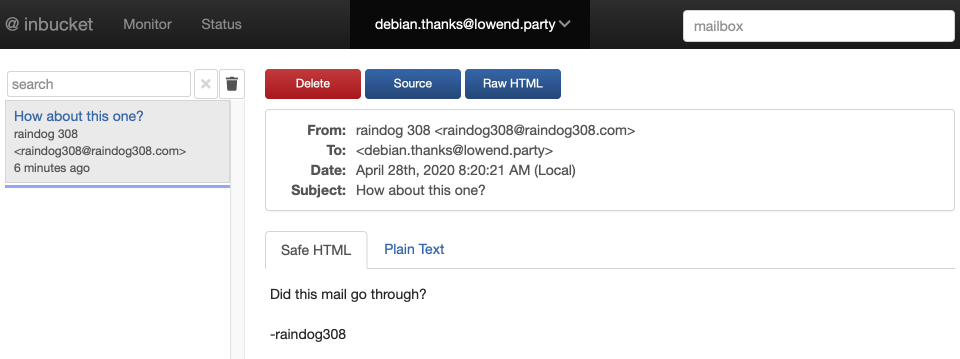
In the upper right corner, I can specify which mailbox I want to view. You need to enter the full email address (since you could have multiple domains), so I entered debian.thanks@lowend.party:

And then I can read individual messages:
Further Config
Here’s my actual production config:
Environment=INBUCKET_SMTP_ADDR="0.0.0.0:25"
Environment=INBUCKET_SMTP_DEFAULTACCEPT="false"
Environment=INBUCKET_SMTP_ACCEPTDOMAINS="lowend.party"
Environment=INBUCKET_STORAGE_TYPE="file"
Environment=INBUCKET_STORAGE_PARAMS="path:/inbucket_storage"
Environment=INBUCKET_STORAGE_RETENTIONPERIOD="1317600h"
Environment=INBUCKET_STORAGE_RETENTIONSLEEP="3600s"
Environment=INBUCKET_STORAGE_MAILBOXMSGCAP="0"
Environment=INBUCKET_POP3_ADDR=127.0.0.1:1100
What these parameters do:
- Accept SMTP on port 25
- Only accept mail for something@lowend.party and reject everything else
- Store the mail on disk (not in memory) in a path called /inbucket_storage
- Retain all emails for 1 year
- Check only once an hour to delete old email (reduces disk thrashing)
- Unlimited capacity for each mailbox
- Since I don’t use POP3, I bind it only to localhost, which effectively disables it
On a 512MB VPS dedicated to inbucket:
              total        used        free      shared  buff/cache   available
Mem:            483          62         110           1         309         406
Swap:           511          10         501
And that’s all there is to it! Now you have your own private Mailinator and can easily keep your spammy signup and throwaway web form emails separate from your main inbox. Enjoy!
Related Posts:
Nyr's Legendary Road Warrior Script: Still the Rock Solid Go-To for Easy VPN!
Roll Your Own: How to Setup and Maintain a Minecraft Server on Your VPS
From Oracle Cloud to TOR to Telegram: Check Out LowEndTalk Tutorials!
LowEndBox BUSTED for Dealing in Mind Expanding Substances
Ramdisks: Why You Might Enjoy One, Plus a Performance Puzzler
Have You Checked Out Our Tutorials?
raindog308 is a longtime community LETizen, technical writer, and self-described techno polymath. With deep roots in the *nix world, he has a passion for systems both modern and vintage, ranging from Unix, Perl, Python, and Golang to shell scripting and mainframe-era operating systems like MVS. He’s equally comfortable with relational database systems, having spent years working with Oracle, PostgreSQL, and MySQL.
As an avid user of LowEndBox providers, raindog308 runs an empire of LEBs, from tiny boxes for VPNs, to mid-sized instances for application hosting, and heavyweight servers for data storage and complex databases. He brings both technical rigor and real-world experience to every piece he writes.
Beyond the command line, raindog308 has a life-long love of German Shepherd Dogs, high-quality knives, target shooting, theology, tabletop RPGs, playing guitar, and hiking in deep, quiet forests.
His goal with every article is to help users, from beginners to seasoned sysadmins, get more value, performance, and enjoyment out of their infrastructure.
You can find him daily in the forums at LowEndTalk under the handle @raindog308.


This sounds like a lot of effort. Just make a temporary forwarder address to sign up with in your webhosting control panel and have catch all mail turned off. Later delete the forwarder and voila – no more emails.
I made a simple forwarder from Exim to custom PHP email parser and store it in database. Then a little script to retrieve it from database. Work flawlessly.
HI, Cn you make same kind of tutorial with CentOS 7 VPS ?
I am confuse because i am not sure if i try to stop exim4 then it will not affect emails of other websites on same server ?
Please make if you can.
Thank you