
Have you ever visited Wikipedia and thought to yourself, “Wow, how do I install my own Wiki app?” If this question sounds familiar, you’re in luck because this tutorial will show you how to rapidly get started with DokuWiki.
DokuWiki doesn’t require a database so if you have a small low end VPS, DokuWiku is a great way to put that VPS to use.
DokuWiki has a Wikipedia-like feel to it which is why many users will choose this app over other free alternatives. DokuWiki is simple, clean and it runs on flat files so there is no need to worry about database maintenance.
Let’s get started on how to install DokuWiki on your VPS. For this tutorial, we’ll use an Ubuntu 14.04 VPS.
How to Install DokuWiki
DokuWiki is a Wikipedia like app that comes standard with an immense amount of documentation. Here is how you can rapidly get started with DokuWiki on Ubuntu.
Open up SSH as Root
Once you’ve logged in, we’ll need to make sure everything is up to date.
> sudo apt-get update

> sudo apt-get upgrade
Please note that you’ll need to hit Y to proceed each time it asks unless otherwise noted.
Setup PHP & Apache
> sudo apt-get install apache2 libapache2-mod-php5
We’ll also need to ensure the Apache Rewrite Module is Present:
> sudo a2enmod rewrite
The installer tells us to restart Apache so lets go ahead and do that now for good measure.
> sudo service apache2 restart
Change Directories to the Apache WWW folder
> cd /var/www
Use WGET to Download DokuWiki
> sudo wget https://download.dokuwiki.org/src/dokuwiki/dokuwiki-stable.tgz
Extract the Files
> sudo tar xvf dokuwiki-stable.tgz
Let’s Move Some Files Around
> sudo mv dokuwiki-*/ dokuwiki
Change File Ownership Privileges
> sudo chown -R www-data:www-data /var/www/dokuwiki
Use Nano to Reconfigure Apache
> sudo nano /etc/apache2/sites-enabled/000*.conf
Once Nano has opened this file, go ahead and change the DocumentRoot entry to reflect:
DocumentRoot /var/www/dokuwiki

Hit CTRL+O, hit Enter, Hit CTRL+X to go back to the SSH prompt.
Change the AllowOverrides Setting
We’ll fire up Nano again to configure this file.
> sudo nano /etc/apache2/apache2.conf
The easiest way to find the AllowOverrides setting is to hit CTRL+W and type in AllowOverrides and hit Enter. This works like a search function in Nano.
You’ll find the AllowOverrides section and you’ll need to change the value from None to All. Your file will look like this:
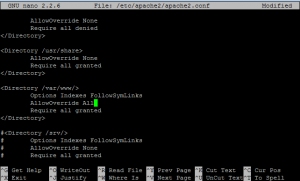
Hit CTRL+O, hit Enter, hit CTRL+X to go back to the SSH prompt.
Restart Apache (Again)
To ensure that the changes take effect, let’s restart Apache one more time.
> sudo service apache2 restart
Install an Email Server
If you wish to send emails from the app or send new registration emails to new users on your Wiki, PostFix is a great way to do this. This is outside the scope of this tutorial because it is preferred that you have domain name already in place for PostFix.
Finish the Installation
Leave your SSH window open for now because you’ll need it for the last step. But first, you’ll need to open your web browser and go to:
http://<youripaddress>/install.php
You’ll be greeted by the DokuWiki Installer page; Fill out the details for your new Wiki page.
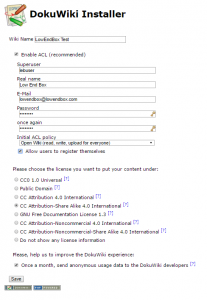
Click Save
If all went well, the next page will tell you to delete your install.php file.
How to Delete the Install.php File
Navigate back to your SSH window execute the following command.
> sudo rm /var/www/dokuwiki/install.php
You’re all set! Open up your web browser again and enjoy your new Wiki app by DokuWiki.


thanks for providing a cool trick mate. it helps a lot to me.
04 Sep 2021 Adding a step I needed to take.
If the first time you open DokuWiki in your browser I get the error, “PHP function xml_parser_create is not available.”
run ‘sudo apt-get install php-xml’
Then restart apache2.