Who should read this tutorial:
This tutorial is written for novice level Linux users and DevOps folks who need to add encryption to their internet traffic. A virtual private network (an encrypted network over the public internet) to access specific networks or services from the outside is the way to go.
What are we going to cover
- Walk through the installation of OpenVPN on Ubuntu 18.04
- How to install the OpenVPN client on a windows workstation
- Generate a certificate and connect to the VPN server
Why Would You Want to Do This?
The key benefit of a VPN is to access resources that are otherwise inaccessible from external networks while maintaining a minimum level of network security at the time.
Generally adding an encrypted virtual private network connection to your infrastructure is a good idea if:
- you are not confident of the security of the network you are connecting from (public wifi anyone?)
- the resources that you want to utilize lack inherent security (such as network communications that don’t support strong levels of encryption.)
- attempting accessing resources that are protected by multiple levels of network security and should never be publicly accessible such as systems holding payment card, healthcare, or security data.
My personal use case is to access my home security system (MotionEye) while traveling on my laptop or on my mobile device so that I can keep an eye on my cats, dogs and fend off porch pirates.

Random internet cat

PRE-REQUISITES
We recommend:
- Starting with a clean VPS
- At least 512Mb of Ram
- 15GB of free disk space
- This tutorial is written for Ubuntu 18.04
Skills and Tools
- You need to know how to SSH and get around the command line
- An SSH client like Putty
- An SFTP client like WinSCP
- The ability to work with files and transfering files
First Step – Make Sure You Are at the Latest and Greatest
Connect to your VPS via SSH
Upgrade your repositories to make sure they are up to date. We are installing git because this is about 500% faster if we use the fantastic script from Angristan.
$ sudo apt-get update && sudo apt-get upgrade
$ sudo apt-get install git
Do you know your public IP address and your private IP address if you are behind a NAT device (like a router?)
Get the IP from your server
—
$ ifconfig
eth0: flags=4163<UP,BROADCAST,RUNNING,MULTICAST>  mtu 1500
        inet 192.168.1.166  netmask 255.255.255.0  broadcast 192.168.1.255
        inet6 fe80::216:3cff:fe43:ba41  prefixlen 64 scopeid 0x20<link>
        ether 00:16:3c:43:ba:41  txqueuelen 1000 (Ethernet)
        RX packets 11672693  bytes 1049010192 (1.0 GB)
        RX errors 0  dropped 0 overruns 0  frame 0
        TX packets 347581  bytes 57193541 (57.1 MB)
        TX errors 0  dropped 0 overruns 0  carrier 0 collisions 0

--
If you are behind a device like a firewall or router I visit http://www.whatismyip.com to find my public IP since it is easier than logging into the router directly.

Make a note of these IP addresses on your scratch pad. You might need them later
The Actual Install starts here
The process with the openvpn-install.sh script is dead simple. We are going to clone the script from github. Then, change into the directory that was created and make sure the script is executable and then bang, run that baby as root or with sudo! That will kick off the installation dialogues and away you go.
—
$ cd ~
$ git clone https://github.com/angristan/openvpn-install openvpn-install
$ cd openvpn-install/
$ ls -l
$ chmod +x openvpn-install.sh
$ sudo ./openvpn-install.sh

Welcome to the OpenVPN installer!
The git repository is available at: https://github.com/angristan/openvpn-install
I need to ask you a few questions before starting the setup.

You can leave the default options and just press enter if you are ok with them.

I need to know the IPv4 address of the network interface you want OpenVPN listening to.
Unless your server is behind NAT, it should be your public IPv4 address.

IP address: 192.168.1.111

Checking for IPv6 connectivity...

Your host does not appear to have IPv6 connectivity.

Do you want to enable IPv6 support (NAT)? [y/n]: n

What port do you want OpenVPN to listen to?

   1) Default: 1194
   2) Custom
   3) Random [49152-65535]

Port choice [1-3]: 2

Custom port [1-65535]: 7777     #YOU MIGHT WANT 80 or 443 if your local network is filtering things

What protocol do you want OpenVPN to use?

UDP is faster. Unless it is not available, you shouldn't use TCP.

   1) UDP
   2) TCP

Protocol [1-2]: 1

What DNS resolvers do you want to use with the VPN?

   1) Current system resolvers (from /etc/resolv.conf)
   2) Self-hosted DNS Resolver (Unbound)
   3) Cloudflare (Anycast: worldwide)
   4) Quad9 (Anycast: worldwide)
   5) Quad9 uncensored (Anycast: worldwide)
   6) FDN (France)
   7) DNS.WATCH (Germany)
   8) OpenDNS (Anycast: worldwide)
   9) Google (Anycast: worldwide)
   10) Yandex Basic (Russia)
   11) AdGuard DNS (Russia)

DNS [1-10]: 9

Do you want to use compression? It is not recommended since the VORACLE attack make use of it.

Enable compression? [y/n]: n

Do you want to customize encryption settings?

Unless you know what you're doing, you should stick with the default parameters provided by the script.

Note that whatever you choose, all the choices presented in the script are safe. (Unlike OpenVPN's defaults)
See https://github.com/angristan/openvpn-install#security-and-encryption to learn more.

Customize encryption settings? [y/n]: n

Okay, that was all I needed. We are ready to setup your OpenVPN server now.
You will be able to generate a client at the end of the installation.

Press any key to continue...

Tell me a name for the client.
Use one word only, no special characters.

Client name: chad

Do you want to protect the configuration file with a password?

(e.g. encrypt the private key with a password)
   1) Add a passwordless client
   2) Use a password for the client

Select an option [1-2]: 2

⚠️ You will be asked for the client password below ⚠️

Note: using Easy-RSA configuration from: ./vars
Using SSL: openssl OpenSSL 1.1.0g  2 Nov 2017
Generating an EC private key
writing new private key to '/etc/openvpn/easy-rsa/pki/private/chad.key.hYBMPyHfHV'
Enter PEM pass phrase:
Verifying - Enter PEM pass phrase:
-----
Using configuration from /etc/openvpn/easy-rsa/pki/safessl-easyrsa.cnf
Check that the request matches the signature

Signature ok

The Subject's Distinguished Name is as follows
commonName            :ASN.1 12:'chad'
Certificate is to be certified until Apr  9 03:48:48 2022 GMT (1080 days)

Write out database with 1 new entries
Data Base Updated
Client chad added, the configuration file is available at /root/chad.ovpn.
—
Download the .ovpn file and import it in your OpenVPN client.
Checking Our Work
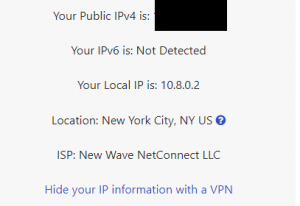
I like to hit https://www.whatismyip.com while I’m connected and make sure that I see the remote network in the returned page rather than the external IP of my local network.
Then I like to visit https://speedtest.net and see what kind of throughput I get out of the system. I got 28.75Mbps down and 73.31 Mbps. Not bad at all!

User Management
To manage OpenVPN users on the system we just re-visit the installer and it will detect that OpenVPN has already been installed and proceed to give us 4 management options.
- Add a new user
- Revoke an existing user
- Remove OpenVPN
- Exit
--
$ ./openvpn-install.sh
Looks like OpenVPN is already installed.

What do you want to do?
   1) Add a new user
   2) Revoke an existing user
   3) Remove OpenVPN
   4) Exit

Select an option [1-4]: 1

Tell me a name for the client certificate.
Please, use one word only, no special characters.

Client name: chad

Using SSL: openssl OpenSSL 1.1.0g  2 Nov 2017
Generating a 2048 bit RSA private key
............+++
.........................+++
writing new private key to '/etc/openvpn/easy-rsa/pki/private/chad.key.YjDIHqlesv'
-----
Using configuration from /etc/openvpn/easy-rsa/pki/safessl-easyrsa.cnf
Check that the request matches the signature
Signature ok
The Subject's Distinguished Name is as follows

commonName            :ASN.1 12:'chad'
Certificate is to be certified until Apr 22 02:45:13 2029 GMT (3650 days)
Write out database with 1 new entries
Data Base Updated
Client chad added, configuration is available at: /root/chad.ovpn
root@ubuntu:~/openvpn-install#
--
Grab your SFTP client and download the username.ovpn certificate file to the workstation that is going to run the OpenVPN client.
Installing the Client on a Windows 10 Workstation
On the workstation download the appropriate client from OpenVPN at https://openvpn.net/community-downloads/
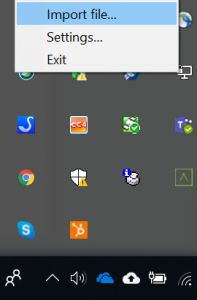
Assuming Windows 10 download and run the installer and then in your system tray right click ![]() the little monitor with a lock on it and Import your chad.ovpn file! Then Chad > Connect and you should be good to go. I like to hit https://whatismyip.com while connected and verify that I’m showing the IP address of the OpenVPN server that I’m connected to and not the public IP address of my local network.
the little monitor with a lock on it and Import your chad.ovpn file! Then Chad > Connect and you should be good to go. I like to hit https://whatismyip.com while connected and verify that I’m showing the IP address of the OpenVPN server that I’m connected to and not the public IP address of my local network.
Installing the OpenVPN client on your iPhone
https://itunes.apple.com/us/app/openvpn-connect/id590379981 grab that thing from the App Store and then use a cloud file utility like google drive to get the chad.ovpn file or do something really insecure and email it to yourself…
References & Other Options
- The Nyr version of Openvpn-install.sh seems to be the original “road warrior” installation script at https://github.com/Nyr/openvpn-install
- Angristan’s Fork https://github.com/angristan/openvpn-install seems to have some more sophisticated configuration options
Alternatives to OpenVPN
- Very curious about WireGuard https://emanuelduss.ch/2018/09/wireguard-vpn-road-warrior-setup/
About the Author
Sean Richards, CISSP, is a 20 year linux enthusiast and security practitioner. He loves family, animals, BBQ, and bicycles.
https://www.linkedin.com/in/seangrichards/
https://github.com/seangrichards/
https://twitter.com/seangrichards
Related Posts:
Should You Run FreeBSD in 2026? Maybe, Maybe Not
Whatever Happened About that Provider Who Claimed a Virtualizor Bug Caused a Breach?
Nyr's Legendary Road Warrior Script: Still the Rock Solid Go-To for Easy VPN!
Provider Claims Virtualizor WHMCS Plugin Vulnerability Caused Breach. Virtualizor Doesn't Agree.
If Your Biometric Data is Stolen, Should You Care? Probably Not.
Knock, Knock: How to Shield Your VPS From Port Scanning with Port Knocking
Kaylee is the Media Specialist at LowEndBox and a long-time follower of the LowEndTalk community. After years of reading and engaging with the platform from the sidelines, she officially joined the team to help expand LowEndBox’s reach, storytelling, and presence across digital channels.
Kaylee brings a strong passion for accessible technology and digital media. Her technical interests span the Apple ecosystem, Android devices, and emerging maker trends like 3D printing. She’s also deeply immersed in the world of social media—she manages the official LowEndBox social feeds and is always on the lookout for creative ways to spotlight community activity, tutorials, and hosting trends.
Whether she’s writing industry news, covering community milestones, interviewing providers, or crafting technical explainers, Kaylee approaches her work with a genuine enthusiasm for tech and a talent for clear, engaging communication.
Outside of the screen, she enjoys creative writing, photography, and discovering new tech tools to experiment with.
You can find her content right here on LowEndBox, as well as on the official LowEndBox Twitter and YouTube accounts—where she helps bring the LowEnd community to life.


I generally use Angristan’s version (fork of nyr’s script). Easier and work well.
Need to have sudo privs to run script: sudo ./openvpn-install.sh
For NAT installs:
I need to know the IPv4 address of the network interface you want OpenVPN listening to.
Unless your server is behind NAT, it should be your public IPv4 address.
IP address: Your_VPS_internal_IP
It seems this server is behind NAT. What is its public IPv4 address or hostname?
We need it for the clients to connect to the server.
Public IPv4 address or hostname: Your_VPS_public_IP
What port do you want OpenVPN to listen to?
1) Default: 1194
2) Custom
3) Random [49152-65535]
Port choice [1-3]: 2
Custom port [1-65535]: One_of_your_allocated_NAT_ports
Tested with Ubuntu 16.04 on 128mb Inception NAT VPS
Hi all, thanks for this!
I can tell this tutorial is written by someone at ColoCrossing because it says “Your host does not appear to have IPv6 connectivity.” 🙂
how do i start stop this vpn service?
Hello, I have followed the tutorial and everything is perfect, thank you very much, but my question is if in any case I need to change my vps, how can I migrate my vpn
Glad to know you found the tutorial helpful!
Hello good afternoon in openvpn how do I see when the certificate expires?
And what must be done to extend or renew that certificate?