


 Way back in 2020, we published a tutorial on how to setup Inbucket, a disposable email app. With Inbucket, you can take a VPS and turn create a Mailinator clone. Once setup, you have an unlimited quantity of disposable email addresses.
So if your domain is, say, lowend.party, then without any additional configuration, you can give someone an email address you make up on the spot (for example, “sevendollars@lowend.party”) and if they email it, the message is delivered to that inbox on your VPS.
This is very useful for all those sites that require email verification. You still get the confirmation code or activation link, but the sender doesn’t get your real email address. This helps keep your real inbox clean and decluttered.
There are public services that offer this – Mailinator is a famous one – but some verification suites explicitly filter out these services. But they can’t filter out one you self-host.
Our tutorial in 2020 was all good and well for its day, but it was a manual build. In the intervening years, Inbucket has released packaged builds so there’s no more fiddling around with npm and “go build” to get it up and running. Let’s give it a shot.
A Small VPS
I’m using a 512MB VPS from DigitalOcean, just because…well, I’m nostalgic about that size. That was a generous system when I started using VPSes 20 years ago. Also, I wanted to see if it was possible to use a system that small.
You cannot build Inbucket from scratch on such a system – you’ll get OOM-killed during the npm steps. But installing the package works fine and Inbucket runs great.
Here’s what I did, starting with a base Debian 13 x64 build.
apt update && apt -y upgrade
apt install -y curl ca-certificates
Then download the .deb:
VERSION=3.1.1
ARCH=$(dpkg --print-architecture)

curl -fLO "https://github.com/inbucket/inbucket/releases/download/v${VERSION}/inbucket_${VERSION}_linux_${ARCH}.deb"
You should have something that looks like this:
# ll inbucket_3.1.1_linux_amd64.deb
-rw-r--r-- 1 root root 11226126 Aug 11 14:04 inbucket_3.1.1_linux_amd64.deb
Then:
apt install ./inbucket_3.1.1_linux_amd64.deb
Yes, you can use apt like that. I used to use dpkg -i but saw an unrelated tutorial where someone used apt, so why not?
Here’s the output:
# apt install ./inbucket_3.1.1_linux_amd64.deb
Note, selecting 'inbucket' instead of './inbucket_3.1.1_linux_amd64.deb'
Installing:
inbucket

Summary:
Upgrading: 0, Installing: 1, Removing: 0, Not Upgrading: 0
Download size: 0 B / 11.2 MB
Space needed: 26.7 MB / 8064 MB available

Get:1 /root/inbucket_3.1.1_linux_amd64.deb inbucket amd64 3.1.1 [11.2 MB]
Selecting previously unselected package inbucket.
(Reading database ... 42344 files and directories currently installed.)
Preparing to unpack .../inbucket_3.1.1_linux_amd64.deb ...
Unpacking inbucket (3.1.1) ...
Setting up inbucket (3.1.1) ...
Notice: Download is performed unsandboxed as root as file '/root/inbucket_3.1.1_linux_amd64.deb' couldn't be accessed by user '_apt'. - pkgAcquire::Run (13: Permission denied)
The part in bold is not an important error. It’s just saying that because apt is running as root, and the .deb is in /root in this case, apt fell back to reading the package as root instead.
Verify it’s installed:
# dpkg -l | grep inbucket
ii inbucket 3.1.1 amd64 All-in-one disposable webmail service.
Now by default, inbucket runs SMTP on port 2500. If you’re running this on a public server, you want it to receive SMTP on port 25. So modify /lib/systemd/system/inbucket.service as follows:
Environment=INBUCKET_SMTP_ADDR=0.0.0.0:25And uncomment this:
ExecStartPre=/sbin/setcap 'cap_net_bind_service=+ep' /usr/bin/inbucketNow disable exim4 because Inbucket will take its place:
systemctl stop exim4
systemctl disable exim4
And start Inbucket:
systemctl enable --now inbucket
You should see it running:
# ps -ef | grep inbuck
daemon 9591 1 0 14:07 ? 00:00:00 /usr/bin/inbucket
root 9597 9411 0 14:07 pts/0 00:00:00 grep inbuck
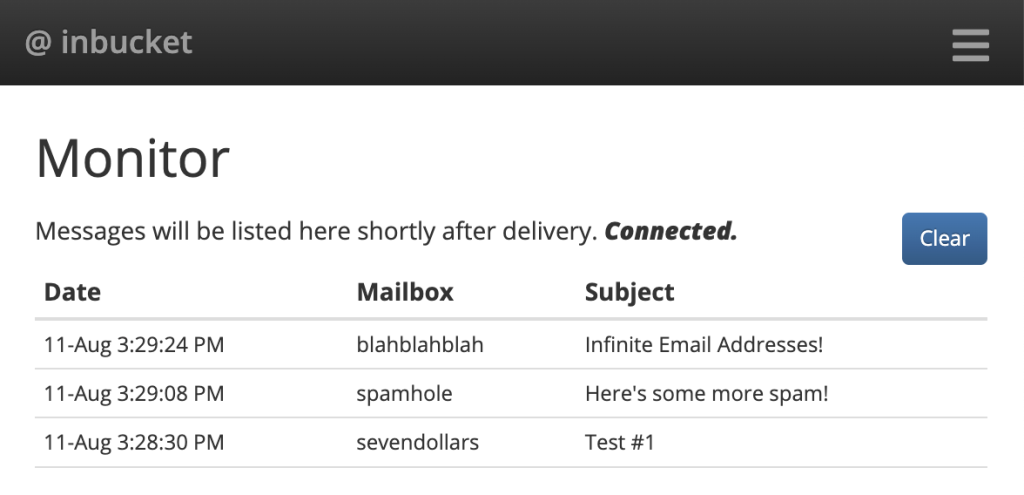
And you’re up and running! I browsed to my server’s port 9000:
Setting Up for the Web
Now there’s nothing wrong with that setup. You visit HTTP port 9000 on your server and read mail. But there’s no authentication or encryption. Let’s fix that.
First, modify /lib/systemd/system/inbucket.service to put the web interface on localhost only:
Environment="INBUCKET_WEB_ADDR=127.0.0.1:9000"
Then:
systemctl daemon-reload
systemctl restart inbucket
Now install some packages:
apt install nginx certbot python3-certbot-nginx apache2-utils
Create a user for authentication:
htpasswd -c /etc/nginx/inbucket.htpasswd adminEnter a strong password when prompted, but be aware HTTPS Basic auth is limited to 8 characters.
Now create /etc/nginx/sites-available/inbucket
server {
    listen 80;
    listen [::]:80;

    server_name mail.lowend.party;

    # Public ACME challenge for Let's Encrypt
    location ^~ /.well-known/acme-challenge/ {
        root /var/www/letsencrypt;
        auth_basic off;
        try_files $uri =404;
    }

    # Inbucket
    location / {
        auth_basic "Inbucket";
        auth_basic_user_file /etc/nginx/inbucket.htpasswd;

        proxy_pass http://127.0.0.1:9000;

        proxy_http_version 1.1;
        proxy_set_header Upgrade $http_upgrade;
        proxy_set_header Connection "upgrade";

        proxy_set_header Host $host;
        proxy_set_header X-Real-IP $remote_addr;
        proxy_set_header X-Forwarded-For $proxy_add_x_forwarded_for;
        proxy_set_header X-Forwarded-Proto $scheme;
    }
}
What we did here is keep the .well-known directory outside of HTTPS Basic auth, so that the Certbot challenge and renewals will work.
I’ll confess that the second in bold is something I Googled when the web UI wouldn’t connect to Inbucket. I was getting these errors in /var/log/daemon.log:
Aug 11 15:51:31 mail inbucket[10583]: 3:51PM ERR Error handling request error="websocket: the client is not using the websocket protocol: 'upgrade' token not found in 'Connection' header" module=web path=/api/v2/monitor/messages
The bolded lines fix this problem.
Make this config live:
ln -s /etc/nginx/sites-available/inbucket /etc/nginx/sites-enabled/inbucketI always get rid of default:
rm -f /etc/nginx/sites-enabled/defaultCheck it:
# nginx -t
nginx: the configuration file /etc/nginx/nginx.conf syntax is ok
nginx: configuration file /etc/nginx/nginx.conf test is successful
And now restart nginx (it’s usually running after the apt install):
systemctl enable nginx
systemctl restart nginx
Get an HTTP cert:
certbot --nginx -d mail.lowend.party
And after that, you can browse to https://your-server.example.com/ (no port 9000), enter “admin” and your chosen password, and enjoy your disposable email system!
Related Posts:
Mango Mail's Spring Sale Has Begun! Get 35% OFF With This Code: 30GB Plan is Only $3.50/Month!
Mango Mail Summer Flash Sale! Get 35% off Great Email Hosting with Tons of Space and Loads of Featu...
MangoMail: Spring Sale Is Now Live, Offering 3 Months FREE With Any Signup Between Now and May 31st!
LAST CHANCE on Lifetime Pricing: CraneMail Lifetime Plans Go Up In Price Starting April 1st, 2025
Mango Mail's Winter Sale is Now Extended Through January 10! Up to Six Months FREE Email Hosting!
Mango Mail's Winter Sale is Only Here Until December 31! Act Now to Get Up to 6 Months Free on Quali...

raindog308 is a longtime community LETizen, technical writer, and self-described techno polymath. With deep roots in the *nix world, he has a passion for systems both modern and vintage, ranging from Unix, Perl, Python, and Golang to shell scripting and mainframe-era operating systems like MVS. He’s equally comfortable with relational database systems, having spent years working with Oracle, PostgreSQL, and MySQL.
As an avid user of LowEndBox providers, raindog308 runs an empire of LEBs, from tiny boxes for VPNs, to mid-sized instances for application hosting, and heavyweight servers for data storage and complex databases. He brings both technical rigor and real-world experience to every piece he writes.
Beyond the command line, raindog308 has a life-long love of German Shepherd Dogs, high-quality knives, target shooting, theology, tabletop RPGs, playing guitar, and hiking in deep, quiet forests.
His goal with every article is to help users, from beginners to seasoned sysadmins, get more value, performance, and enjoyment out of their infrastructure.
You can find him daily in the forums at LowEndTalk under the handle @raindog308.























Sorry this is a terrible application with really slow development and previous serious security flaws I don’t think it should be advertised at all, not considering every mail solution like MailCow, Mailinaox or many others work exactly like this utilising catch-all or other normal mail solutions.
Mailpit serves the same purpose. It is actually maintained and has more features.