MinIO is self-hosted S3-compatible object storage. You can set it up in minutes and your VPS will look and act just like Amazon S3 storage, compatible with many backup programs and applications. In this tutorial, we’ll setup MinIO and do so in a secure, encrypted, and maintainable fashion.
The Setup
We’re using:
- A Debian 10 VPS called storage.lowend.party
- /etc/minio for MinIO config files
- /usr/local/bin for the MinIO binary
- /data for MinIO storage
This is actually not my preferred MinIO config (I prefer to have everything MinIO-related under /minio, with /minio/bin, /minio/data, /minio/etc, etc.) However, by using the default configs, we can save a great deal of time and you can always tweak later.
Installing MinIO
You shouldn’t run MinIO as root, so let’s create a MinIO user.
useradd -r -s /sbin/nologin minio-user
Now create required directories and make minio-user the owner.
mkdir /data /etc/minio
chown minio-user:minio-user /data /etc/minio
Next, we’ll download the MinIO binary:
wget -O /usr/local/bin/minio https://dl.min.io/server/minio/release/linux-amd64/minio
chmod 755 minio
Now we need to specify options to pass to the systemd startup. We do this by creating /etc/default/minio and populating it as follows:
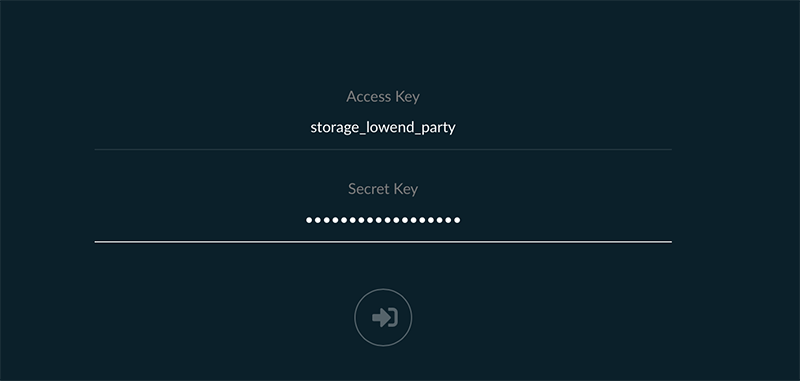
MINIO_ACCESS_KEY="storage_lowend_party"
MINIO_SECRET_KEY="complex-secret-key"
MINIO_VOLUMES="/data"
MINIO_OPTS="-C /etc/minio --address storage.lowend.party:9000"
Obviously, you’ll want to change MINIO_ACCESS_KEY and set a significantly more complex password for MINIO_SECRET_KEY.
Next, grab the MinIO systemd unit file and put it in /etc/systemd/service:
wget -O /etc/systemd/service/minio.service https://raw.githubusercontent.com/minio/minio-service/master/linux-systemd/minio.service
If you’ve used all the config I’ve specific, this unit file will work without modification, but if you’ve changed paths, MinIO user name, etc., you’ll need to tweak this file. When it’s as you like, load it into systemctl:
systemctl daemon-reload
Configuring TLS
Before we fire up MinIO, let’s make sure our connections are encrypted. We’ll use Let’s Encrypt for this.
apt -y install certbot
Now run the certbot standalone web server:
certbot certonly --standalone -d storage.lowend.party
Enter your email, accept the terms, and decide if you want EFF spam:
Saving debug log to /var/log/letsencrypt/letsencrypt.log
Plugins selected: Authenticator standalone, Installer None
Enter email address (used for urgent renewal and security notices) (Enter 'c' to
cancel): raindog308@raindog308.com

- - - - - - - - - - - - - - - - - - - - - - - - - - - - - - - - - - - - - - - -
Please read the Terms of Service at
https://letsencrypt.org/documents/LE-SA-v1.2-November-15-2017.pdf. You must
agree in order to register with the ACME server at
https://acme-v02.api.letsencrypt.org/directory
- - - - - - - - - - - - - - - - - - - - - - - - - - - - - - - - - - - - - - - -
(A)gree/(C)ancel: a

- - - - - - - - - - - - - - - - - - - - - - - - - - - - - - - - - - - - - - - -
Would you be willing to share your email address with the Electronic Frontier
Foundation, a founding partner of the Let's Encrypt project and the non-profit
organization that develops Certbot? We'd like to send you email about our work
encrypting the web, EFF news, campaigns, and ways to support digital freedom.
- - - - - - - - - - - - - - - - - - - - - - - - - - - - - - - - - - - - - - - -
(Y)es/(N)o: n
Obtaining a new certificate
Performing the following challenges:
http-01 challenge for storage.lowend.party
Waiting for verification...
Cleaning up challenges

IMPORTANT NOTES:

- Congratulations! Your certificate and chain have been saved at:
/etc/letsencrypt/live/storage.lowend.party/fullchain.pem
Your key file has been saved at:
/etc/letsencrypt/live/storage.lowend.party/privkey.pem
Your cert will expire on 2020-09-26. To obtain a new or tweaked
version of this certificate in the future, simply run certbot
again. To non-interactively renew *all* of your certificates, run
"certbot renew"
- Your account credentials have been saved in your Certbot
configuration directory at /etc/letsencrypt. You should make a
secure backup of this folder now. This configuration directory will
also contain certificates and private keys obtained by Certbot so
making regular backups of this folder is ideal.
- If you like Certbot, please consider supporting our work by:

Donating to ISRG / Let's Encrypt: https://letsencrypt.org/donate
Donating to EFF: https://eff.org/donate-le
Maintaining the Certs
We have a small problem, in that MinIO needs access to the certs but they’re going to change every 90 days. We don’t want the hassle of manually copying, chmodding, etc. every 90 days, so let’s automate this.
If you look in /etc/letsencrypt/live (where the certs live), you’ll see that the certs are actually symlinks, and they point to files (in /etc/letsencrypt/storage/archive) whose names change, so we can’t simply symlink to the symlink because symlink permissions aren’t really permissions. We’ll need to create a short script to solve the problem.
Put this in a file called /usr/local/bin/maintain_minio_certs.sh
#!/bin/bash

cp /etc/letsencrypt/live/storage.lowend.party/privkey.pem /etc/minio/certs/private.key
chown minio-user:minio-user /etc/minio/certs/private.key
cp /etc/letsencrypt/live/storage.lowend.party/fullchain.pem /etc/minio/certs/public.crt
chown minio-user:minio-user /etc/minio/certs/public.crt
systemctl restart minio
Save it, and then
chmod 755 /usr/local/bin/maintain_minio_certs.sh
We could schedule it to run regularly, but an easier method is to link it in to the certbot service itself. This way, every time certbot updates, this script will run.
Modify /lib/systemd/service/certbot.service and add the ExecStartPost line shown below:
[Service]
Type=oneshot
ExecStart=/usr/bin/certbot -q renew
ExecStartPost=/usr/local/bin/maintain_minio_certs.sh
PrivateTmp=true
Now reload the unit file:
systemctl daemon-reload
And run
systemctl start certbot
After that, you can see that the certificates are now properly installed:
root@storage:/lib/systemd/system# ls -l /etc/minio/certs/
total 20
drwx------ 3 minio-user minio-user 4096 Jun 28 10:08 .
drwxr-xr-x 3 minio-user minio-user 4096 Jun 28 09:37 ..
drwx------ 2 minio-user minio-user 4096 Jun 28 09:37 CAs
-rw------- 1 minio-user minio-user 1704 Jun 28 10:08 private.key
-rw-r--r-- 1 minio-user minio-user 3574 Jun 28 10:08 public.crt
Starting MinIO
At this point, you’re ready to fire up MinIO:
systemctl start minio
Your MinIO server should now be running on port 9000. Start a web browser and navigate to https://your-server-name:9000 and you should be able to log into MinIO:
Related Posts:
Swap Is Back: High RAM Prices Are Bringing Back an Old Technology
That Was a Fun Read! Pondering Cosmological UUIDs
2026: The Breakthrough Year for Rust
Looking Back at 2025: What a Wild Year! Our Recap of the Year's Biggest Moments
The AI Killing Spree Has Begun. The First Victims: Crucial and MinIO
Ten Cool Linux Command Line Tricks for the Journeyman Practitioner
raindog308 is a longtime community LETizen, technical writer, and self-described techno polymath. With deep roots in the *nix world, he has a passion for systems both modern and vintage, ranging from Unix, Perl, Python, and Golang to shell scripting and mainframe-era operating systems like MVS. He’s equally comfortable with relational database systems, having spent years working with Oracle, PostgreSQL, and MySQL.
As an avid user of LowEndBox providers, raindog308 runs an empire of LEBs, from tiny boxes for VPNs, to mid-sized instances for application hosting, and heavyweight servers for data storage and complex databases. He brings both technical rigor and real-world experience to every piece he writes.
Beyond the command line, raindog308 has a life-long love of German Shepherd Dogs, high-quality knives, target shooting, theology, tabletop RPGs, playing guitar, and hiking in deep, quiet forests.
His goal with every article is to help users, from beginners to seasoned sysadmins, get more value, performance, and enjoyment out of their infrastructure.
You can find him daily in the forums at LowEndTalk under the handle @raindog308.


Interesting read. I do have a couple of questions:
1. What hardware requirements are needed for MinIO – is there a particular RAID configuration needed – and what about RAM requirements?
2. Do you know if there is a Docker image that can be used instead of manual installation – and if so, can it be used on ARM processors?
Thank you.
The underlying storage scheme should be independent of Minio, whether you use RAID or ZFS or plain-ol’ UFS or ext4.
It looks like there’s a Docker image at https://min.io/download#/docker if you prefer that. The source appears to be written in Go, so I imagine it could be coerced into working on other OSes (I’m a FreeBSD/OpenBSD guy) and non-amd64 hardware (like arm64) if you have a working Go compiler there.