 In this tutorial, we’re going to get up and running with OpenBSD on a KVM VPS.
What is OpenBSD
OpenBSD is one of the three primary BSD-based operating systems. While FreeBSD focuses on x86 architectures and NetBSD focuses on supporting as many architectures as possible, OpenBSD focuses on security and correctness. Many popular programs have come from the OpenBSD project: OpenSSH, OpenNTPD, OpenBGPD, LibreSSL, and others.
If you’re coming from a Linux background, OpenBSD will be very familiar because they both come from the same two ancestral fountainheads (SystemV and BSD Unix). While there are more differences at a systems programming level (i.e., if you were doing kernel work), the differences for a user or sysadmin are probably not that much greater than moving between CentOS and Debian.
One notable difference is that everything in OpenBSD is integrated into one source tree. This is very different than Linux, where you have hundreds of independent packages bolted together to form a distribution. Additional software is available through ports, which are similar to packages on other systems.
OpenBSD’s mascot is Puffy, a pufferfish, whose external spikes symbolize OpenBSD’s zealous commitment to security:

Why OpenBSD?
OpenBSD offers several advantages:
- The preeminent record on security. The developers continually audit their code, and the project has introduced many important technology advances in this area. Vulnerabilities in the core OpenBSD product are very rare.
https://www.openbsd.org/security.html - BSD-licensed (not GPL-licensed), which sometimes makes reuse and integration in other systems and products easier.
- Broad platform support (DEC Alpha, HPPA, Sparc, x86, x86-64, and others.)
https://www.openbsd.org/plat.html - Gorgeous man pages that truly document everything. In the Linux world, if you get a man page, it may be out of date, or it may just be a stub for an info page, or there may simply not be a man page. Some important systems (e.g., systemd) refer users to outside wikis, etc. With OpenBSD, you can truly learn everything you need to know about the system and how to use it from the man pages. In the OpenBSD world, a man page that isn’t accurate is considered a bug.
Installing OpenBSD
I’m going to be using a VPS at BuyVM, but any KVM should work. OpenBSD needs to be installed from the CDROM. If your provider doesn’t have the OpenBSD CDROM, ask them to download it.
Be sure your VPS is configured to boot from CD first. Here is the setup in Stallion (the BuyVM control panel):
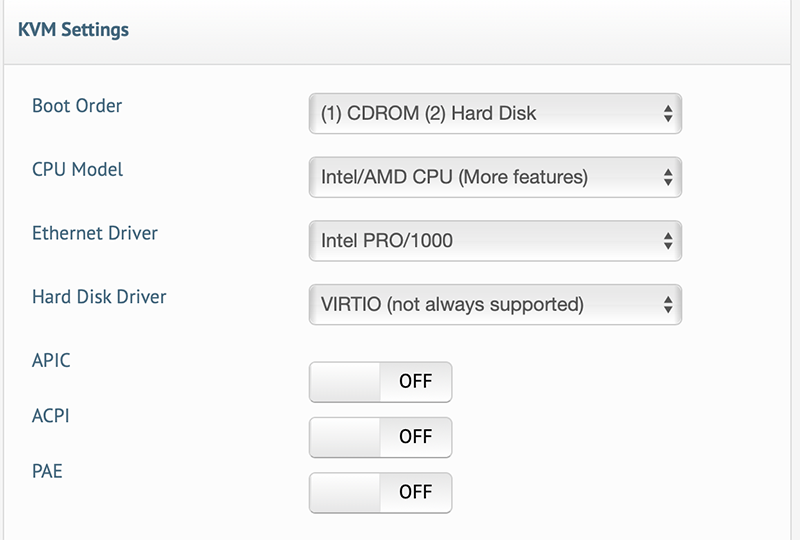
Note that I’ve selected the e1000 adapter instead of VirtIO.
Before you begin, make sure you know your IP address and gateway IP. OpenBSD supports both ipv4 and ipv6. In this tutorial, I’m only using ipv4.
OpenBSD installs via a non-graphical, old school installer. Here I’ll walk through it:
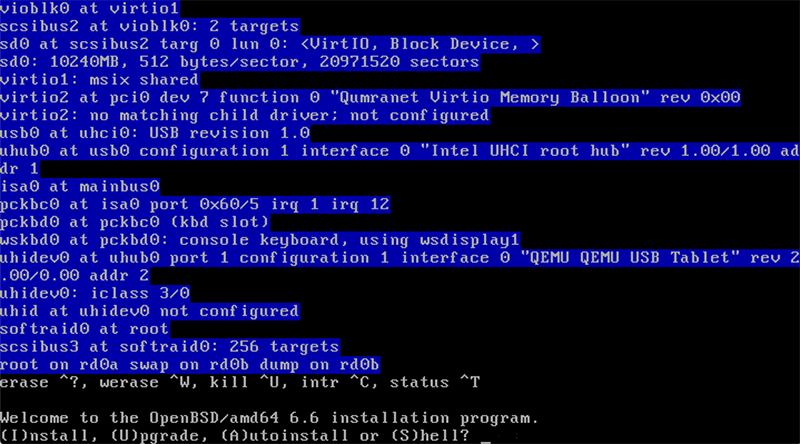
Here I enter I for install. I’m booting the kernel bsd.rd, which can also be used as a rescue boot (in which case I’d enter S for shell, then proceed to mount filesystems, etc.)
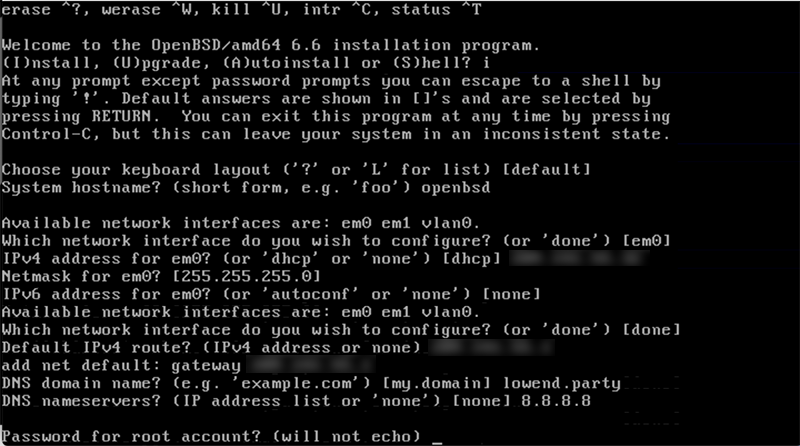
I’ve entered my IPv4 information, gateway, etc., as well as my DNS information.
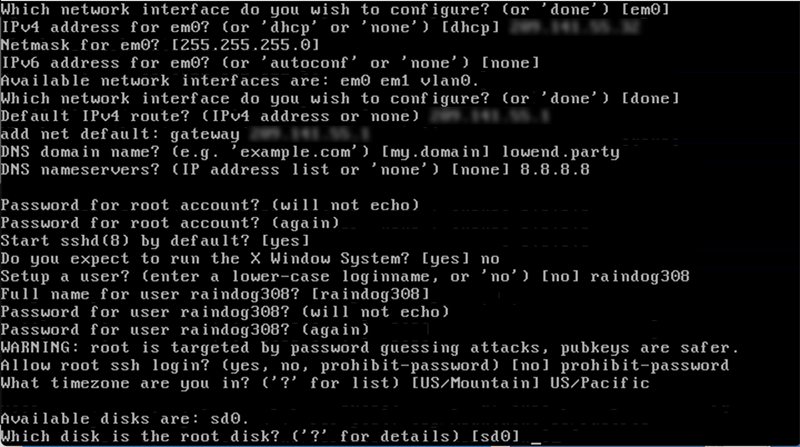
A classic mistake is to enter “yes” for “setup a user,” at which point OpenBSD will ask you to read more carefully. You enter the username you want. This username will also be setup so it can su to root (see “The wheel Group” below).
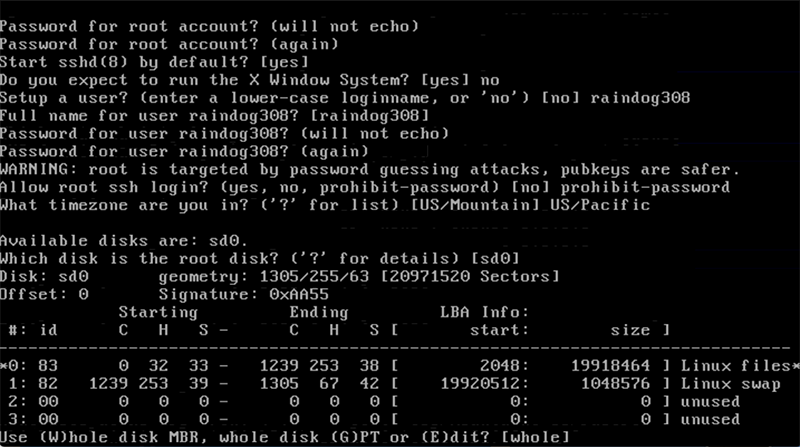
I’ll use the Whole disk for OpenBSD. Note that I’m reusing a VPS that previously ran Linux which is why it shows Linux filesystem info in its fdisk.
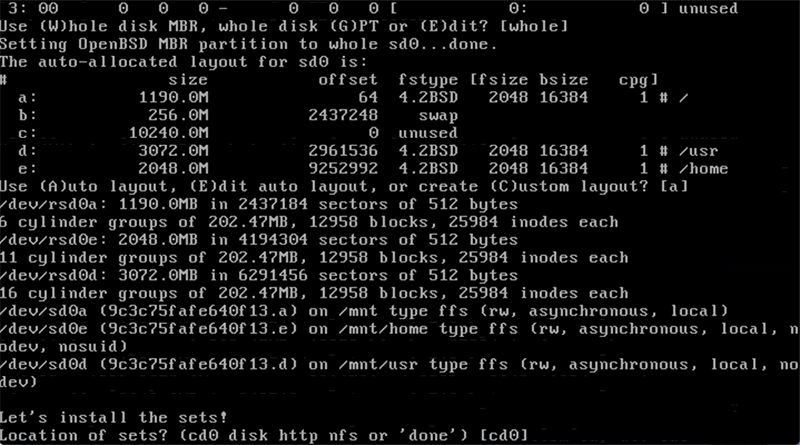
I highly recommend you use Auto layout. This allows OpenBSD to divide the filesystems over your disk and add some additional mount-time protections.
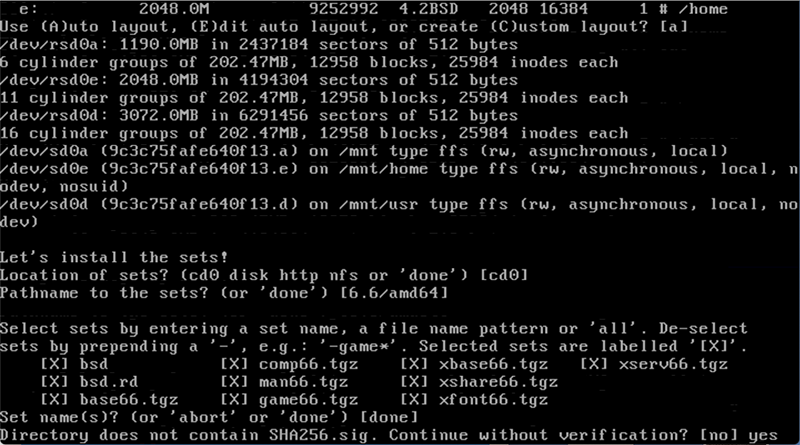
I’m install from the cd, though OpenBSD does support installing from the network. I recommend selecting all sets (the default). Even if you are not planning to run X-windows, it’s handy to have the sets installed in case you need something from them for a dependency.
I answered “yes” to the “continue without verification” question, since I’m installing from a cd. If you are installing from the network, OpenBSD would fetch and verify the sets for you.
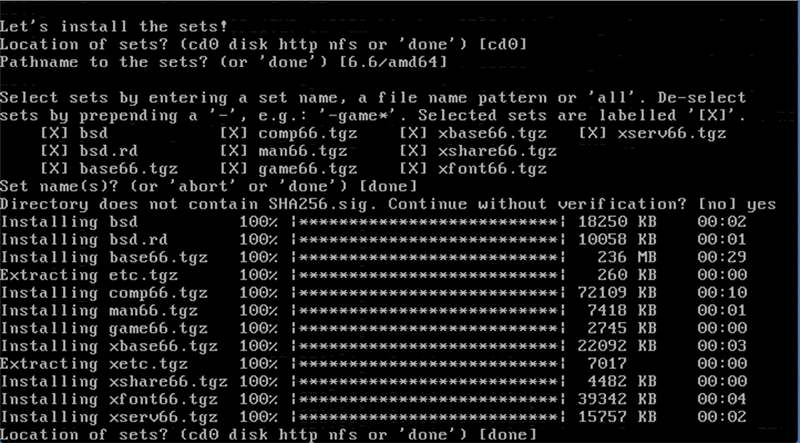
There are no further sets, so I said “done” (return).
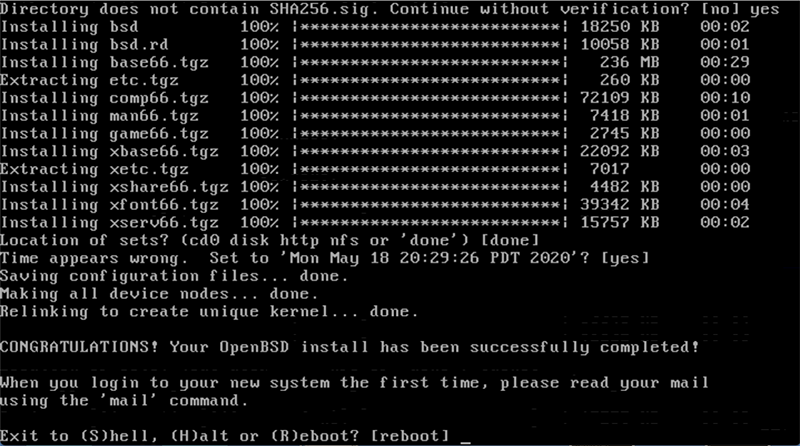
OpenBSD has done some final touches and is now ready to boot. Here I selected (H)alt. Once the VPS was shut down, I went back to the control panel and changed the boot order so that HDD booted before CDROM, then power-cycled the VPS.
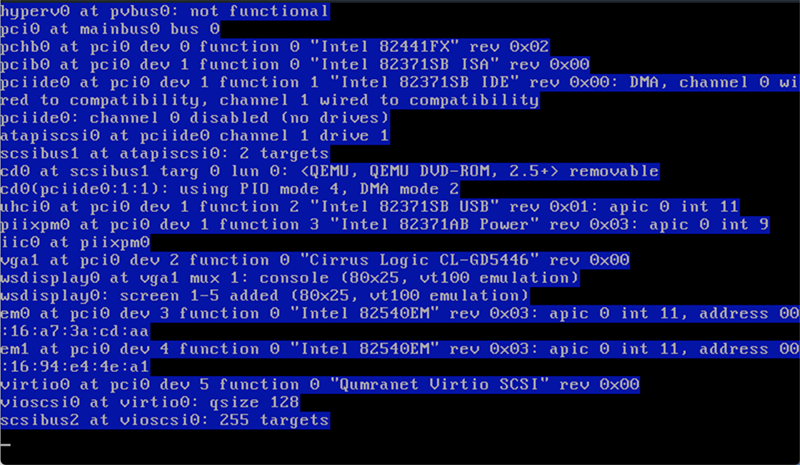
Ah, that glorious white-on-blue text!
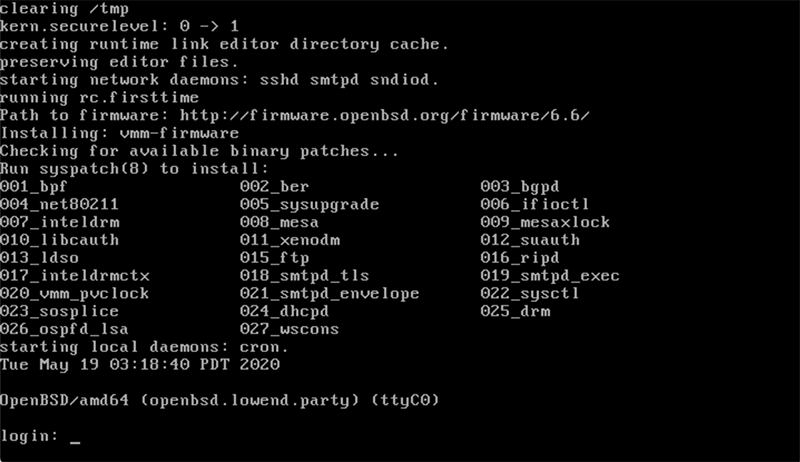
And we’re booted. Note that on the very first boot, OpenBSD will do some special things like check for firmware. It’s also noted that there are some patches available, which we’ll take care of below.
Logging In
After logging in as the user created, you’ll find yourself in a familiar Unix environment. The shell in use is OpenBSD’s improved ksh, which for most purposes behaves just like bash, which is more common on Linux. If you really want bash, it can be installed from ports (see below).
Let’s see what’s running:
openbsd$ ps -ef
ps: unknown option -- f
usage: ps [-AaceHhjkLlmrSTuvwx] [-M core] [-N system] [-O fmt] [-o fmt] [-p pid]
[-t tty] [-U username] [-W swap]
Oops! This isn’t Linux. The flags to ‘ps’ are one of the areas where System V and BSD Unices traditionally vary.
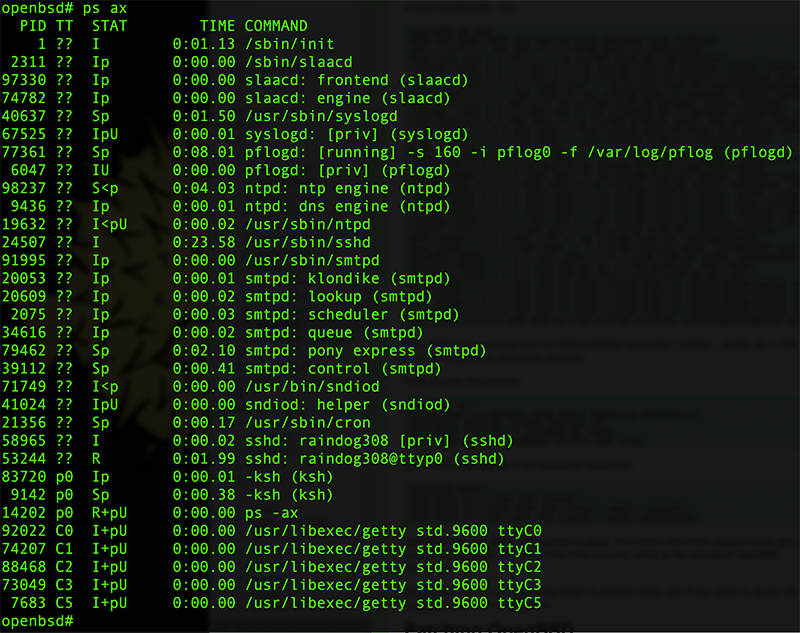
Note that many services are run with underbar accounts (_smtpd, _sndio, etc.) This privilege separation enhances security.
Here are the filesystems:
openbsd$ df
Filesystem 512-blocks Used Avail Capacity Mounted on
/dev/sd0a 2397788 172292 2105608 8% /
/dev/sd0e 4122108 36 3915968 0% /home
/dev/sd0d 6186460 2365624 3511516 40% /usr
Even more interesting is the output of mount(1):
openbsd# mount
/dev/sd0a on / type ffs (local)
/dev/sd0e on /home type ffs (local, nodev, nosuid)
/dev/sd0d on /usr type ffs (local, nodev, wxallowed)
OpenBSD has put some safeguards in place. Your home directory doesn’t need device nodes, for example. ‘ffs’ is the Fast File System, which is the standard OpenBSD filesystem.
Since I’m on a VM, I’m not using RAID to protect disks, but if you want to do so, the softraid subsystem is available.
Patching OpenBSD
Remember when we booted that we saw patches were available. To list available patches, use the syspatch command:
openbsd# syspatch -c
001_bpf
002_ber
003_bgpd
004_net80211
005_sysupgrade
006_ifioctl
007_inteldrm
008_mesa
009_mesaxlock
010_libcauth
011_xenodm
012_suauth
013_ldso
015_ftp
016_ripd
017_inteldrmctx
018_smtpd_tls
019_smtpd_exec
020_vmm_pvclock
021_smtpd_envelope
022_sysctl
023_sosplice
024_dhcpd
025_drm
026_ospfd_lsa
027_wscons
Each of these corresponds to a listed errata.
To download and apply these patches, run syspatch without arguments:
openbsd# syspatch
Get/Verify syspatch66-001_bpf.tgz 100% |****************| 102 KB 00:00
Installing patch 001_bpf
Get/Verify syspatch66-002_ber.tgz 100% |****************| 660 KB 00:00
Installing patch 002_ber
Get/Verify syspatch66-003_bgpd.tgz 100% |***************| 181 KB 00:00
Installing patch 003_bgpd
Get/Verify syspatch66-004_net8021... 100% |*************| 64839 00:00
Installing patch 004_net80211
Get/Verify syspatch66-005_sysupgr... 100% |*************| 3023 00:00
Installing patch 005_sysupgrade
Get/Verify syspatch66-006_ifioctl... 100% |*************| 381 KB 00:00
Installing patch 006_ifioctl
Get/Verify syspatch66-007_inteldr... 100% |*************| 21468 KB 00:02
Installing patch 007_inteldrm
Get/Verify syspatch66-008_mesa.tgz 100% |***************| 5598 KB 00:01
Installing patch 008_mesa
Get/Verify syspatch66-009_mesaxlo... 100% |*************| 2036 KB 00:00
Installing patch 009_mesaxlock
Get/Verify syspatch66-010_libcaut... 100% |*************| 20185 KB 00:03
Installing patch 010_libcauth
Get/Verify syspatch66-011_xenodm.tgz 100% |*************| 45914 00:00
Installing patch 011_xenodm
Get/Verify syspatch66-012_suauth.tgz 100% |*************| 7997 00:00
Installing patch 012_suauth
Get/Verify syspatch66-013_ldso.tgz 100% |***************| 295 KB 00:00
Installing patch 013_ldso
Get/Verify syspatch66-015_ftp.tgz 100% |****************| 65164 00:00
Installing patch 015_ftp
Get/Verify syspatch66-016_ripd.tgz 100% |***************| 45685 00:00
Installing patch 016_ripd
Get/Verify syspatch66-017_inteldr... 100% |*************| 268 KB 00:00
Installing patch 017_inteldrmctx
Get/Verify syspatch66-018_smtpd_t... 100% |*************| 224 KB 00:00
Installing patch 018_smtpd_tls
Get/Verify syspatch66-019_smtpd_e... 100% |*************| 224 KB 00:00
Installing patch 019_smtpd_exec
Get/Verify syspatch66-020_vmm_pvc... 100% |*************| 178 KB 00:00
Installing patch 020_vmm_pvclock
Get/Verify syspatch66-021_smtpd_e... 100% |*************| 317 KB 00:00
Installing patch 021_smtpd_envelope
Get/Verify syspatch66-022_sysctl.tgz 100% |*************| 162 KB 00:00
Installing patch 022_sysctl
Get/Verify syspatch66-023_sosplic... 100% |*************| 101 KB 00:00
Installing patch 023_sosplice
Get/Verify syspatch66-024_dhcpd.tgz 100% |**************| 58786 00:00
Installing patch 024_dhcpd
Get/Verify syspatch66-025_drm.tgz 100% |****************| 1131 KB 00:00
Installing patch 025_drm
Get/Verify syspatch66-026_ospfd_l... 100% |*************| 87802 00:00
Installing patch 026_ospfd_lsa
Get/Verify syspatch66-027_wscons.tgz 100% |*************| 118 KB 00:00
Installing patch 027_wscons
Relinking to create unique kernel... done; reboot to load the new kernel
Errata can be reviewed under /var/syspatch
openbsd# reboot
Enabling/Configuring Services
OpenBSD does not use systemd. Instead it uses a traditional rc.d-style system. For example, to restart sshd:
openbsd# /etc/rc.d/sshd restart
sshd(ok)
You can look at the rc.d man page (man rc.d) for more information.
OpenBSD comes with a stock configuration specifying which services are to run at startup. This is kept in rc.conf, but you should not modify this file. Instead, you should modify (or create) an rc.conf.local file which overrides it.
For example, ntpd runs by default. If you didn’t want it to run, you would put this in rc.conf.local:
ntpd_flags=NO
Or if you wanted ntpd to run with special flags, you could put this in:
ntpd_flags=-s
This would cause ntpd to try to set the system time immediately on startup. If you want dhcpd to run without any special flags, then this entry can be put in rc.conf.local:
dhcpd_flags=
OpenBSD also provides the rcctl command, which can make some of this easier. For example:
openbsd# rcctl disable ntpd
openbsd# cat /etc/rc.conf.local
ntpd_flags=NO
Daily Insecurity
OpenBSD sends a nightly email analyzing your security configuration and noting signficant changes. To receive it, you probably want to point root’s email at a different destination. Edit /etc/mail/aliases and add your email address as an alias for root:
root: raindog308@raindog308.com
Then run newaliases:
openbsd# newaliases
/etc/mail/aliases: 70 aliases
Next morning, you should get the somewhat whimsically named Daily Insecurity Report.
The wheel Group
One thing to take a look at it is /etc/group:
wheel:*:0:root,raindog308
The wheel group is a special group that controls who can su to root. Quoting the su man page:
If group 0 (normally “wheel”) has users listed then only those users can su to “root”. It is not sufficient to change a user’s /etc/passwd entry to add them to the “wheel” group; they must explicitly be listed in /etc/group. If no one is in the “wheel” group, it is ignored, and anyone who knows the root password is permitted to su to “root”.
Adding Software
Many common software packages are available as either packages (precompiled binaries) or ports (configuration information to build the package yourself). When possible, you should use packages.
The various pkg_* commands used to install packages refer to /etc/installurl to find a mirror to source binaries from. This file should be setup at install time, but if it’s missing, following the FAQ’s instructions to populate it.
In this case, I’d like to install bash.
openbsd# pkg_info -Q bash
bash-5.0.11
bashunit-20140327p0
checkbashisms-2.0.0.2p0
openbsd# pkg_add bash
quirks-3.187 signed on 2020-05-19T14:41:48Z
quirks-3.187: ok
bash-5.0.11:libiconv-1.16p0: ok
bash-5.0.11:gettext-runtime-0.20.1p0: ok
bash-5.0.11: ok
openbsd# which bash
/usr/local/bin/bash
openbsd#
Learning More
OpenBSD comes with its own firewall (pf), mail system (OpenSMTPD), disk encryption tools, methods for duplicating the root volume (altroot), privilege escalation (doas, a replacement for sudo), kernel reconfiguration, release levels (-current, snapshots, and releases), virtualization (vmmd), and more. We’ve only scratched the surface here. Some places to learn more:
- The excellent man pages. ‘man afterboot’ is a great place to start. Or look at the introduction for each manual chapter (man 1 intro, man 2 intro, etc.)
- The OpenBSD FAQ covers a lot of detail on how to perform system administration tasks.
- Michael W. Lucas’s book “Absolute OpenBSD” is a great resource.


Leave a Reply