 MariaDB and PostgreSQL are the two leading SQL databases. Both adhere to many ANSI SQL standards, but these ANSI standards don’t specify all behaviors. The SQL statement themselves (such as SELECT, INSERT, UPDATE, and DELETE) are the areas where they have the most commonality. Where they differ the most is in their DDL (data definition language) commands, and the administrative/server components. In this tutorial, we’ll cover PostgreSQL.
History
PostgreSQL (sometimes called Postgres) is the successor to Ingres, which was a project at the University of California, Berkeley. Originally known simply as POSTGRES (a play on words), it was renamed to PostgreSQL in 1996.
Install
To install PostgreSQL on Debian systems:
apt-get install postgresql
On CentOS systems:
yum -y install postgresql-server
Post-Install Steps
On Debian, PostgreSQL comes ready to roll. On Centos, you need to initialize Pg with this command:
# /usr/bin/postgresql-setup --initdb
* Initializing database in '/var/lib/pgsql/data'
* Initialized, logs are in /var/lib/pgsql/initdb_postgresql.log
Configuration Files
On Debian systems, PostgreSQL configuration lives in /etc/postgresql/VERSION/main. So if you’re running version 11, the configuration files are in
/etc/postgresql/11/main
On Centos, PostgreSQL configuration files can be found in /var/lib/pgsql/data, regardless of version.
Starting and Stopping
PostgreSQL starts and starts like a normal systemd service:
systemctl start postgresql
systemctl stop postgresql
Connecting
Typically you would connect this way from the command line:
psql -U someuser -W -h localhost somedb
Password:
psql (11.7 (Debian 11.7-0+deb10u1))
SSL connection (protocol: TLSv1.3, cipher: TLS_AES_256_GCM_SHA384, bits: 256, compression: off)
Type "help" for help.

somedb=>
The reason we use -h localhost is to force a network connection. Otherwise, peer authentication is used and PostgreSQL would expect your Unix username to be the same as your database username.
If connecting from an application, note that by default PostgreSQL runs on port 5432.
Super User Access
In PostgreSQL, the system ‘postgres’ account is the superuser.
# su - postgres
$ psql
psql (11.7 (Debian 11.7-0+deb10u1))
Type "help" for help.

postgres=#
Scripted Access
If you are scripting PostgreSQL (perhaps for backups), you can eliminate the need to enter a password. There are two methods for accomplishing this. The first is to set the PGPASSWORD environment variable:
export PGPASSWORD=some-password
However, be advised that any user can see this environment variable in the process table. Hence, it’s better to use method two, which is to create a .pgpass file in the user’s home directory. It must be owned by that user and set to read/write by that user only:
# touch ~/.pgpass
# chmod 600 ~/.pgpass
Then populate it with this format:
hostname:port:database:username:password
For example:
localhost:5432:somedb:user1:my-password
Then you could do this without a password:
psql -U user1 -h localhost somedb
Backing Up Databases
PostgreSQL can be backed up with the pg_dump program, which dumps your database to a .sql file that contains the SQL instructions for recreating the database. Basic usage for dumping a database called ‘mydb’ looks like this:
$ pg_dump mydb > /some/path/mydb.sql
To dump all databases:
pg_dumpall > /some/path/all.sql
Creating a New Database
$ psql
psql (11.7 (Debian 11.7-0+deb10u1))
Type "help" for help.

postgres=# create database new1;
CREATE DATABASE
postgres=#
You can also us the ‘createdb’ program in the shell:
$ createdb new2
Switching to a Database
Most PostgreSQL commands start with a backslash. For example, to switch databases, use \c (for “connect”):
$ psql
psql (11.7 (Debian 11.7-0+deb10u1))
Type "help" for help.

postgres=# \c new1;
You are now connected to database "new1" as user "postgres".
new1=#
Creating a User
new1=# create user someone with password 'something';
CREATE ROLE
To grant privileges on a database:
new1=# grant all privileges on database new1 to someone;
GRANT
Note that this does not, as you might think, grant all privileges on all tables and sequences in that database. It only grants the ability to connect to that database and create objects. If you need to grant the ability to select, update, etc. existing tables, then you need to grant privileges on those tables individually. Alternatively, you can make the new user the owner of the database:
new1=# alter database new1 owner to someone;
ALTER DATABASE
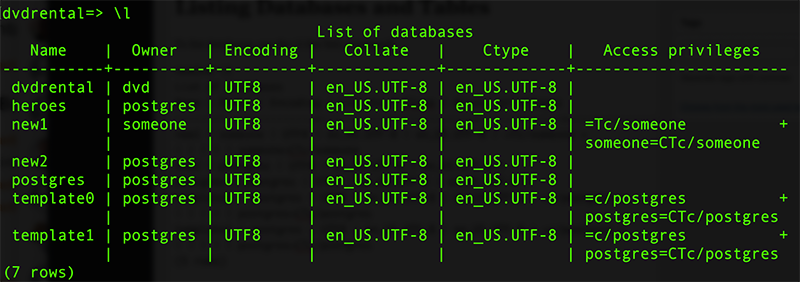
Listing Databases and Tables
To list databases, use the \l (for list) command:
To list tables, use \dt:
dvdrental=> \dt
List of relations
Schema  | Name          | Type  | Owner
--------+---------------+-------+----------
public  | actor         | table | postgres
public  | address       | table | postgres
public  | category      | table | postgres
public  | city          | table | postgres
public  | country       | table | postgres
public  | customer      | table | postgres
public  | film          | table | postgres
public  | film_actor    | table | postgres
public  | film_category | table | postgres
public  | inventory     | table | postgres
public  | language      | table | postgres
public  | payment       | table | postgres
public  | rental        | table | postgres
public  | staff         | table | postgres
public  | store         | table | postgres
(15 rows)
Creating Tables
Creating tables is a very standard SQL command. In this case, we are setting the ‘id’ column to be the primary key and also declaring it as type “serial”, which means that it will automatically increase with every insert.
CREATE TABLE superheroes (
id serial primary key,
hero_name varchar(30),
secret_identity varchar(30),
team varchar(30)
);

heroes=# CREATE TABLE superheroes (
heroes(# id serial primary key,
heroes(# hero_name varchar(30),
heroes(# secret_identity varchar(30),
heroes(# team varchar(30)
heroes(# );
CREATE TABLE
heroes=#
Inserting Data
We'll add some rows, but we don't need to include the 'id' column in our insert statement because it will auto-increment for us. The "START TRANSACTION" is optional, as we'll explain next;

START TRANSACTION;
INSERT INTO superheroes (hero_name, secret_identity, team) VALUES ('Iron Man', 'Tony Stark', 'Avengers');
INSERT INTO superheroes (hero_name, secret_identity, team) VALUES ('Captain America', 'Steve Rogers', 'Avengers');
INSERT INTO superheroes (hero_name, secret_identity, team) VALUES ('Thor', 'Donald Blake', 'Avengers');
INSERT INTO superheroes (hero_name, secret_identity, team) VALUES ('She-Hulk', 'Jennifer Walters', 'Avengers');
INSERT INTO superheroes (hero_name, secret_identity, team) VALUES ('Wolverine', 'Logan', 'X-Men');
INSERT INTO superheroes (hero_name, secret_identity, team) VALUES ('Cyclops', 'Scott Summers', 'X-Men');
INSERT INTO superheroes (hero_name, secret_identity, team) VALUES ('Shadowcat', 'Kitty Pryde', 'X-Men');
INSERT INTO superheroes (hero_name, secret_identity, team) VALUES ('Colossus', 'Piotr Rasputin', 'X-Men');

heroes=# START TRANSACTION;
START TRANSACTION
heroes=# INSERT INTO superheroes (hero_name, secret_identity, team) VALUES ('Iron Man', 'Tony Stark', 'Avenger
s');
INSERT 0 1
heroes=# INSERT INTO superheroes (hero_name, secret_identity, team) VALUES ('Captain America', 'Steve Rogers',
'Avengers');
INSERT 0 1
heroes=# INSERT INTO superheroes (hero_name, secret_identity, team) VALUES ('Thor', 'Donald Blake', 'Avengers'
);
INSERT 0 1
heroes=# INSERT INTO superheroes (hero_name, secret_identity, team) VALUES ('She-Hulk', 'Jennifer Walters', 'A
vengers');
INSERT 0 1
heroes=# INSERT INTO superheroes (hero_name, secret_identity, team) VALUES ('Wolverine', 'Logan', 'X-Men');
INSERT 0 1
heroes=# INSERT INTO superheroes (hero_name, secret_identity, team) VALUES ('Cyclops', 'Scott Summers', 'X-Men
');
INSERT 0 1
heroes=# INSERT INTO superheroes (hero_name, secret_identity, team) VALUES ('Shadowcat', 'Kitty Pryde', 'X-Men
');
INSERT 0 1
heroes=# INSERT INTO superheroes (hero_name, secret_identity, team) VALUES ('Colossus', 'Piotr Rasputin', 'X-M
en');
INSERT 0 1
heroes=#
Transactions
We’re in the middle of a transaction thanks to the START TRANSACTION statement. From our perspective, this is what the superheroes table looks like:
heroes=# select count(*) from superheroes;
count
-------
8
(1 row)
However, logging in from another session and running the same query produces this:
heroes=# select count(*) from superheroes;
count
-------
0
(1 row)
This is because we haven’t committed the data yet. Let’s do so.
heroes=# commit;
COMMIT
heroes=#
Now both queries show:
heroes=# select count(*) from superheroes;
count
-------
8
(1 row)
Let’s try one more transaction. I’m going to delete one of the heroes:
START TRANSACTION;
DELETE FROM superheroes WHERE hero_name = 'Thor';

heroes=# START TRANSACTION;
START TRANSACTION
heroes=# DELETE FROM superheroes WHERE hero_name = 'Thor';
DELETE 1
heroes=#
heroes=# select count(*) from superheroes;
count
-------
7
(1 row)
However, in the other session, I still see all rows:
heroes=# select count(*) from superheroes;
count
-------
8
(1 row)
I could COMMIT in session #1, but I also have the option to ROLLBACK – in other words, abandon my changes. In this case, it’s only one statement, but I could have hundreds or thousands of statements pending commit. A COMMIT would apply them all, and a ROLLBACK would roll them all back. In this case, I’ll rollback:
heroes=# rollback;
ROLLBACK
heroes=# select count(*) from superheroes;
count
-------
8
(1 row)
Querying Data
To query data, we use SELECT in the from “SELECT (columns) FROM (table)” and then optionally adding clauses to filter data (WHERE), group data (GROUP BY), and sort data (ORDER BY). Some examples:
heroes=# select secret_identity from superheroes where hero_name = 'Iron Man';
secret_identity
-----------------
Tony Stark
(1 row)
I can use “*” to mean all columns:
heroes=# select * from superheroes where hero_name = 'Thor';
id | hero_name | secret_identity | team
----+-----------+-----------------+----------
3 | Thor | Donald Blake | Avengers
(1 row)
Of course, I may have many rows:
heroes=# select hero_name, secret_identity from superheroes where team = 'Avengers' order by hero_name;
hero_name | secret_identity
-----------------+------------------
Captain America | Steve Rogers
Iron Man | Tony Stark
She-Hulk | Jennifer Walters
Thor | Donald Blake
(4 rows)
I can also use various database functions to summarize data:
heroes=# select team, count(*) from superheroes group by team order by team;
team | count
----------+-------
Avengers | 4
X-Men | 4
(2 rows)
Deleting Data
PostgreSQL uses a standard DELETE statement:
heroes=# delete from superheroes where team = 'X-Men';
DELETE 4
Updating Data
Perhaps She-Hulk decides to leave the Avengers (nerds: she joined in Avengers #221 and left in Avengers #243):
heroes=# update superheroes set team = NULL where hero_name = 'She-Hulk';
UPDATE 1
heroes=# select hero_name from superheroes where team = 'Avengers' order by hero_name;
hero_name
-----------------
Captain America
Iron Man
Thor
(3 rows)
Learning More
– The official PostgreSQL page and documentation
– The “dvdrental” database, which is an unofficial but useful PostgreSQL test database
raindog308 is a longtime community LETizen, technical writer, and self-described techno polymath. With deep roots in the *nix world, he has a passion for systems both modern and vintage, ranging from Unix, Perl, Python, and Golang to shell scripting and mainframe-era operating systems like MVS. He’s equally comfortable with relational database systems, having spent years working with Oracle, PostgreSQL, and MySQL.
As an avid user of LowEndBox providers, raindog308 runs an empire of LEBs, from tiny boxes for VPNs, to mid-sized instances for application hosting, and heavyweight servers for data storage and complex databases. He brings both technical rigor and real-world experience to every piece he writes.
Beyond the command line, raindog308 has a life-long love of German Shepherd Dogs, high-quality knives, target shooting, theology, tabletop RPGs, playing guitar, and hiking in deep, quiet forests.
His goal with every article is to help users, from beginners to seasoned sysadmins, get more value, performance, and enjoyment out of their infrastructure.
You can find him daily in the forums at LowEndTalk under the handle @raindog308.


Leave a Reply