How to Use ClusterCS to Manage Your Server
Finally had enough of the CLI? Filled with rage every time you have to log in to your server just to change a basic setting? Or maybe, deep down inside, you have a fear for the letters “S”, ”S”, and ”H”?
Rejoice, for there is a solution to your server woes which we’ll be covering in this tutorial: ClusterCS.
ClusterCS is a cloud-based control panel for managing servers, and it is surprising how useful this server management platform can be, especially for small self-hosted setups.
Officially, ClusterCS is “a control panel for remote management of cloud VPS and dedicated servers.”
One of its treasured features is an out-of-the-box optimized, scalable LAMP stack with HAProxy support, ready to power most websites or apps in a few clickety-clicks. By default, ClusterCS enables its own hand-crafted server-side optimizations to keep your server running in top shape with minimal setup. And you can cluster and combine servers from any provider, bringing true democracy to your server environment.
Of course, as with most tools that abstract away the CLI, you have to decide whether you’re willing to sacrifice control for convenience. If you’re a diehard CLI commando, know that ClusterCS fully does away with the CLI as far as daily server management is involved.
Here we’ve written a walkthrough on how to manage a server with ClusterCS. It will show you the basic workflow from spinning up a server to managing your domains, services, and applications using the web-based control panel.
How does ClusterCS Work?
In order to run, ClusterCS connects to your server the same way you would — over SSH. Once it has established a connection for the first time, it installs a daemon called ccsRemoteAgent on your machine, which is able to automate all kinds of server management and maintenance tasks at the system level. These tasks can be initiated on the web GUI at clustercs.com, hiding the complex scripting behind a neat, central user interface.
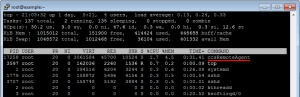
Figure 1 Output of top command, showing ccsRemoteAgent hard at work
On your behalf via the GUI, ClusterCS automatically carries out the configuration of:
- DNS and domain management
- Operating system software (CentOS / RHEL)
- Web server software (Apache / Nginx / lighttpd)
- SSL (Let’s Encrypt / self-signed / custom)
- Database software (MySQL / PHPMyAdmin)
- FTP storage software (ProFTPD)
- Email software (Postfix / Roundcube)
- Application software (PHP and modules)
- Cron and backups (full or custom)
- Reporting and logs
On a single server, you might have multiple domains, each with their own unique configuration set, including different document roots, PHP versions, databases, backup schemes, and so on. ClusterCS lets you easily manage these domains separately on the same operating system while retaining the specific configuration needed for each domain. Think: a modern, load-balanced WordPress ecommerce store with PHP 7.3 running alongside someone’s grandma’s blog using PHP 5.4 – on the same server with no conflicts.
For those wanting one-click solutions to common tech stacks, ClusterCS provides what they call, “Recipes”. Recipes take care of the installation of a complete stack such as LAMP, as well as a host of extras such as a firewall (iptables and Fail2Ban) and mail server (Postfix) with web mail client (Roundcube). You are free to customize the recipes, and add or remove services as needed.
If you’re interested in high availability with single services spread over multiple servers, it’s also possible to create and manage HA clusters with automated request routing, configurable via the web GUI.
At the time of writing, ClusterCS is compatible with servers running:
- CentOS 6/7
- RHEL 6/7
- Amazon AMI/Linux 2
Connecting your server to ClusterCS
To connect a new server to ClusterCS, you will need a clean, newly-installed operating system with root permissions. For this tutorial, we are using CentOS 7 on a VPS courtesy of Hudson Valley Host.
Step 1: Create the SSH keys
Although you can choose to let ClusterCS connect with password authentication, SSH keys are much preferred. To create a new SSH keypair, log in to your new server using “root” as the username and the password provided by your host.
At the command line, enter:
<pre>ssh-keygen -t rsa</pre>
Follow the prompts till the end, and you will now have a directory at /root/.ssh with your private key (id_rsa) and your public key (id_rsa.pub).
Put your public key inside a new file called “authorized_keys” in the .ssh directory:
<pre> cat .ssh/id_rsa.pub >> .ssh/authorized_keys</pre>
Display the contents of your private key and copy this to the clipboard for the next step:
<pre>cat .ssh/id_rsa</pre>
Step 2: Connect to ClusterCS
Sign up at the ClusterCS website and select a license. A free license is available for 1 server and 5 domains, with limited extras. The major feature lacking with a free license is the Dev Environment, but you will have the option to upgrade to a 14-day trial for the Dev Environment after you have fully added a server and domain.
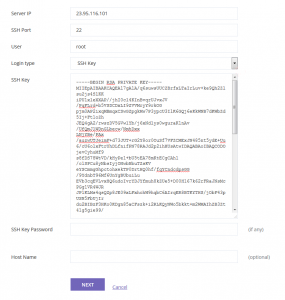
To install the ClusterCS daemon on your server, click Add Server, then add your server IP, root username, and private SSH key as shown below.
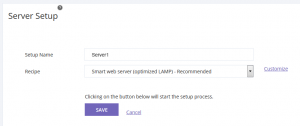
Next, enter a Server Name (which can be anything – e.g. Server1) and select a Recipe (i.e. the stack). You can start from scratch and create your own Recipe, or choose one of three ready-made Recipes, optimized by default. We’re going with “Smart web server (optimized LAMP)” which, in addition to Apache, also includes Nginx, lighttpd, and HAProxy for load-balancing and traffic management.
Once the build is complete and the system is installed, you won’t be able to connect to your VPS through SSH again unless you change the firewall rules on the ClusterCS web GUI. But that’s okay, because now we don’t need SSH! At least, that’s the theory… In practice, always expect the unexpected and keep that SSH private key handy just in case.
To re-enable normal SSH access, go to the Firewall tab and add a new firewall rule for port 22 on all interfaces via the ClusterCS dashboard, then click APPLY FIREWALL CHANGES.
Managing your server
Add a domain
Now that you’ve got your server set up with all the right packages and configuration settings, it’s time to start using the server to host websites and applications. To do so, you’ll need to add a new domain by going to Domains > Manage.
When you have successfully added a new domain, you can type your domain name into a web browser and you will see the default welcome page shown here:
If you don’t want your domain to be live while configuring things, then set Domain Status to “Disabled”, “Under Maintenance”, or “No Web Domain”. Alternatively, you can just not set your domain’s DNS records to point at the server IP yet.
Create email accounts
Want yourname@yourdomain.com to be your new email address? Go to Domains > Email and add a new email address. Easy as that. Postfix takes care of your emails, and you can access your inbox with Roundcube.
Configure your services
The bulk of server management work will be done in Servers > Manage Server. This page lists the essential application services for your web server such as PHP, MySQL, and HAProxy, and lets you change the configuration of each service.
Basic configuration of your server’s running services should be performed to make sure that your server meets the requirements of the application you want to run (e.g. WordPress, MediaWiki). Consult the documentation for any app you host for the correct PHP settings and other configuration options.
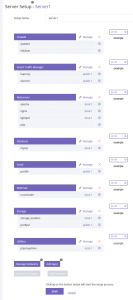
With ClusterCS, a related grouping of services is called a Layer, within which you can choose and customize individual Modules. In the screenshot above, Firewall is one Layer, and its Modules include iptables and fail2ban. Now you can see why the whole arrangement is called a Recipe, as all of the “ingredients” of your server can be customized from this page.
Oftentimes, when you change something important — like php.ini — you’ll want to restart PHP (or the related service) afterwards for the changes to take effect. To stop, start, or restart running services such as PHP, click Servers > Services. The status of each service is also displayed here, which is important info to know when troubleshooting issues.
Monitor performance
To see what’s happening under the hood, ClusterCS displays a sidebar for real-time updates called System Messages in Servers > Services. The sidebar lists completed, pending, and in-progress operations.
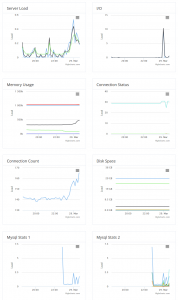
For performance monitoring, click Reports to access graphs on Server Load, I/O, Memory Usage, Disk Space, and so on.
Add an application
So you want to set up an application like WordPress? Of course you do.
If you use the Dev Environment feature, you can access a handful of 1-click installers for popular apps like WordPress and Mediawiki. However, installing an app without the Dev Environment is easy, too.
Here is an overview of the steps to install a WordPress site with SSL on ClusterCS:
Step 1: Add a domain and make sure your DNS host records point to your server IP.
Step 2: In Domains, select your domain, then click Databases and create a new database and user for WordPress on localhost.
Step 3: Download WordPress to your PC and use an FTP client to upload the files to your server (inside the public_html directory), using the FTP username and password provided in Domains. Finish the setup via your web browser.
Step 4: Add a free SSL certificate from Let’s Encrypt under Domains > SSL.
Step 5: Sit back and marvel at how easy that was, with not a single CLI command in sight.
Do you prefer using a control panel or CLI-only to manage your servers? Let’s hear your thoughts in the comments below!
Related Posts:
Is SolusVM V2 Suitable to Use in 2024? Latest Updates and Ongoing Improvements
Nostalgia: The Evolution of VPS Control Panels: From HyperVM to SolusVM and Beyond
Your DirectAdmin Cost Might Be Going Up By 250%
SolusIO VPS Control Panel - Initial Impressions of Solus.io. Should You Switch?
CentOS 7 LAMP Server Tutorial Part 5: Speeding up WordPress with Redis
CentOS 7 LAMP Server Tutorial Part 4: WordPress and wp-cli
At LowEndBox, our News and Editorial Team is dedicated to delivering timely, accurate, and actionable content tailored to the needs of developers, hosting enthusiasts, and infrastructure professionals. We curate, report, and analyze the latest developments in the world of hosting, cloud infrastructure, data centers, open-source platforms, and internet services, always with a focus on value, performance, and accessibility.
Our team monitors the global hosting landscape to bring you breaking news, vendor updates, platform changes, market trends, and expert insights. Whether it’s a price hike from a major control panel, a breakthrough in virtualization technology, or a new indie provider shaking up the market, we strive to deliver content that empowers the LowEnd community to stay informed and ahead of the curve.
We also collaborate closely with the vibrant LowEndTalk community to surface meaningful discussions, highlight real-world deployments, and share voices from within the ecosystem.
Our mission is simple: to help you make smarter infrastructure decisions by delivering the stories that matter, clearly, consistently, and without hype.
Stay tuned for fresh editorial content, in-depth analyses, and community-powered features from the team that keeps LowEndBox running.


Leave a Reply